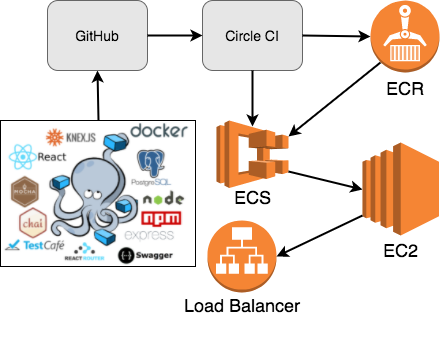
On-Demand Environments with Docker and AWS ECS
In this tutorial, we’ll look at how to spin up reproducible (and easily-destructible), on-demand test environments with Docker, Amazon EC2 Container Service (ECS), and Circle CI (for continuous integration and delivery).
We’ll be using the following tools…
| Tool | Use Cases | Version |
|---|---|---|
| Docker | Containerization and distribution | 17.03.2-ce |
| AWS ECS | Container orchestration and management | 1.14.4 (service agent) |
| Circle CI | Continuous integration | 2.0 |
| AWS JavaScript SDK | Interacting with AWS | 2.114.0 |
For a demo, check out the following video.
Contents
- Prerequisites
- Objectives
- Introduction
- Development Workflow
- Project Setup
- Manual AWS Setup
- Circle CI Setup
- AWS SDK Setup
- Deployment Script
- Testing
- Teardown
- Conclusion and Next Steps
Prerequisites
This post assumes prior knowledge of Docker and Docker Compose along with microservice architecture in general.
If you haven’t already, review the Developing Microservices - Node, React, and Docker blog post. This tutorial utilizes a slightly modified version of the finished project from that post, so be sure to review the code from the v3 tag of the microservice-movies repository, taking note of each service:
| Name | Service | Container | Tech |
|---|---|---|---|
| Web | Web | web | React, React-Router |
| Movies API | Movies | movies | Node, Express |
| Movies DB | Movies | movies-db | Postgres |
| Swagger | Movies | swagger | Swagger UI |
| Users API | Users | users | Node, Express |
| Users DB | Users | users-db | Postgres |
| Functional Tests | Test | n/a | TestCafe |
You should also be familiar with AWS in general along with the following AWS services - VPC, ELB, EC2, and IAM.
Objectives
By the end of this tutorial, you will be able to…
- Explain what on-demand environments are, why you would want to use them, and the overall development workflow
- Discuss the benefits of using on-demand environments
- Automate the building, configuring, deploying, and maintaining of on-demand environments on AWS
- Configure an Application Load Balancer and ECS to run a set of microservices
- Set up continuous integration and deployment to ECS via Circle CI
- Integrate Amazon EC2 Container Registry, an image registry, into the continuous integration process
- Create a teardown script to remove the environment once testing is complete
Introduction
The end goal of on-demand test environments is to allow developers to quickly and easily spin up multiple, independent testing environments.
In other words, testing environments are spun up as needed during the development process - when code is checked-in, for example - and, then, when no longer needed, spun down just as quickly to free up resources and keep costs down.
With microservices, testing a single service can be difficult, time consuming, and expensive since you often have to spin up a plethora of services, especially if you have resource and/or config-heavy services. On-demand environments simplify this, making testing and trial easy, decreasing the feedback cycle between review and development.
Such environments can used for running integration and end-to-end tests, QA, UAT, troubleshooting, and basic trial.
NOTE: For more on the benefits of using reproducible, on-demand test environments, review the The Business Case for On-Demand Test Services whitepaper.
Development Workflow
With on-demand environments, the development workflow looks like…
(1) Local development
- Create a new feature branch from the master branch
- Make code changes
- Commit and push code to GitHub
(2) Continuous integration
- Open a new PR against the development branch
- A new build is then triggered on Circle CI
- If the build passes, manually merge the PR
- A new build is triggered again on Circle CI
- If the build passes, deployment occurs…
(3) Deployment on AWS via deployment scripts
- Images are created, tagged, and pushed to ECR
- Task Definitions are registered on ECS
- Target Groups are created
- A Listener is added to the load balancer and Rules are added
- ECS Services are created
(4) Testing
- End-to-end tests
- Acceptance tests
- UAT
(5) Teardown
- All AWS Resources are torn down
Project Setup
Fork the microservice-movies repo, clone it down, and then check out the v3 tag to a new branch called aws-docker-on-demand:
$ git clone https://github.com/YOUR_GITHUB_NAME/microservice-movies
$ cd microservice-movies
$ git checkout tags/v3 -b aws-docker-on-demand
Set the environment variables:
$ export NODE_ENV=test
$ export REACT_APP_USERS_SERVICE_URL=http://localhost:3000
$ export REACT_APP_MOVIES_SERVICE_URL=http://localhost:3001
Build the images and fire up the containers:
$ docker-compose -f docker-compose-review.yml build
$ docker-compose -f docker-compose-review.yml up -d
Run the tests:
$ docker-compose -f docker-compose-review.yml \
    run users-service-review npm test \ &&
  docker-compose -f docker-compose-review.yml \
    run movies-service-review npm test \ &&
  testcafe firefox tests/**/*.js
Finally, ensure you can view the app in your browser at http://localhost:3007, and then try logging in with username michael and password herman.
Manual AWS Setup
Before deploying, we need to configure the the following AWS resources:
- EC2 Key Pair
- ECS Cluster
- EC2 Container Registry (ECR)
- Application Load Balancer (ALB)
- Security Group
Keep in mind that you could create each of these resources dynamically as well. Clusters can take a bit of time to fire up since EC2 instances need to be spun up though. By setting up the Cluster beforehand, EC2 instances are up and running, ready for Tasks to be added.
EC2 Key Pair
Within the EC2 Dashboard, click “Key Pairs” on the navigation pane, and then click the “Create Key Pair” button. Name the key microservicemovies-review. Save the file in a safe place - i.e., “~/.ssh”.
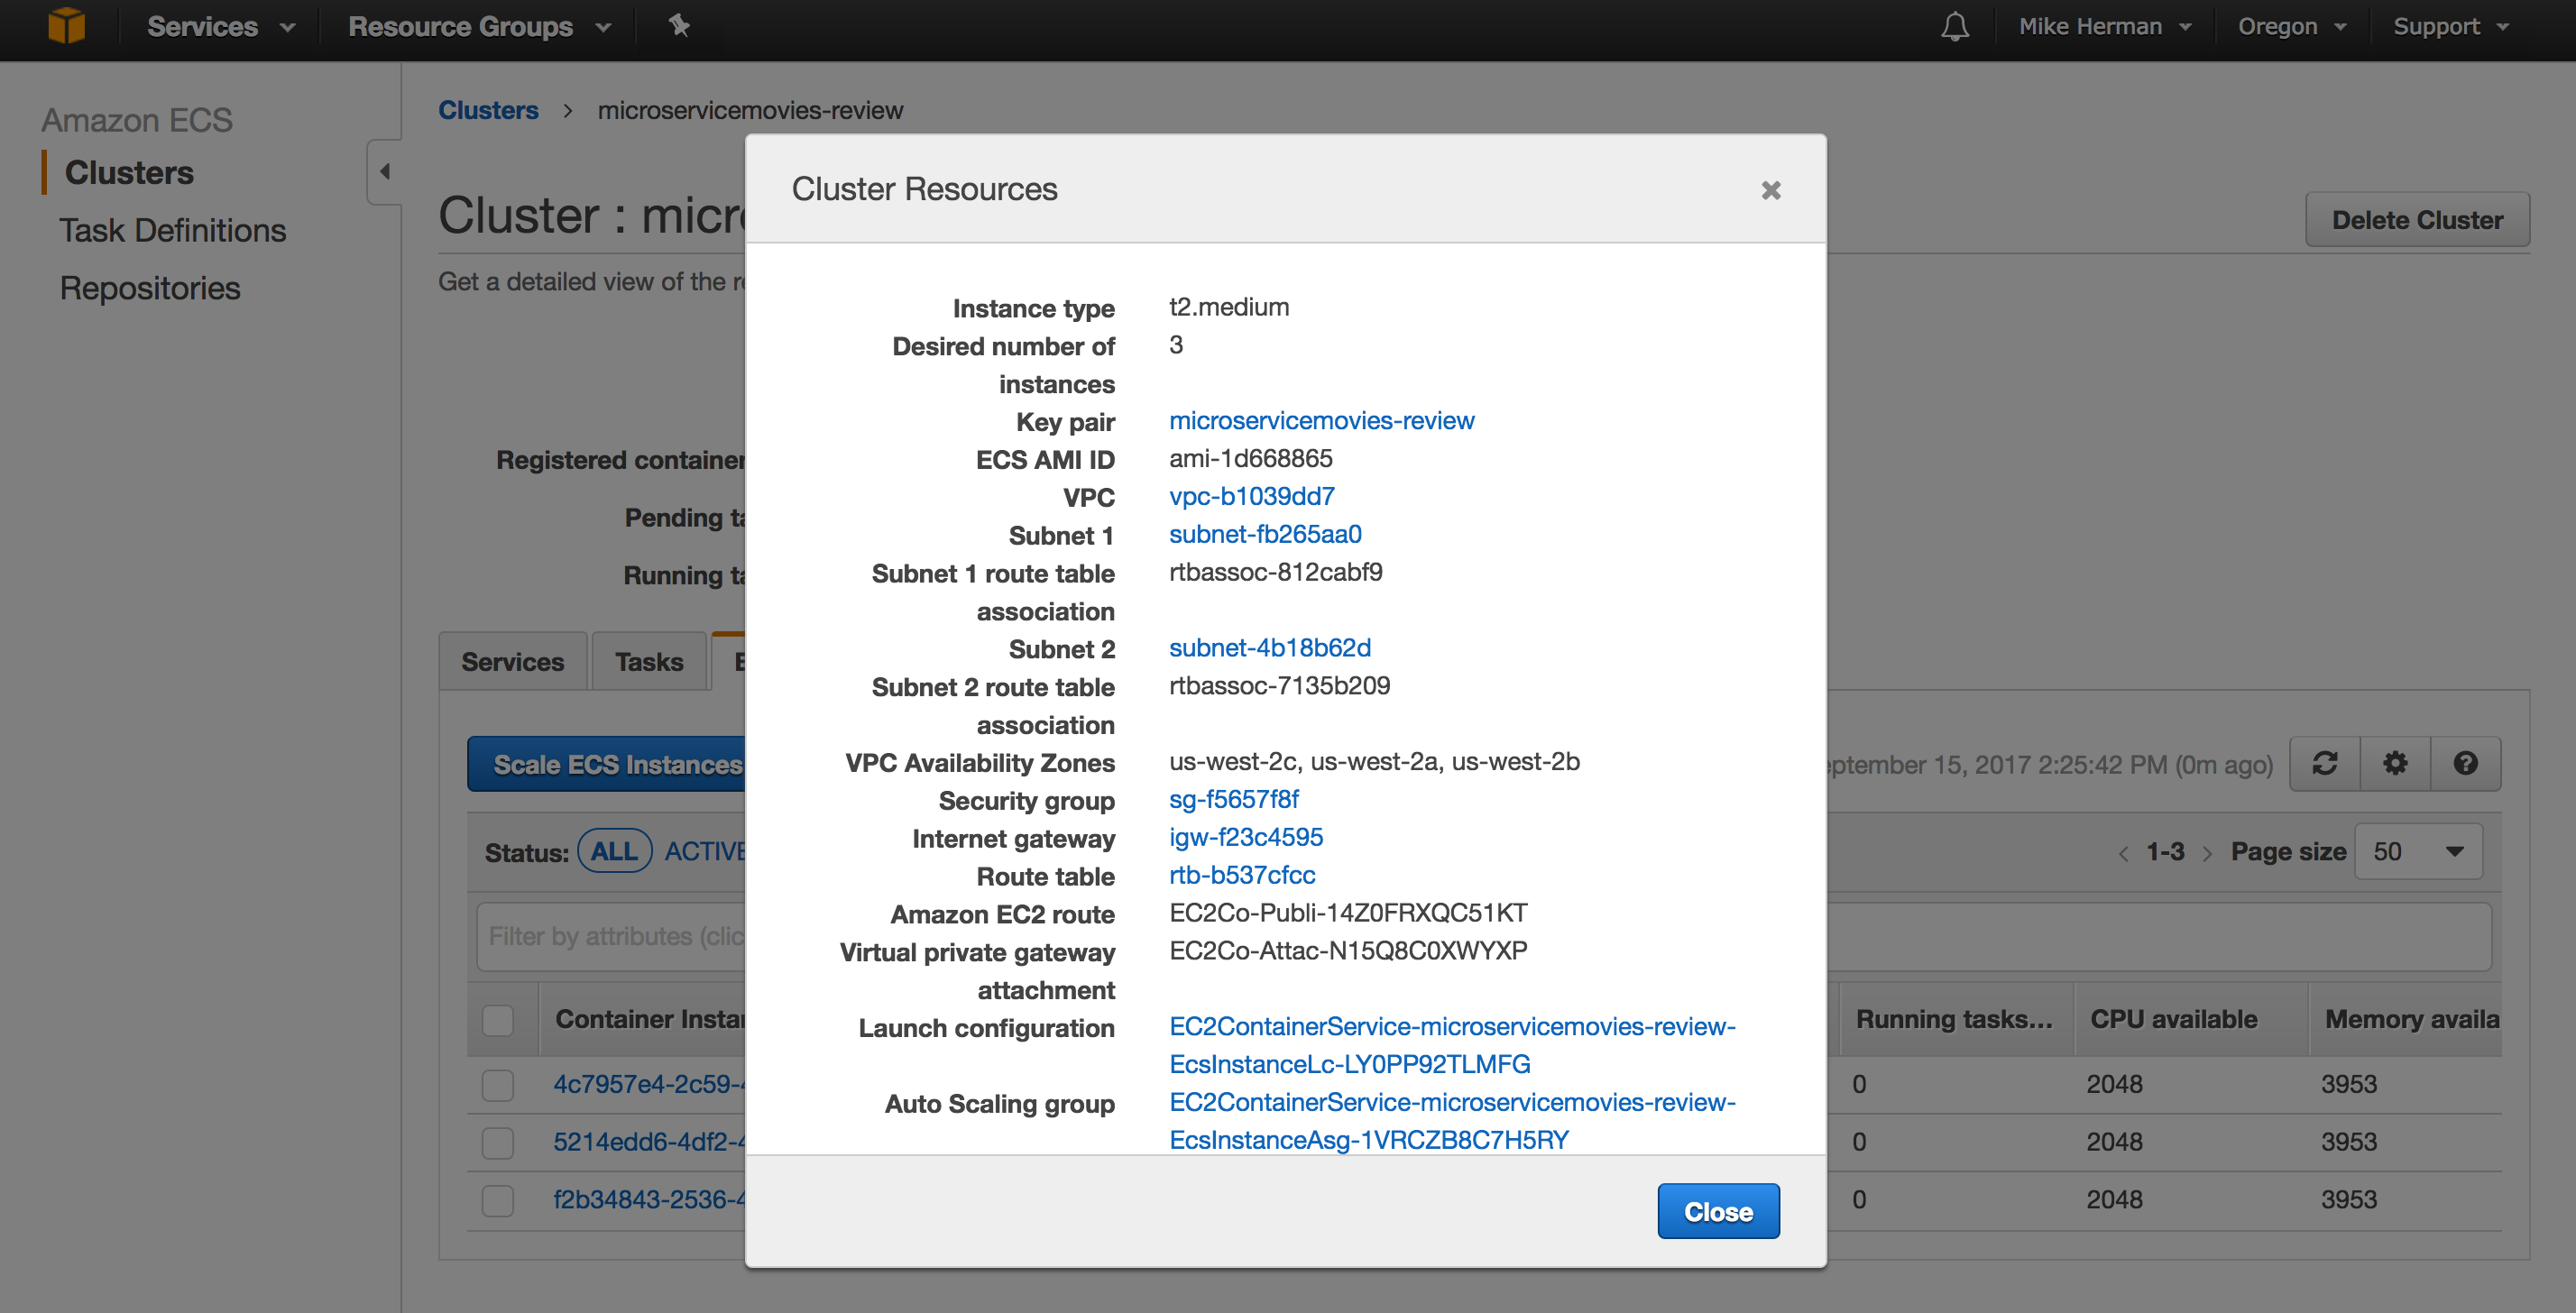
ECS Cluster
An ECS Cluster is just a group of EC2 container instances managed by ECS. To set up, navigate to the ECS Console, and then select the region for the Cluster on the right-side of the nav bar.
NOTE: This tutorial uses the
US West (Oregon)/us-west-2region. Feel free to use the region of your choice. For more info, review the Regions and Availability Zones guide.
Next, click the “Create Cluster” button:
- “Cluster name”:
microservicemovies-review - “EC2 instance type”:
t2.medium - “Number of instances”:
3 - “Key pair”:
microservicemovies-review - Create a new VPC and Security Group
Create the Cluster.
Navigate to the Cluster once it’s created, and then click the “ECS Instances” tab. From there, click the “Actions” dropdown and select “View Cluster Resources”. Take note of the VPC and Security Group:
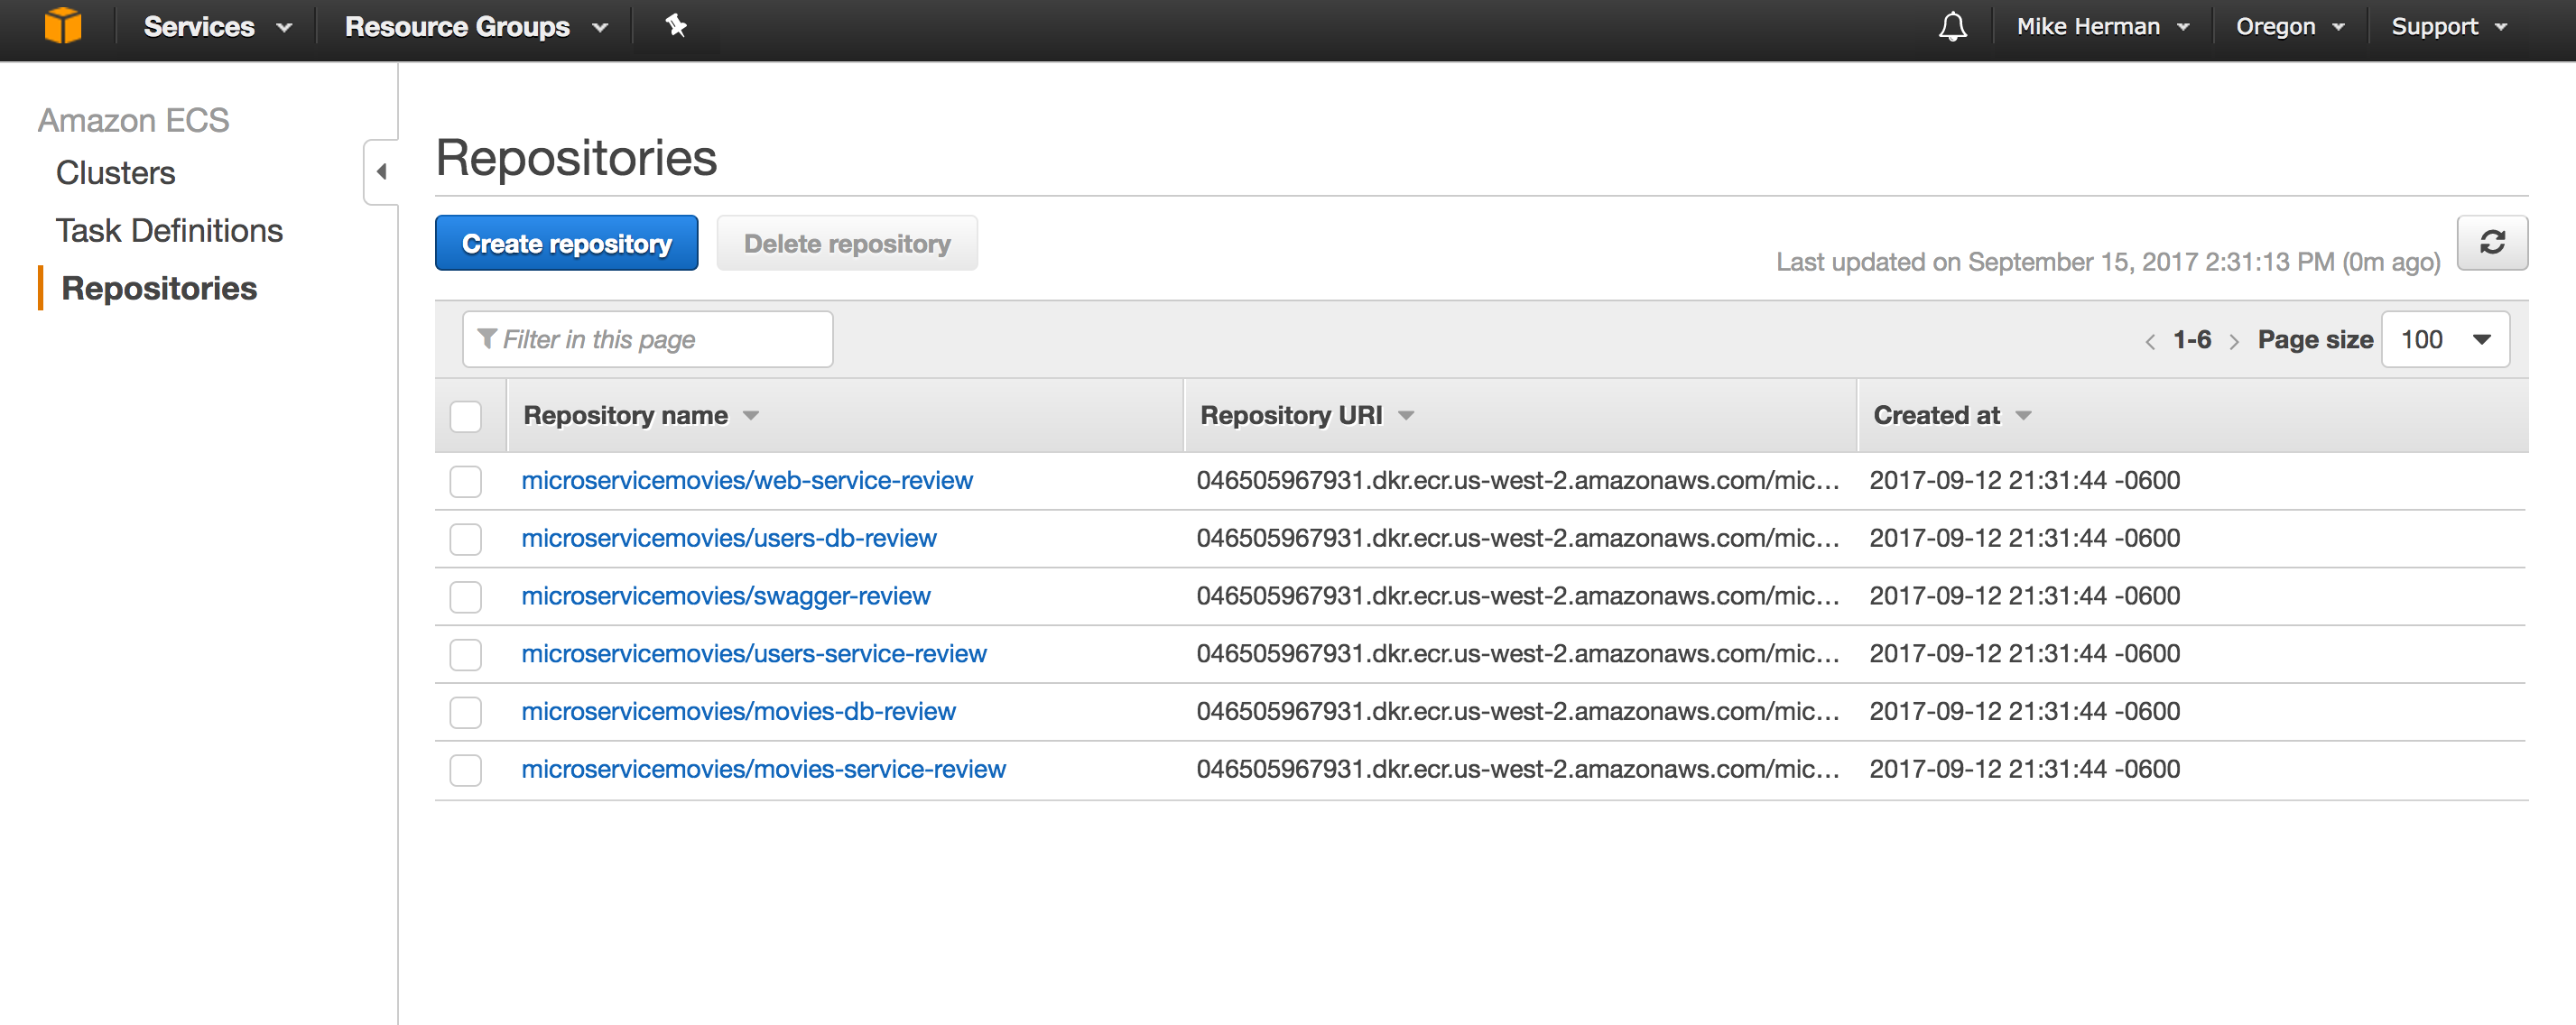
ECR
Within the ECS Console, click “Repositories” on the navigation pane, and then click the “Create repository” button. Add the following repositories:
microservicemovies/users-db-reviewmicroservicemovies/movies-db-reviewmicroservicemovies/users-service-reviewmicroservicemovies/movies-service-reviewmicroservicemovies/web-service-reviewmicroservicemovies/swagger-review
Application Load Balancer
Elastic Load Balancing, as of writing, supports two types of load balancers - Classic and Application. Either will work with ECS, but the Application Load Balancer (ALB) is the better of the two since it:
- Dynamically maps container services to ports
- Distributes traffic evenly across the entire ECS Service
- Runs status health checks against each service
- Allows for zero-downtime deploys
To set up, navigate to the EC2 Dashboard, update the region (if necessary), and then click “Load Balancers” in the navigation pane. Click the “Create Load Balancer” button. Select “Application Load Balancer”, and then go through each of the steps to configure the load balancer…
- Configure Load Balancer:
- “Name”:
microservicemovies-review - “VPC”: Select the VPC that was just created
- “Availability Zones”: Select at least two available subnets
- “Name”:
- Configure Security Settings: Skip this for now
- Configure Security Groups: Select the Security Group that was just created
- Configure Routing:
- “Name”:
review-default - “Port”:
80 - “Path”:
/
- “Name”:
- Register Targets: Do not assign any instances manually since this will be managed by ECS
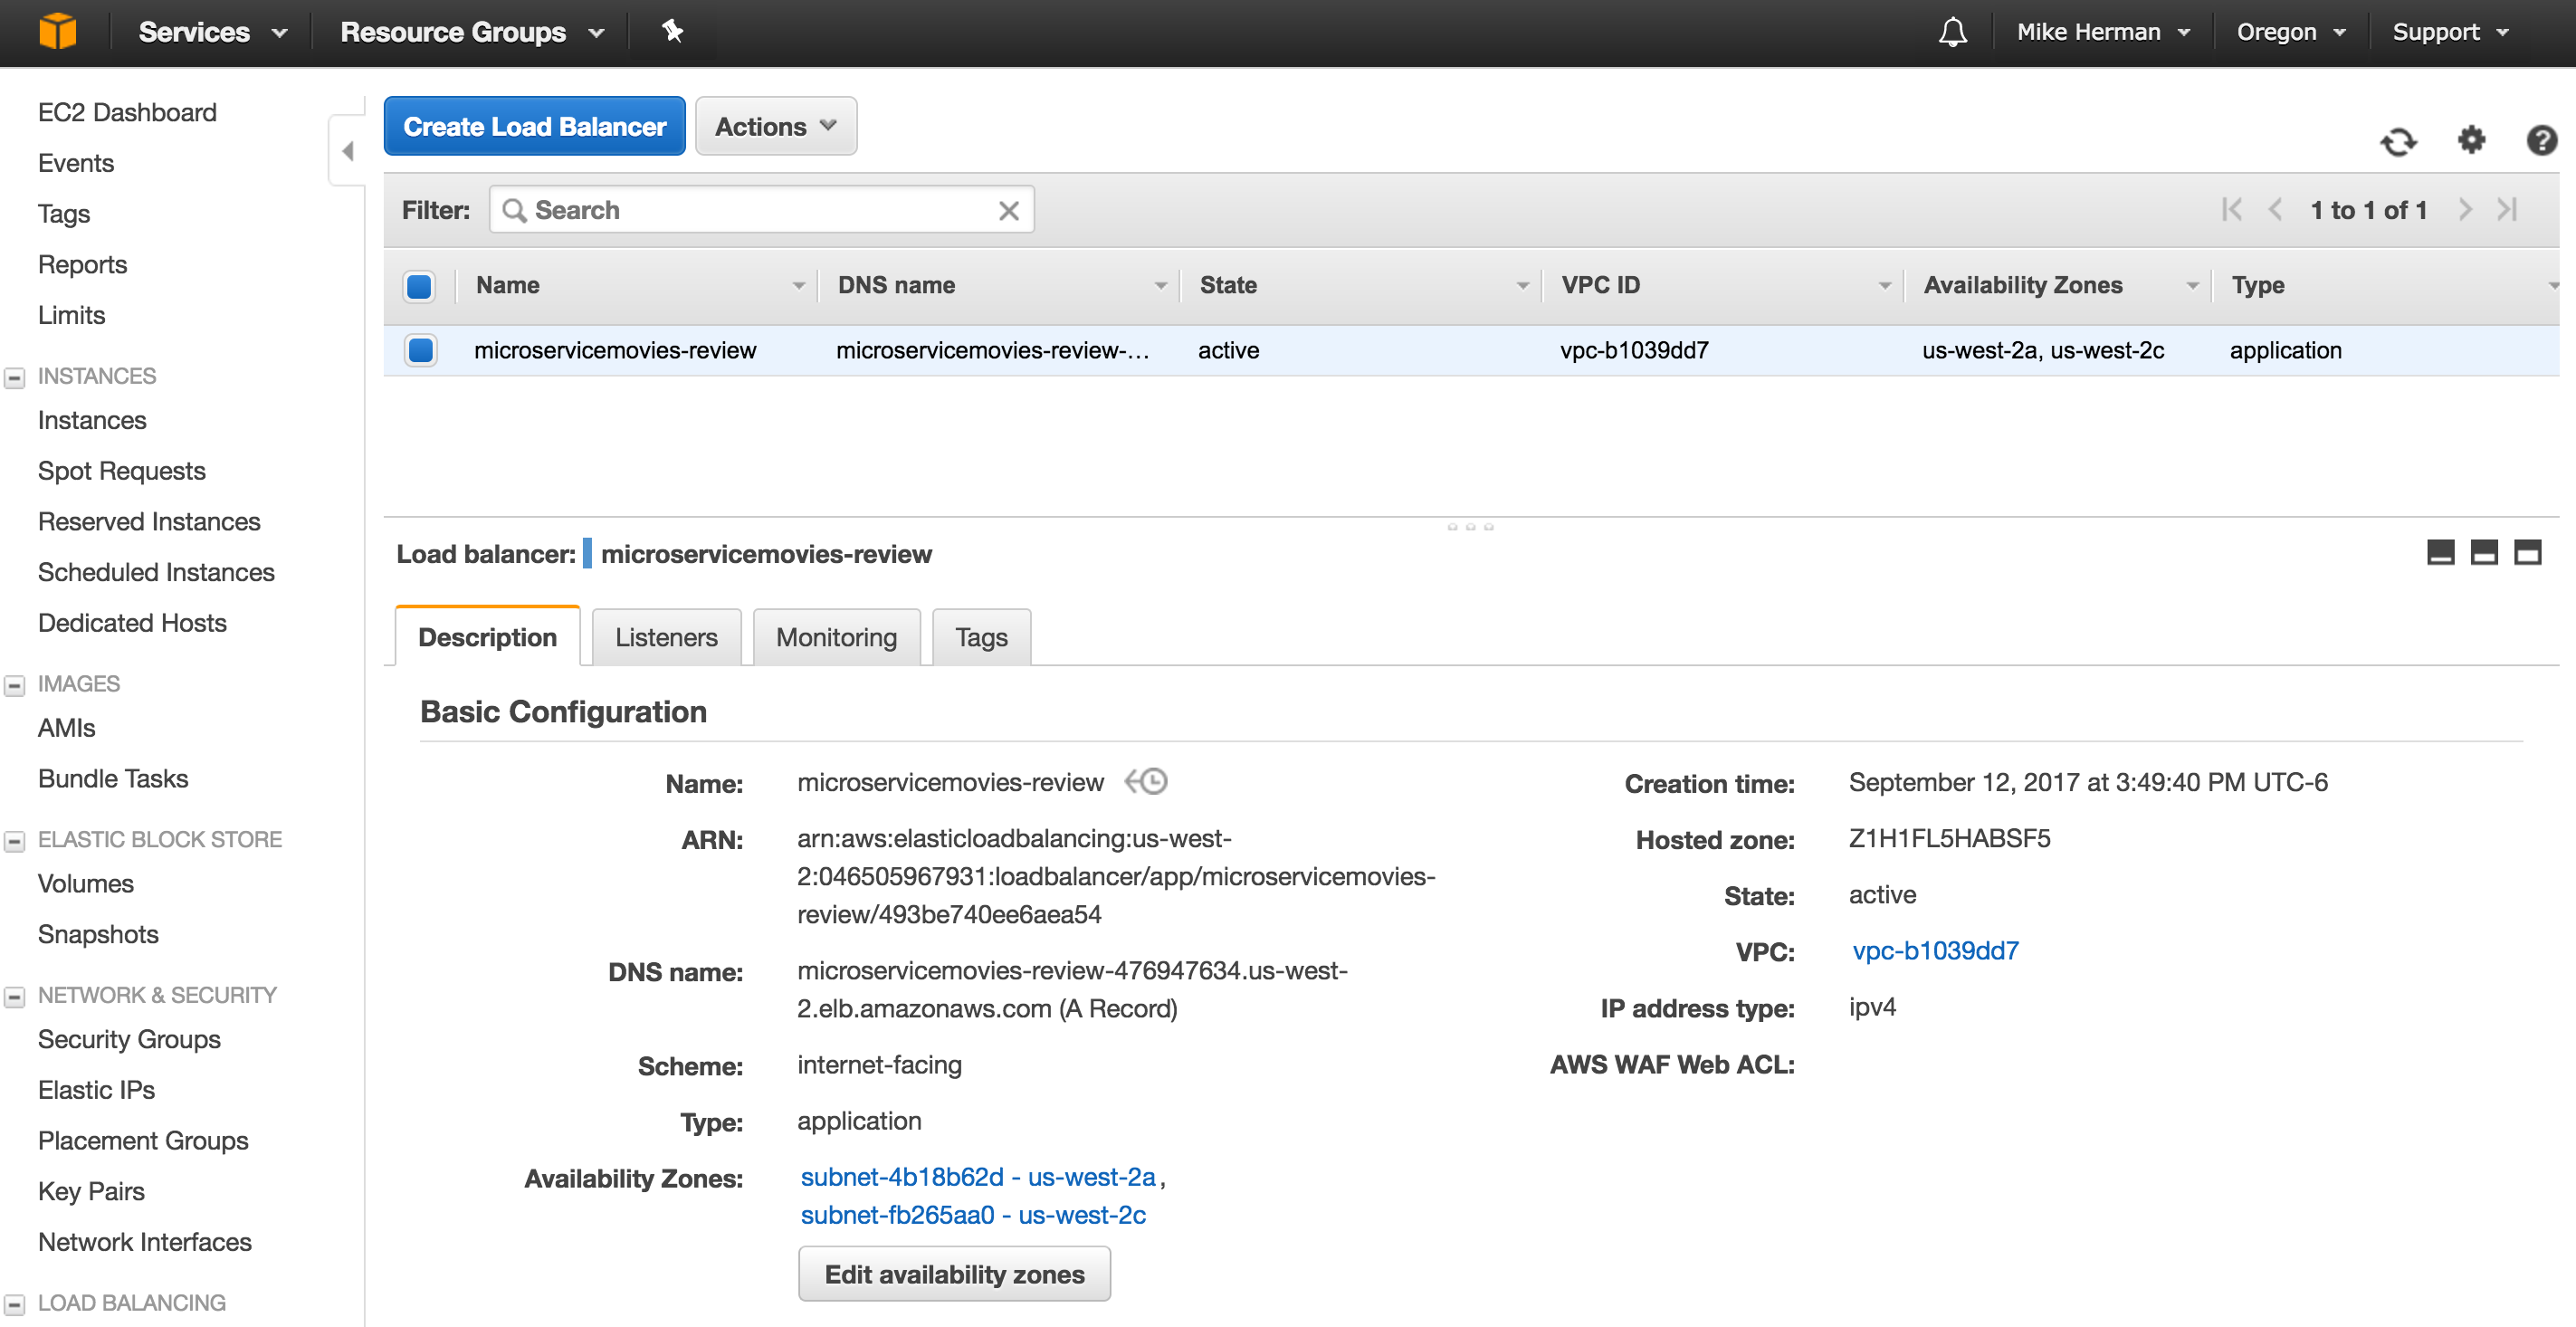
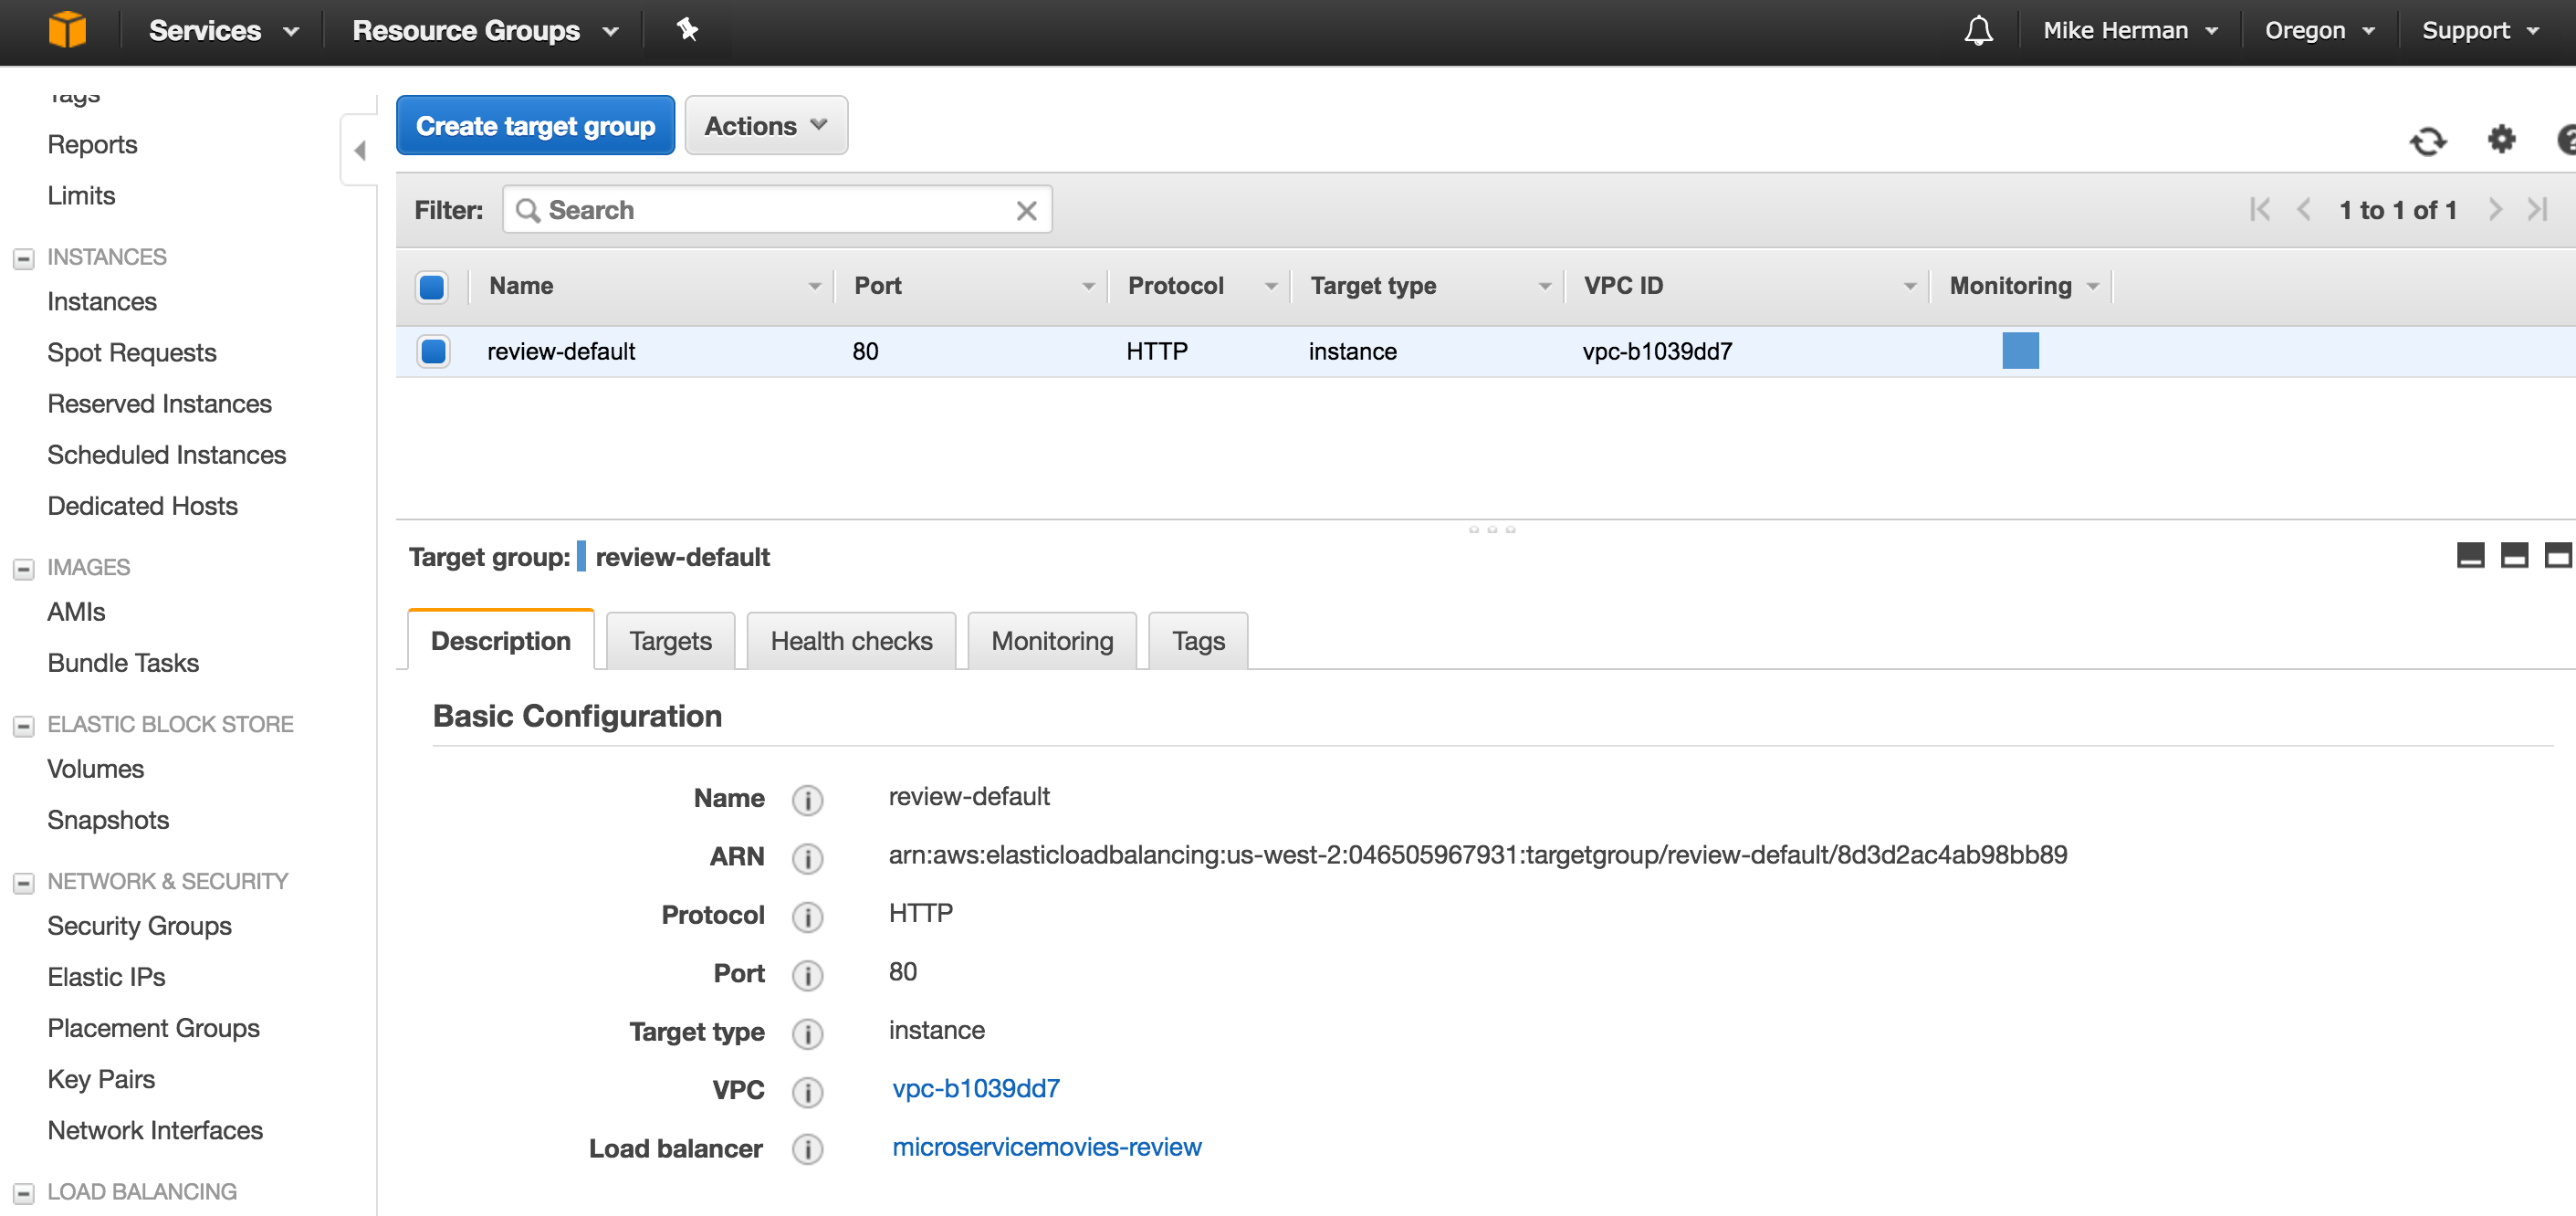
Along with the Application Load Balancer, this will also create a default Target Group called review-default:
Security Group
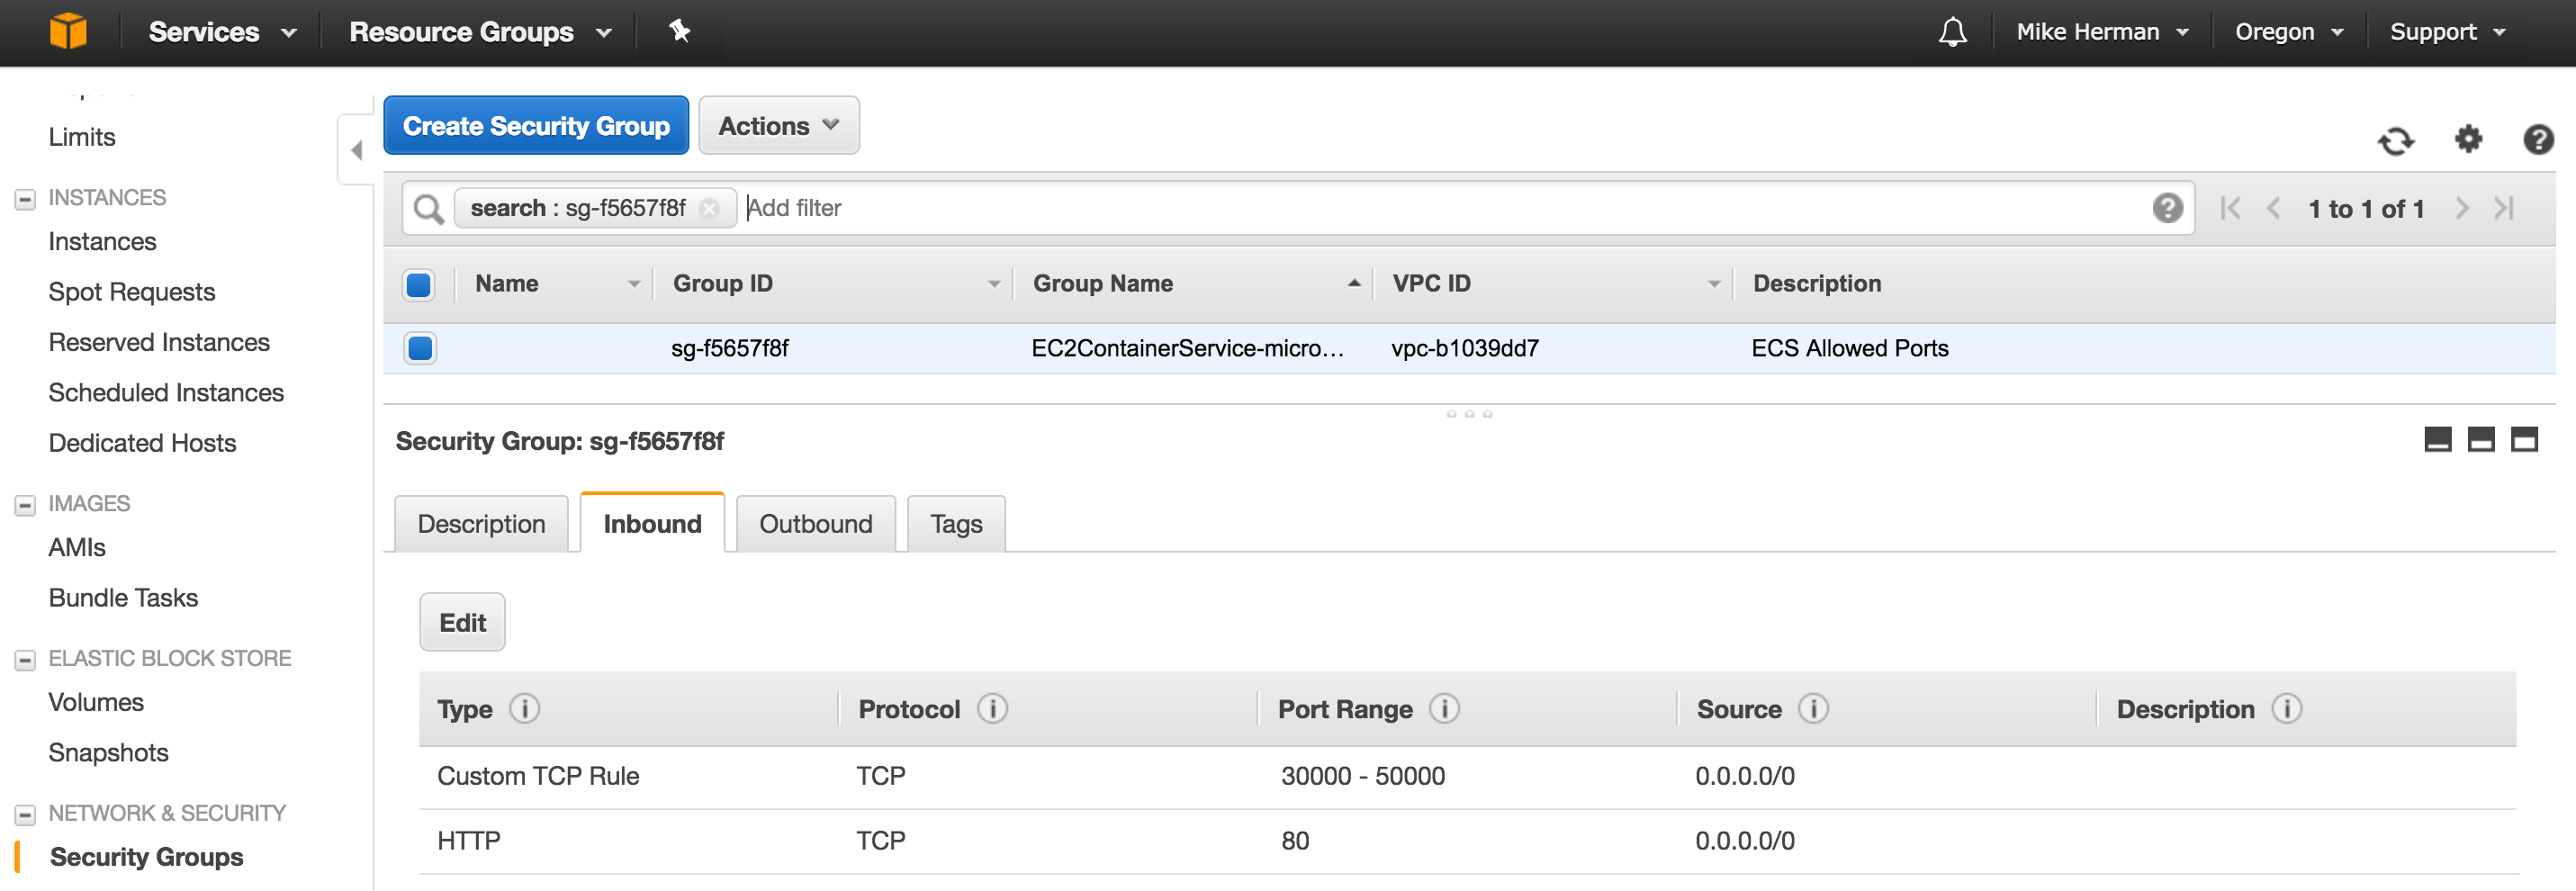
Finally, let’s add some ports to work with to the Security Group. Within the EC2 Dashboard, click “Security Groups” in the navigation pane, and then select the Security Group that was just created. On the “Inbound Rules” pane, click the “Edit” button and the “Add another rule button”:
- “Type”: “Custom TCP Rule”
- “Protocol”: “TCP (6)”
- “Port Range”:
30000-50000 - “Source”:
0.0.0.0/0
Click the “Save” button.
That’s it for the basic AWS resources.
Circle CI Setup
Next, sign up for Circle CI (if necessary) and follow the basic steps to configure Circle 2.0, making sure to enable access to your GitHub repos. Then, create a new folder called “.circleci” in the project root of “microservice-movies” and add a config.yml file to that directory:
version: 2

jobs:
  build:
    docker:
      - image: docker:17.03.2-ce-git
    working_directory: ~/microservice-movies
    environment:
      - NODE_ENV: test
      - REACT_APP_USERS_SERVICE_URL: http://localhost:3000
      - REACT_APP_MOVIES_SERVICE_URL: http://localhost:3001
    parallelism: 1
    steps:
      - checkout
      - setup_remote_docker:
          reusable: true
          exclusive: false
      - run:
          name: Install dependencies
          command: |
            apk add --no-cache \
              py-pip=9.0.0-r1 \
              bash \
              jq \
              curl \
              nodejs
            pip install \
              docker-compose==1.12.0 \
              awscli==1.11.76
      - run:
          name: Build Docker images
          command: docker-compose -f docker-compose-review.yml build
      - run:
          name: Spin up Docker containers
          command: docker-compose -f docker-compose-review.yml up -d
      - run:
          name: Test the user service
          command: docker-compose -f docker-compose-review.yml run users-service-review npm test
      - run:
          name: Test the movies service
          command: docker-compose -f docker-compose-review.yml run movies-service-review npm test
Review this file. Refer to the Circle documentation as needed. Commit and push your code to GitHub once done. On Circle, navigate to the “Add Projects” page and click the “Build Project” button next to your project. This will trigger a new build, which should pass.
AWS SDK Setup
Since the microservice stack is built with Node, we’ll develop the deployment script in JavaScript with the AWS JavaScript SDK.
Add a package.json to the project root:
{
  "name": "microservice-movies",
  "dependencies": {
    "aws-sdk": "2.114.0"
  }
}
Install the dependency:
$ npm install
Add a new folder to the project root called “ecs”, and then create a new folder called “scripts” within that folder. Finally, add a new file called setup.js to “scripts”:
const AWS = require('aws-sdk');


// globals

const AWS_ACCOUNT_ID = process.env.AWS_ACCOUNT_ID;
const AWS_ACCESS_KEY_ID = process.env.AWS_ACCESS_KEY_ID;
const AWS_SECRET_ACCESS_KEY = process.env.AWS_SECRET_ACCESS_KEY;
const AWS_USERNAME = process.env.AWS_USERNAME;
const AWS_CONFIG_REGION = 'us-west-2';

const clusterName = 'microservicemovies-review';


// config

AWS.config = new AWS.Config();
AWS.config.accessKeyId = AWS_ACCESS_KEY_ID;
AWS.config.secretAccessKey = AWS_SECRET_ACCESS_KEY;
AWS.config.region = AWS_CONFIG_REGION;


// init aws services

const ecs = new AWS.ECS();
const iam = new AWS.IAM();


// methods

function ensureAuthenticated() {
  return new Promise((resolve, reject) => {
    const params = { UserName: AWS_USERNAME };
    iam.getUser(params, (err, data) => {
      if (err) { reject(err); }
      resolve(data);
    });
  });
}

function confirmRegion() {
  return new Promise((resolve, reject) => {
    if (AWS.config.region !== AWS_CONFIG_REGION) {
      reject('Something went wrong!');
    }
    resolve(AWS_CONFIG_REGION);
  });
}

function getCluster() {
  return new Promise((resolve, reject) => {
    const params = { clusters: [ clusterName ] };
    ecs.describeClusters(params, (err, data) => {
      if (err) { reject(err); }
      resolve(data);
    });
  });
}


// main

return ensureAuthenticated()
.then((data) => {
  console.log(`Welcome ${data.User.UserName}!`);
  return confirmRegion();
})
.then((region) => {
  console.log(`AWS Region -> ${region}`);
  return getCluster();
})
.then((cluster) => {
  if (!cluster.clusters.length) {
    console.log('Cluster does not exist!');
    return;
  }
  console.log(`ECS Cluster -> ${cluster.clusters[0].clusterName}`);
})
.catch((err) => { console.log(err); });
In essence, this confirms that the AWS user credentials are correct and that the AWS Region and ECS Cluster are configured properly.
Set the following environment variables locally:
AWS_ACCOUNT_IDAWS_ACCESS_KEY_IDAWS_SECRET_ACCESS_KEYAWS_USERNAME
Run the script:
$ node ecs/scripts/setup.js
You should see:
Welcome AWS_USERNAME!
AWS Region -> us-west-2
ECS Cluster -> microservicemovies-review
Add another step to the bottom of .circleci/config.yml:
- run:
    name: Deploy
    command: |
      npm install
      node ecs/scripts/setup.js
Add the following environment variables to Circle so that we can properly configure the AWS SDK:
AWS_ACCOUNT_IDAWS_ACCESS_KEY_IDAWS_SECRET_ACCESS_KEYAWS_USERNAME
Commit your changes, and then push to GitHub to trigger a new build. Make sure it passes before moving on.
Deployment Script
Moving right along, let’s start building the deployment scripts to set up the AWS resources and deploy the app.
Main Steps:
- Tag and push images to ECR
- Get open port for the Listener
- Register Task Definitions
- Create Target Groups
- Add the Listener and Rules
- Create new Services
(1) Tag and push images to ECR
Create a new file in “ecs/scripts” called ecr.sh:
#!/usr/bin/env bash


# config

set -e

ECS_REGION="us-west-2"
NAMESPACE="microservicemovies"
IMAGE_BASE="microservicemovies"
ECR_URI="${AWS_ACCOUNT_ID}.dkr.ecr.${ECS_REGION}.amazonaws.com"
SHORT_GIT_HASH=$(echo $CIRCLE_SHA1 | cut -c -7)
TAG=$SHORT_GIT_HASH


# helpers

configure_aws_cli() {
  echo "Configuring AWS..."
  aws --version
  aws configure set default.region $ECS_REGION
  aws configure set default.output json
  echo "AWS configured!"
}

tag_and_push_images() {
  echo "Tagging and pushing images..."
  $(aws ecr get-login --region "${ECS_REGION}")
  # tag
  docker tag ${IMAGE_BASE}_users-db-review ${ECR_URI}/${NAMESPACE}/users-db-review:${TAG}
  docker tag ${IMAGE_BASE}_movies-db-review ${ECR_URI}/${NAMESPACE}/movies-db-review:${TAG}
  docker tag ${IMAGE_BASE}_users-service-review ${ECR_URI}/${NAMESPACE}/users-service-review:${TAG}
  docker tag ${IMAGE_BASE}_movies-service-review ${ECR_URI}/${NAMESPACE}/movies-service-review:${TAG}
  docker tag ${IMAGE_BASE}_web-service-review ${ECR_URI}/${NAMESPACE}/web-service-review:${TAG}
  docker tag ${IMAGE_BASE}_swagger-review ${ECR_URI}/${NAMESPACE}/swagger-review:${TAG}
  # push
  docker push ${ECR_URI}/${NAMESPACE}/users-db-review:${TAG}
  docker push ${ECR_URI}/${NAMESPACE}/movies-db-review:${TAG}
  docker push ${ECR_URI}/${NAMESPACE}/users-service-review:${TAG}
  docker push ${ECR_URI}/${NAMESPACE}/movies-service-review:${TAG}
  docker push ${ECR_URI}/${NAMESPACE}/web-service-review:${TAG}
  docker push ${ECR_URI}/${NAMESPACE}/swagger-review:${TAG}
  echo "Images tagged and pushed!"
}

# main

configure_aws_cli
tag_and_push_images
Each deploy is associated with a different commit and, thus, a different version of the code. To link the commit back to a specific image, we just used part of the Git commit SHA as the image tag:
SHORT_GIT_HASH=$(echo $CIRCLE_SHA1 | cut -c -7)
TAG=$SHORT_GIT_HASH
NOTE: Instead of using the associated Git commit SHA, you could get a bit creative and build a Heroku-like random name generator.
Update the Deploy command in .circle/config.yml:
- run:
    name: Deploy
    command: |
      npm install
      node ecs/scripts/setup.js
      sh ecs/scripts/ecr.sh
Commit and push your code to GitHub to trigger a new Circle build. Once done, ensure the images are up on ECS with the appropriate tag:

(2) Get open port for the Listener
Remember how we set a range of open ports, 30000 - 50000, when we set up the Security Group? Well, each new environment will be assigned to a port within this range.
Add a new file called listener.js to “ecs/scripts”:
const AWS = require('aws-sdk');


// globals

const AWS_ACCOUNT_ID = process.env.AWS_ACCOUNT_ID;
const AWS_ACCESS_KEY_ID = process.env.AWS_ACCESS_KEY_ID;
const AWS_SECRET_ACCESS_KEY = process.env.AWS_SECRET_ACCESS_KEY;
const AWS_USERNAME = process.env.AWS_USERNAME;
const AWS_CONFIG_REGION = 'us-west-2';
const LOAD_BALANCER_ARN = 'UPDATE_ME';


// config

AWS.config = new AWS.Config();
AWS.config.accessKeyId = AWS_ACCESS_KEY_ID;
AWS.config.secretAccessKey = AWS_SECRET_ACCESS_KEY;
AWS.config.region = AWS_CONFIG_REGION;


// init aws services

const elbv2 = new AWS.ELBv2();


// methods

function getPort() {
  return new Promise((resolve, reject) => {
    var params = {
      LoadBalancerArn: LOAD_BALANCER_ARN
    };
    elbv2.describeListeners(params, (err, data) => {
      if (err) { reject(err); }
      const max = data.Listeners.reduce((prev, current) => {
        return (prev.Port > current.Port) ? prev : current;
      });
      if (parseInt(max.Port) === 80) {
        resolve(30000);
      } else {
        const port = parseInt(max.Port) + 1;
        resolve(port);
      }
    });
  });
}


module.exports = {
  getPort
};
Add then update the following variable:
const LOAD_BALANCER_ARN = 'UPDATE_ME';
Then, take note of the following if statement:
if (parseInt(max.Port) === 80) {
  resolve(30000);
} else {
  const port = parseInt(max.Port) + 1;
  resolve(port);
}
Why do we need this?
Since the default Target Group, review-default, was configured to listen on port 80, we need to account for it if it’s the only Listener set up since we’re bumping the port by 1 each time.
We’ll test this out in the next section…
(3) Register Task Definitions
A Task Definition is used to create an application from one or more containers. It’s similar to a Docker Compose file.
Steps:
- Create Task Definition files
- Create script to register Task Definitions
Create Task Definition files
Create a new directory called “tasks” within “ecs”, and then add the following files:
- users-review_task.js
- movies-review_task.js
- web-review_task.js
Users - users-review_task.js
function createUsersTaskDefinition(accountID, region, tag, family, revision) {
  const taskDefinition = {
    containerDefinitions: [
      {
        name: 'users-service-review',
        image: `${accountID}.dkr.ecr.${region}.amazonaws.com\/microservicemovies\/users-service-review:${tag}`,
        essential: true,
        memoryReservation: 300,
        cpu: 300,
        portMappings: [
          {
            containerPort: 3000,
            hostPort: 0,
            protocol: 'tcp'
          }
        ],
        environment: [
          {
            name: 'DATABASE_URL',
            value: 'postgres://postgres:postgres@users-db-review:5432/users_dev'
          },
          {
            name: 'DATABASE_TEST_URL',
            value: 'postgres://postgres:postgres@users-db-review:5432/users_test'
          },
          {
            name: 'NODE_ENV',
            value: 'test'
          },
          {
            name: 'TOKEN_SECRET',
            value: 'changeme'
          }
        ],
        links: [
          'users-db-review'
        ],
        logConfiguration: {
          logDriver: 'awslogs',
          options: {
            'awslogs-group': 'microservicemovies',
            'awslogs-region': region
          }
        }
      },
      {
        name: 'users-db-review',
        image: `${accountID}.dkr.ecr.${region}.amazonaws.com\/microservicemovies\/users-db-review:${tag}`,
        essential: true,
        memoryReservation: 300,
        cpu: 300,
        portMappings: [
          {
            containerPort: 5432
          }
        ],
        environment: [
          {
            name: 'POSTGRES_USER',
            value: 'postgres'
          },
          {
            name: 'POSTGRES_PASSWORD',
            value: 'postgres'
          }
        ],
        logConfiguration: {
          logDriver: 'awslogs',
          options: {
            'awslogs-group': 'microservicemovies',
            'awslogs-region': region
          }
        }
      }
    ],
    family: 'microservicemovies-review-users-td'
  };
  return taskDefinition;
}

module.exports = {
  createUsersTaskDefinition
};
Most of this should be fairly straightforward since the container definition relates back to the Docker Compose file. Review the Task Definition Parameters guide for more info.
Two things to note:
- We set the host port for the users service to
0so that a port is dynamically assigned when the Task is fired up. - We also configured logs, via LogConfiguration, to pipe logs to CloudWatch. To set up, we need to create a new Log Group. Simply navigate to CloudWatch, click “Logs” on the navigation pane, click the “Actions” drop-down button, and then select “Create log group”. Name the group
microservicemovies-review.
Movies - movies-review_task.js
function createMoviesTaskDefinition(accountID, region, tag, family, revision) {
  const taskDefinition = {
    containerDefinitions: [
      {
        name: 'movies-service-review',
        image: `${accountID}.dkr.ecr.${region}.amazonaws.com\/microservicemovies\/movies-service-review:${tag}`,
        essential: true,
        memoryReservation: 300,
        cpu: 300,
        portMappings: [
          {
            containerPort: 3000,
            hostPort: 0,
            protocol: 'tcp'
          }
        ],
        environment: [
          {
            name: 'DATABASE_URL',
            value: 'postgres://postgres:postgres@movies-db-review:5432/movies_dev'
          },
          {
            name: 'DATABASE_TEST_URL',
            value: 'postgres://postgres:postgres@movies-db-review:5432/movies_test'
          },
          {
            name: 'NODE_ENV',
            value: 'test'
          },
          {
            name: 'TOKEN_SECRET',
            value: 'changeme'
          }
        ],
        links: [
          'movies-db-review'
        ],
        logConfiguration: {
          logDriver: 'awslogs',
          options: {
            'awslogs-group': 'microservicemovies',
            'awslogs-region': region
          }
        }
      },
      {
        name: 'movies-db-review',
        image: `${accountID}.dkr.ecr.${region}.amazonaws.com\/microservicemovies\/movies-db-review:${tag}`,
        essential: true,
        memoryReservation: 300,
        cpu: 300,
        portMappings: [
          {
            containerPort: 5432
          }
        ],
        environment: [
          {
            name: 'POSTGRES_USER',
            value: 'postgres'
          },
          {
            name: 'POSTGRES_PASSWORD',
            value: 'postgres'
          }
        ],
        logConfiguration: {
          logDriver: 'awslogs',
          options: {
            'awslogs-group': 'microservicemovies',
            'awslogs-region': region
          }
        }
      },
      {
        name: 'swagger-review',
        image: `${accountID}.dkr.ecr.${region}.amazonaws.com\/microservicemovies\/swagger-review:${tag}`,
        essential: true,
        memoryReservation: 300,
        cpu: 300,
        portMappings: [
          {
            containerPort: 3001,
            hostPort: 0,
            protocol: 'tcp'
          }
        ],
        environment: [
          {
            name: 'NODE_ENV',
            value: 'test'
          }
        ],
        logConfiguration: {
          logDriver: 'awslogs',
          options: {
            'awslogs-group': 'microservicemovies',
            'awslogs-region': region
          }
        }
      }
    ],
    family: 'microservicemovies-review-movies-td'
  };
  return taskDefinition;
}

module.exports = {
  createMoviesTaskDefinition
};
The first two containers should be almost identical to the containers in the previous Task Definition. Review the Swagger container definition.
Web - web-review_task.js
function createWebTaskDefinition(accountID, region, tag, usersURL, moviesURL) {
  const taskDefinition = {
    containerDefinitions: [
      {
        name: 'web-service-review',
        image: `${accountID}.dkr.ecr.${region}.amazonaws.com\/microservicemovies\/web-service-review:${tag}`,
        essential: true,
        memoryReservation: 300,
        cpu: 300,
        portMappings: [
          {
            containerPort: 9000,
            hostPort: 0,
            protocol: 'tcp'
          }
        ],
        environment: [
          {
            name: 'NODE_ENV',
            value: 'test'
          },
          {
            name: 'REACT_APP_USERS_SERVICE_URL',
            value: usersURL
          },
          {
            name: 'REACT_APP_MOVIES_SERVICE_URL',
            value: moviesURL
          }
        ],
        logConfiguration: {
          logDriver: 'awslogs',
          options: {
            'awslogs-group': 'microservicemovies',
            'awslogs-region': region
          }
        }
      },
    ],
    family: 'microservicemovies-review-web-td'
  };
  return taskDefinition;
}

module.exports = {
  createWebTaskDefinition
};
Notice how we’re passing in values for the environment variables. You could also use HashiCorp’s Vault project to better manage secrets and variables.
Create script to register Task Definitions
Next, add a new file called tasks.js to “ecs/scripts”:
const AWS = require('aws-sdk');

const createUsersTaskDefinition = require('../tasks/users-review_task').createUsersTaskDefinition;
const createMoviesTaskDefinition = require('../tasks/movies-review_task').createMoviesTaskDefinition;
const createWebTaskDefinition = require('../tasks/web-review_task').createWebTaskDefinition;

const port = require('./listener').getPort;


// globals

const AWS_ACCOUNT_ID = process.env.AWS_ACCOUNT_ID;
const AWS_ACCESS_KEY_ID = process.env.AWS_ACCESS_KEY_ID;
const AWS_SECRET_ACCESS_KEY = process.env.AWS_SECRET_ACCESS_KEY;
const AWS_USERNAME = process.env.AWS_USERNAME;
const AWS_CONFIG_REGION = 'us-west-2';
const SHORT_GIT_HASH = process.env.CIRCLE_SHA1.substring(0, 7);
const LOAD_BALANCER_DNS = 'http://microservicemovies-review-476947634.us-west-2.elb.amazonaws.com';


// config

AWS.config = new AWS.Config();
AWS.config.accessKeyId = AWS_ACCESS_KEY_ID;
AWS.config.secretAccessKey = AWS_SECRET_ACCESS_KEY;
AWS.config.region = AWS_CONFIG_REGION;


// init aws services

const ecs = new AWS.ECS();
const iam = new AWS.IAM();


// methods

function ensureAuthenticated() {
  return new Promise((resolve, reject) => {
    const params = { UserName: AWS_USERNAME };
    iam.getUser(params, (err, data) => {
      if (err) { reject(err); }
      resolve(data);
    });
  });
}

function registerTaskDef(task) {
  return new Promise((resolve, reject) => {
    const params = task;
    ecs.registerTaskDefinition(params, (err, data) => {
      if (err) { reject(err); }
      resolve(data);
    });
  });
}

function registerUsersTD() {
  const task = createUsersTaskDefinition(AWS_ACCOUNT_ID, AWS_CONFIG_REGION, SHORT_GIT_HASH);
  return registerTaskDef(task)
  .then((res) => {
    console.log('Task Registered!');
    console.log(res.taskDefinition.taskDefinitionArn);
  })
  .catch((err) => {
    console.log(err);
  });
}

function registerMoviesTD() {
  const task = createMoviesTaskDefinition(AWS_ACCOUNT_ID, AWS_CONFIG_REGION, SHORT_GIT_HASH);
  return registerTaskDef(task)
  .then((res) => {
    console.log('Task Registered!');
    console.log(res.taskDefinition.taskDefinitionArn);
  })
  .catch((err) => {
    console.log(err);
  });
}

function registerWebTD(usersURL, moviesURL) {
  const task = createWebTaskDefinition(AWS_ACCOUNT_ID, AWS_CONFIG_REGION, SHORT_GIT_HASH, usersURL, moviesURL);
  return registerTaskDef(task)
  .then((res) => {
    console.log('Task Registered!');
    console.log(res.taskDefinition.taskDefinitionArn);
  })
  .catch((err) => {
    console.log(err);
  });
}


// main

return ensureAuthenticated()
.then((data) => {
  console.log(`Welcome ${data.User.UserName}!`);
  return port();
})
.then((port) => {
  const usersURL = `${LOAD_BALANCER_DNS}:${port}/users`;
  const moviesURL = `${LOAD_BALANCER_DNS}:${port}/movies`;
  registerUsersTD();
  registerMoviesTD();
  registerWebTD(usersURL, moviesURL);
})
.catch((err) => { console.log(err); });
Here, we pulled in the getPort function from the listener.js file, created the individual Task Definitions, and then passed the definitions to the registerTaskDefinition function to register them on AWS. Review the official AWS SDK documentation for more info.
Update the Deploy command in .circle/config.yml:
- run:
    name: Deploy
    command: |
      npm install
      node ecs/scripts/setup.js
      sh ecs/scripts/ecr.sh
      node ecs/scripts/tasks.js
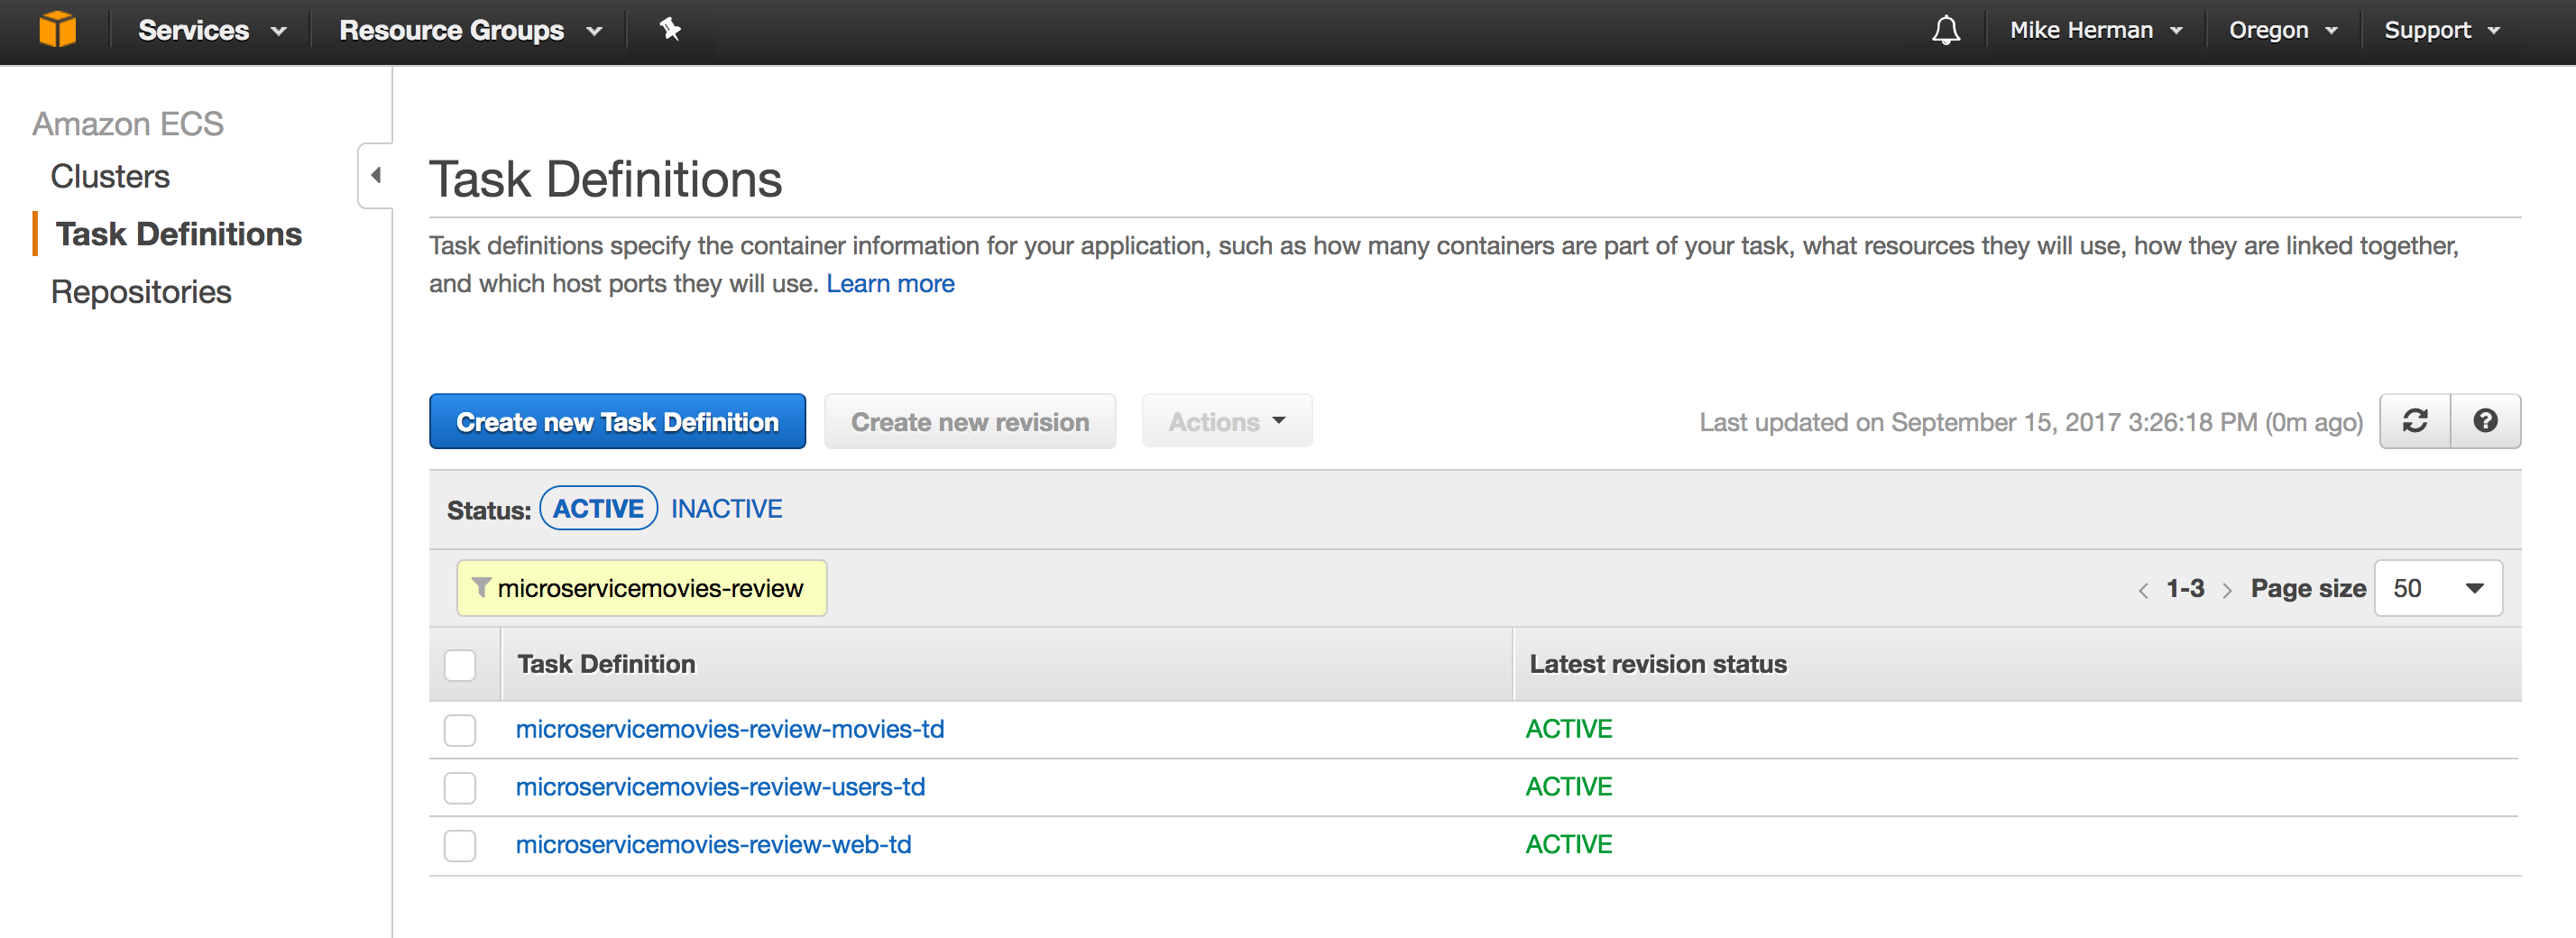
Commit and push your code to GitHub. Once the Circle build passes, make sure the Task Definitions were created:
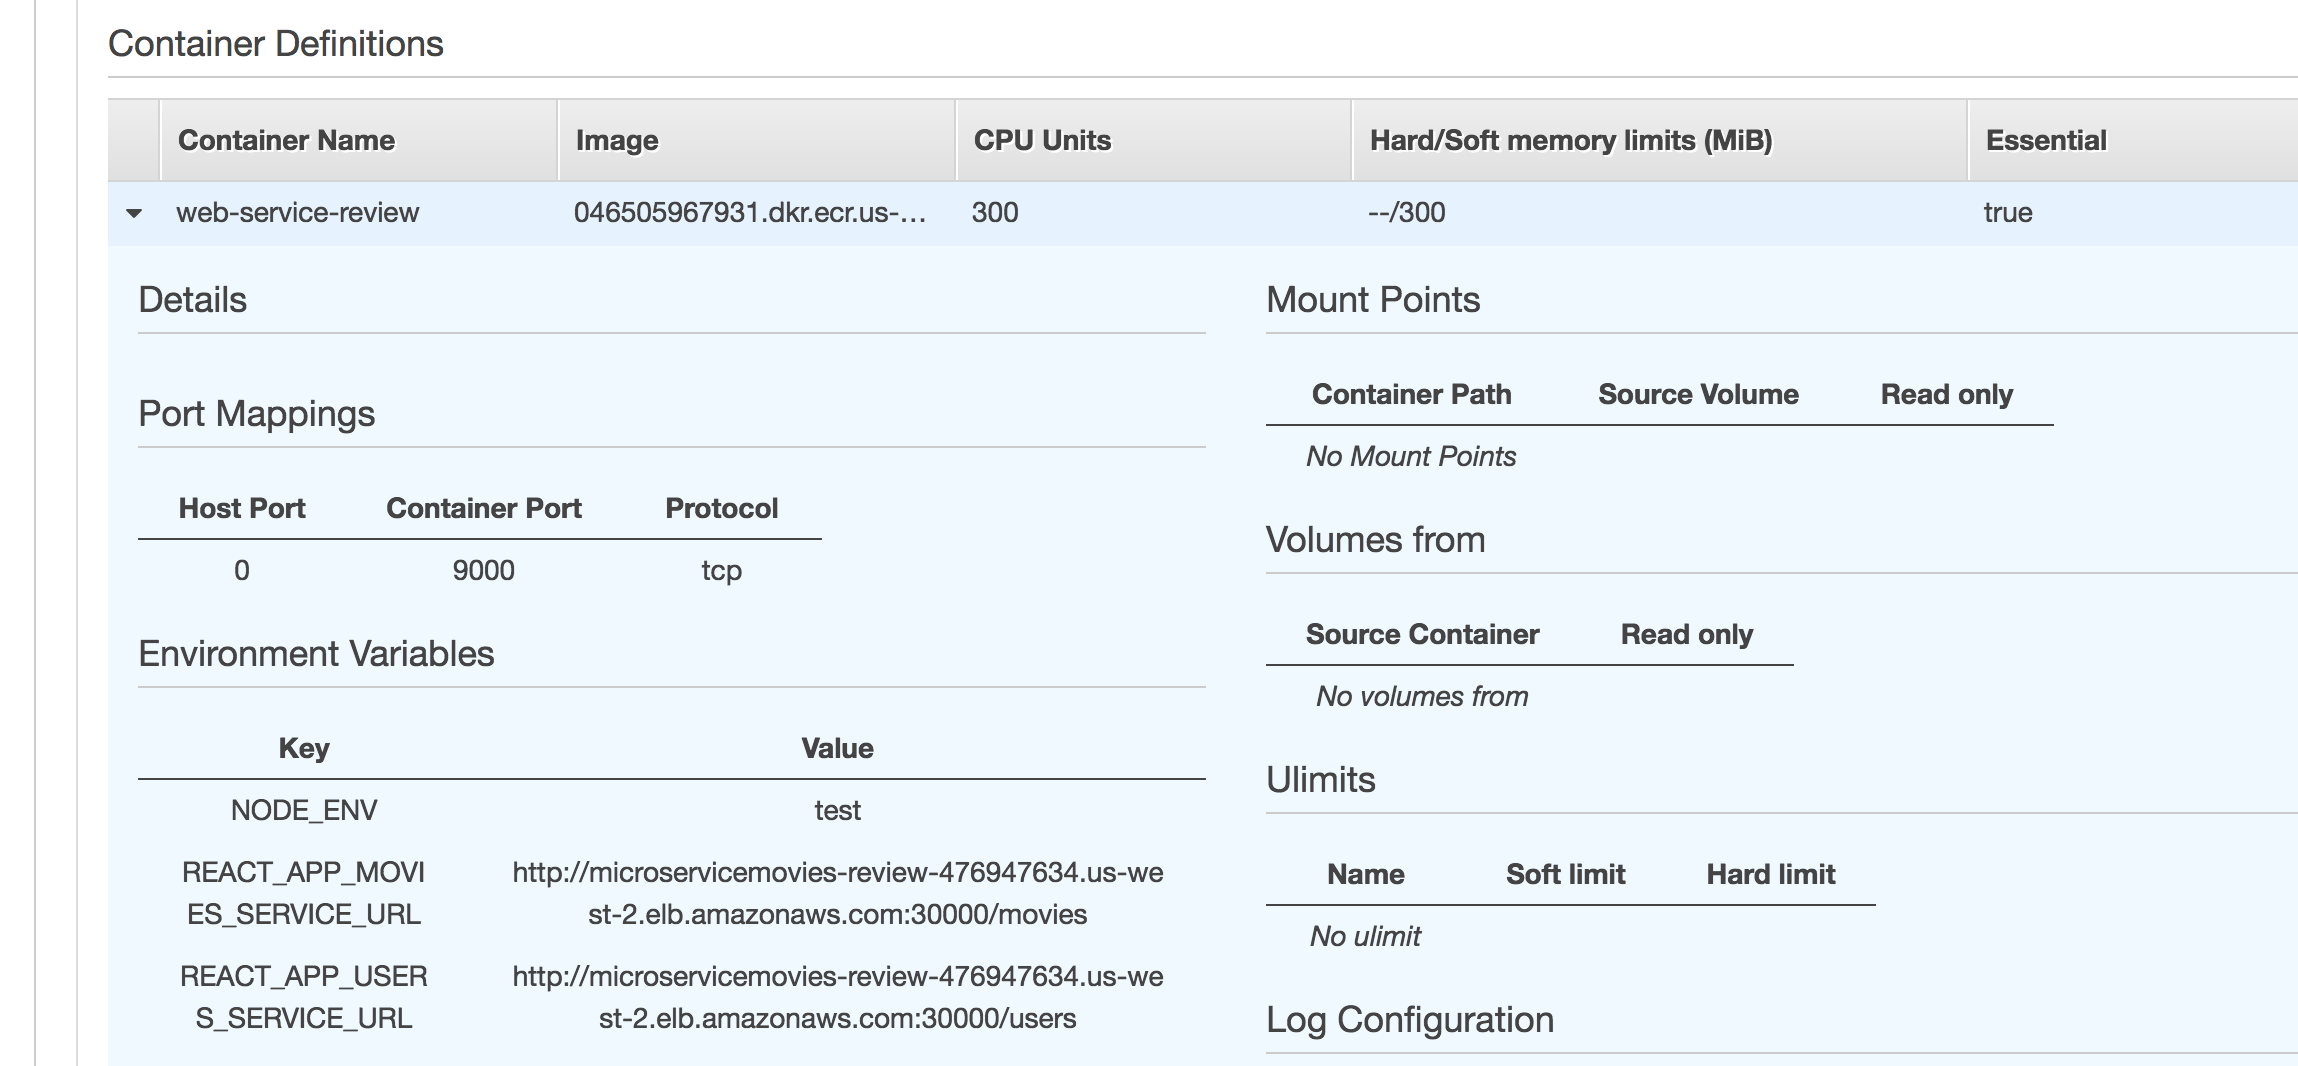
Also, make sure the REACT_APP_USERS_SERVICE_URL and REACT_APP_MOVIES_SERVICE_URL environment variables were added correctly to the microservicemovies-review-web-td Task Definition by clicking the Task Definition name, selecting the latest revision, and then expanding the web-service-review container:
(4) Create Target Groups
Target Groups are used to link the Application Load Balancer (ALB) to the container instances, which we just defined.
Create a new script in “scripts” called alb.js:
const AWS = require('aws-sdk');


// globals

const AWS_ACCOUNT_ID = process.env.AWS_ACCOUNT_ID;
const AWS_ACCESS_KEY_ID = process.env.AWS_ACCESS_KEY_ID;
const AWS_SECRET_ACCESS_KEY = process.env.AWS_SECRET_ACCESS_KEY;
const AWS_USERNAME = process.env.AWS_USERNAME;
const AWS_CONFIG_REGION = 'us-west-2';
const SHORT_GIT_HASH = process.env.CIRCLE_SHA1.substring(0, 7);
const VPC_ID='UPDATE_ME';

let USERS_TARGET_GROUP_ARN;
let MOVIES_TARGET_GROUP_ARN;
let WEB_TARGET_GROUP_ARN;


// config

AWS.config = new AWS.Config();
AWS.config.accessKeyId = AWS_ACCESS_KEY_ID;
AWS.config.secretAccessKey = AWS_SECRET_ACCESS_KEY;
AWS.config.region = AWS_CONFIG_REGION;


// init aws services

const elbv2 = new AWS.ELBv2();
const iam = new AWS.IAM();


// methods

function ensureAuthenticated() {
  return new Promise((resolve, reject) => {
    const params = { UserName: AWS_USERNAME };
    iam.getUser(params, (err, data) => {
      if (err) { reject(err); }
      resolve(data);
    });
  });
}

function addTargetGroup(service, port, path) {
  return new Promise((resolve, reject) => {
    var params = {
      Name: `${SHORT_GIT_HASH}-${service}`,
      Port: port,
      Protocol: 'HTTP',
      VpcId: VPC_ID,
      HealthCheckPath: path
    };
    elbv2.createTargetGroup(params, (err, data) => {
      if (err) { reject(err); }
      resolve(data);
    });
  });
}


// main

return ensureAuthenticated()
.then((data) => {
  console.log(`Welcome ${data.User.UserName}!`);
  return addTargetGroup('users', '3000', '/users/ping');
})
.then((res) => {
  USERS_TARGET_GROUP_ARN = res.TargetGroups[0].TargetGroupArn;
  console.log('Target Group Added!');
  return addTargetGroup('movies', '3000', '/movies/ping');
})
.then((res) => {
  MOVIES_TARGET_GROUP_ARN = res.TargetGroups[0].TargetGroupArn;
  console.log('Target Group Added!');
  return addTargetGroup('web', '9000', '/');
})
.then((res) => {
  WEB_TARGET_GROUP_ARN = res.TargetGroups[0].TargetGroupArn;
  console.log('Target Group Added!');
})
.catch((err) => { console.log(err); });
Make sure to add the correct VPC ID in the script, and then take note of the addTargetGroup function:
function addTargetGroup(service, port, path) {
  return new Promise((resolve, reject) => {
    var params = {
      Name: `${SHORT_GIT_HASH}-${service}`,
      Port: port,
      Protocol: 'HTTP',
      VpcId: VPC,
      HealthCheckPath: path
    };
    elbv2.createTargetGroup(params, (err, data) => {
      if (err) { reject(err); }
      resolve(data);
    });
  });
}
Again, the name should be unique, so we used a portion of the Git commit SHA in it. The port refers back to the container port, and the HealthCheckPath is used by the load balancer to ensure the container is running.
| Task Name | Port | Path |
|---|---|---|
| users-service-review | 3000 | /users/ping |
| movies-service-review | 3000 | /movies/ping |
| web-review | 9000 | / |
After the Target Groups are created, we grabbed the returned Amazon Resource Name (ARN) and assigned it to a variable, which we’ll end up using shortly when we set up the Listeners. For more on registering Target Groups, review the official documentation.
Update the Deploy command in .circle/config.yml:
- run:
    name: Deploy
    command: |
      npm install
      node ecs/scripts/setup.js
      sh ecs/scripts/ecr.sh
      node ecs/scripts/tasks.js
      node ecs/scripts/alb.js
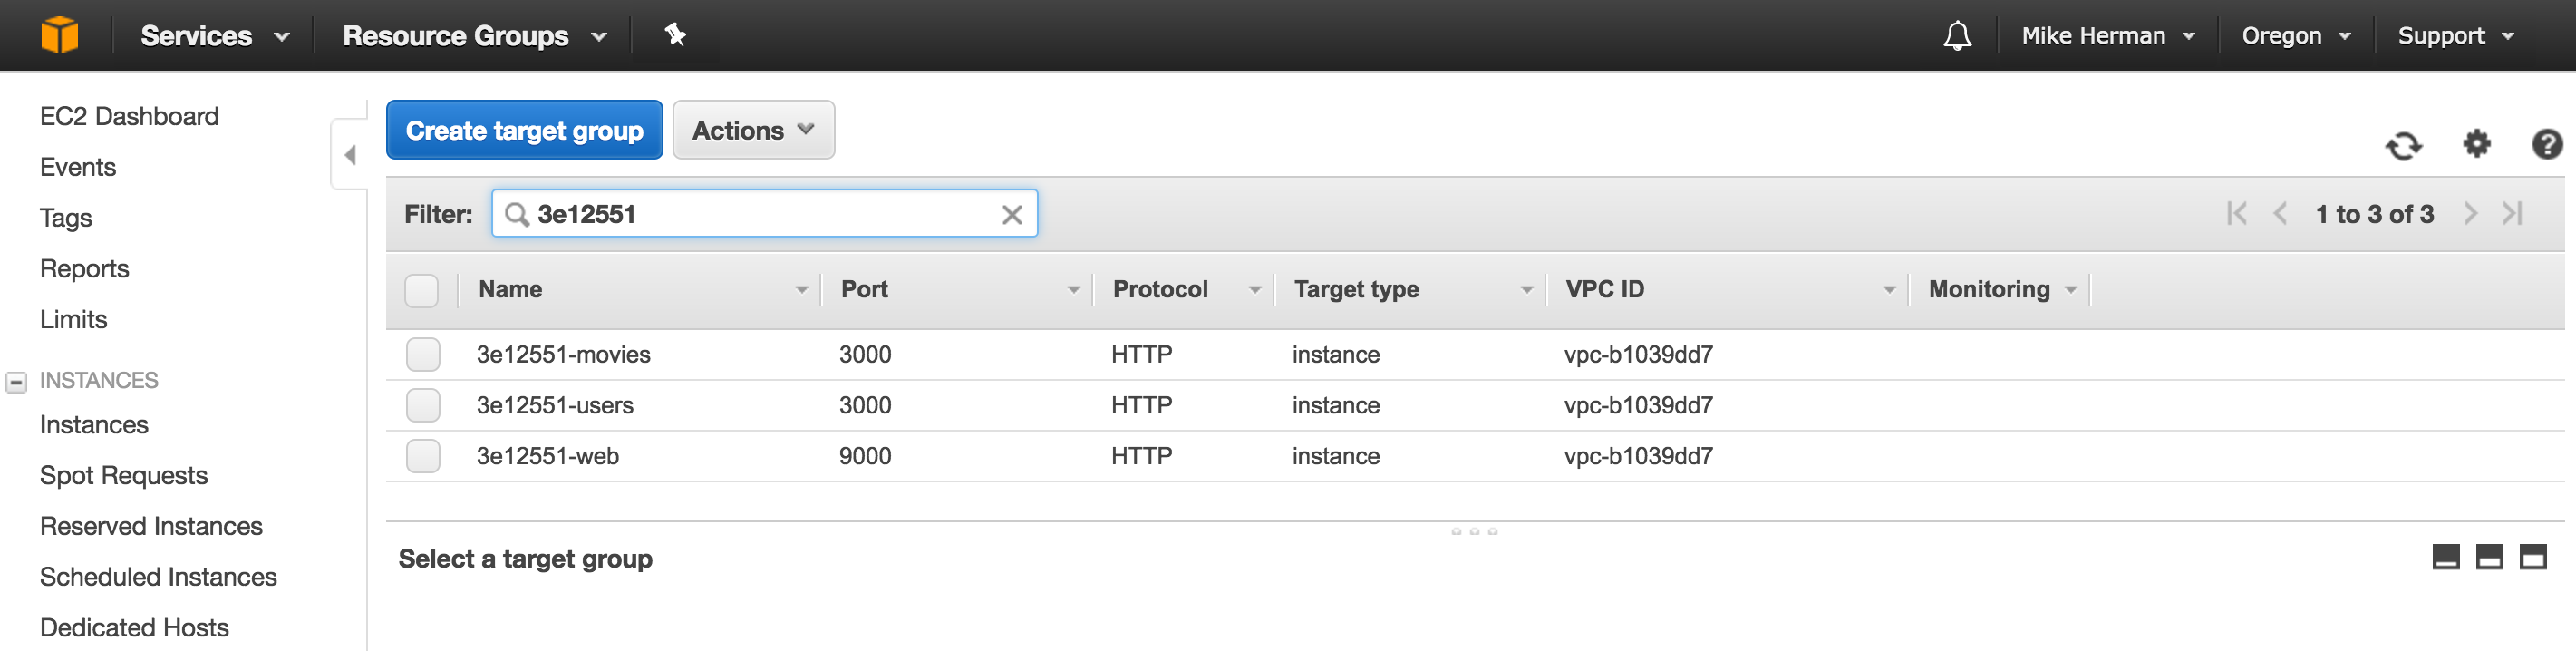
Commit and push your changes to GitHub. Make sure the Circle build passes. Within the EC2 Dashboard, click “Target Groups” on the navigation pane, and you should see three new Target Groups:
(5) Add the Listener and Rules
A Listener forwards traffic from the load balancer to a specific Target Group.
Add Listener
Add the following function to alb.js:
function addListener(port) {
  return new Promise((resolve, reject) => {
    var params = {
      DefaultActions: [
        {
          TargetGroupArn: DEFAULT_TARGET_GROUP_ARN,
          Type: 'forward'
        }
      ],
      LoadBalancerArn: LOAD_BALANCER_ARN,
      Port: port,
      Protocol: 'HTTP'
    };
    elbv2.createListener(params, (err, data) => {
      if (err) { reject(err); }
      resolve(data);
    });
  });
}
And add then update the following variable:
const DEFAULT_TARGET_GROUP_ARN = 'UPDATE_ME';
const LOAD_BALANCER_ARN = 'UPDATE_ME';
Get open port
Before we can create a new Listener, we need to find an open port on the Application Load Balancer to add it to. So, import the getPort function that we created before:
const port = require('./listener').getPort;
Update the promise chain:
// main

return ensureAuthenticated()
.then((data) => {
  console.log(`Welcome ${data.User.UserName}!`);
  return addTargetGroup('users', '3000', '/users/ping');
})
.then((res) => {
  USERS_TARGET_GROUP_ARN = res.TargetGroups[0].TargetGroupArn;
  console.log('Target Group Added!');
  return addTargetGroup('movies', '3000', '/movies/ping');
})
.then((res) => {
  MOVIES_TARGET_GROUP_ARN = res.TargetGroups[0].TargetGroupArn;
  console.log('Target Group Added!');
  return addTargetGroup('web', '9000', '/');
})
.then((res) => {
  WEB_TARGET_GROUP_ARN = res.TargetGroups[0].TargetGroupArn;
  console.log('Target Group Added!');
  return addListener(MAX_PORT);
})
.then((res) => {
  LISTENER_ARN = res.Listeners[0].ListenerArn;
  console.log(`Listener added on port ${res.Listeners[0].Port}!`);
})
.catch((err) => { console.log(err); });
Be sure to add let LISTENER_ARN; to the top as well.
Add rules
Finally, add some rules to the Listener:
function addRule(targetGroup, pattern, listener, priority) {
  return new Promise((resolve, reject) => {
    var params = {
      Actions: [
        {
          TargetGroupArn: targetGroup,
          Type: 'forward'
        }
     ],
     Conditions: [
      {
        Field: 'path-pattern',
        Values: [pattern]
      }
     ],
     ListenerArn: listener,
     Priority: priority
    };
    elbv2.createRule(params, (err, data) => {
      if (err) { reject(err); }
      resolve(data);
    });
  });
}
Update the promise chain again:
// main

return ensureAuthenticated()
.then((data) => {
  console.log(`Welcome ${data.User.UserName}!`);
  return addTargetGroup('users', '3000', '/users/ping');
})
.then((res) => {
  USERS_TARGET_GROUP_ARN = res.TargetGroups[0].TargetGroupArn;
  console.log('Target Group Added!');
  return addTargetGroup('movies', '3000', '/movies/ping');
})
.then((res) => {
  MOVIES_TARGET_GROUP_ARN = res.TargetGroups[0].TargetGroupArn;
  console.log('Target Group Added!');
  return addTargetGroup('web', '9000', '/');
})
.then((res) => {
  WEB_TARGET_GROUP_ARN = res.TargetGroups[0].TargetGroupArn;
  console.log('Target Group Added!');
  return port();
})
.then((port) => {
  return addListener(port);
})
.then((res) => {
  LISTENER_ARN = res.Listeners[0].ListenerArn;
  console.log(`Listener added on port ${res.Listeners[0].Port}!`);
  return addRule(USERS_TARGET_GROUP_ARN, '/users*', LISTENER_ARN, 1);
})
.then((res) => {
  console.log('Rule Added!');
  return addRule(MOVIES_TARGET_GROUP_ARN, '/movies*', LISTENER_ARN, 2);
})
.then((res) => {
  console.log('Rule Added!');
  return addRule(MOVIES_TARGET_GROUP_ARN, '/docs*', LISTENER_ARN, 3);
})
.then((res) => {
  console.log('Rule Added!');
  return addRule(WEB_TARGET_GROUP_ARN, '/*', LISTENER_ARN, 4);
})
.then((res) => {
  console.log('Rule Added!');
})
.catch((err) => { console.log(err); });
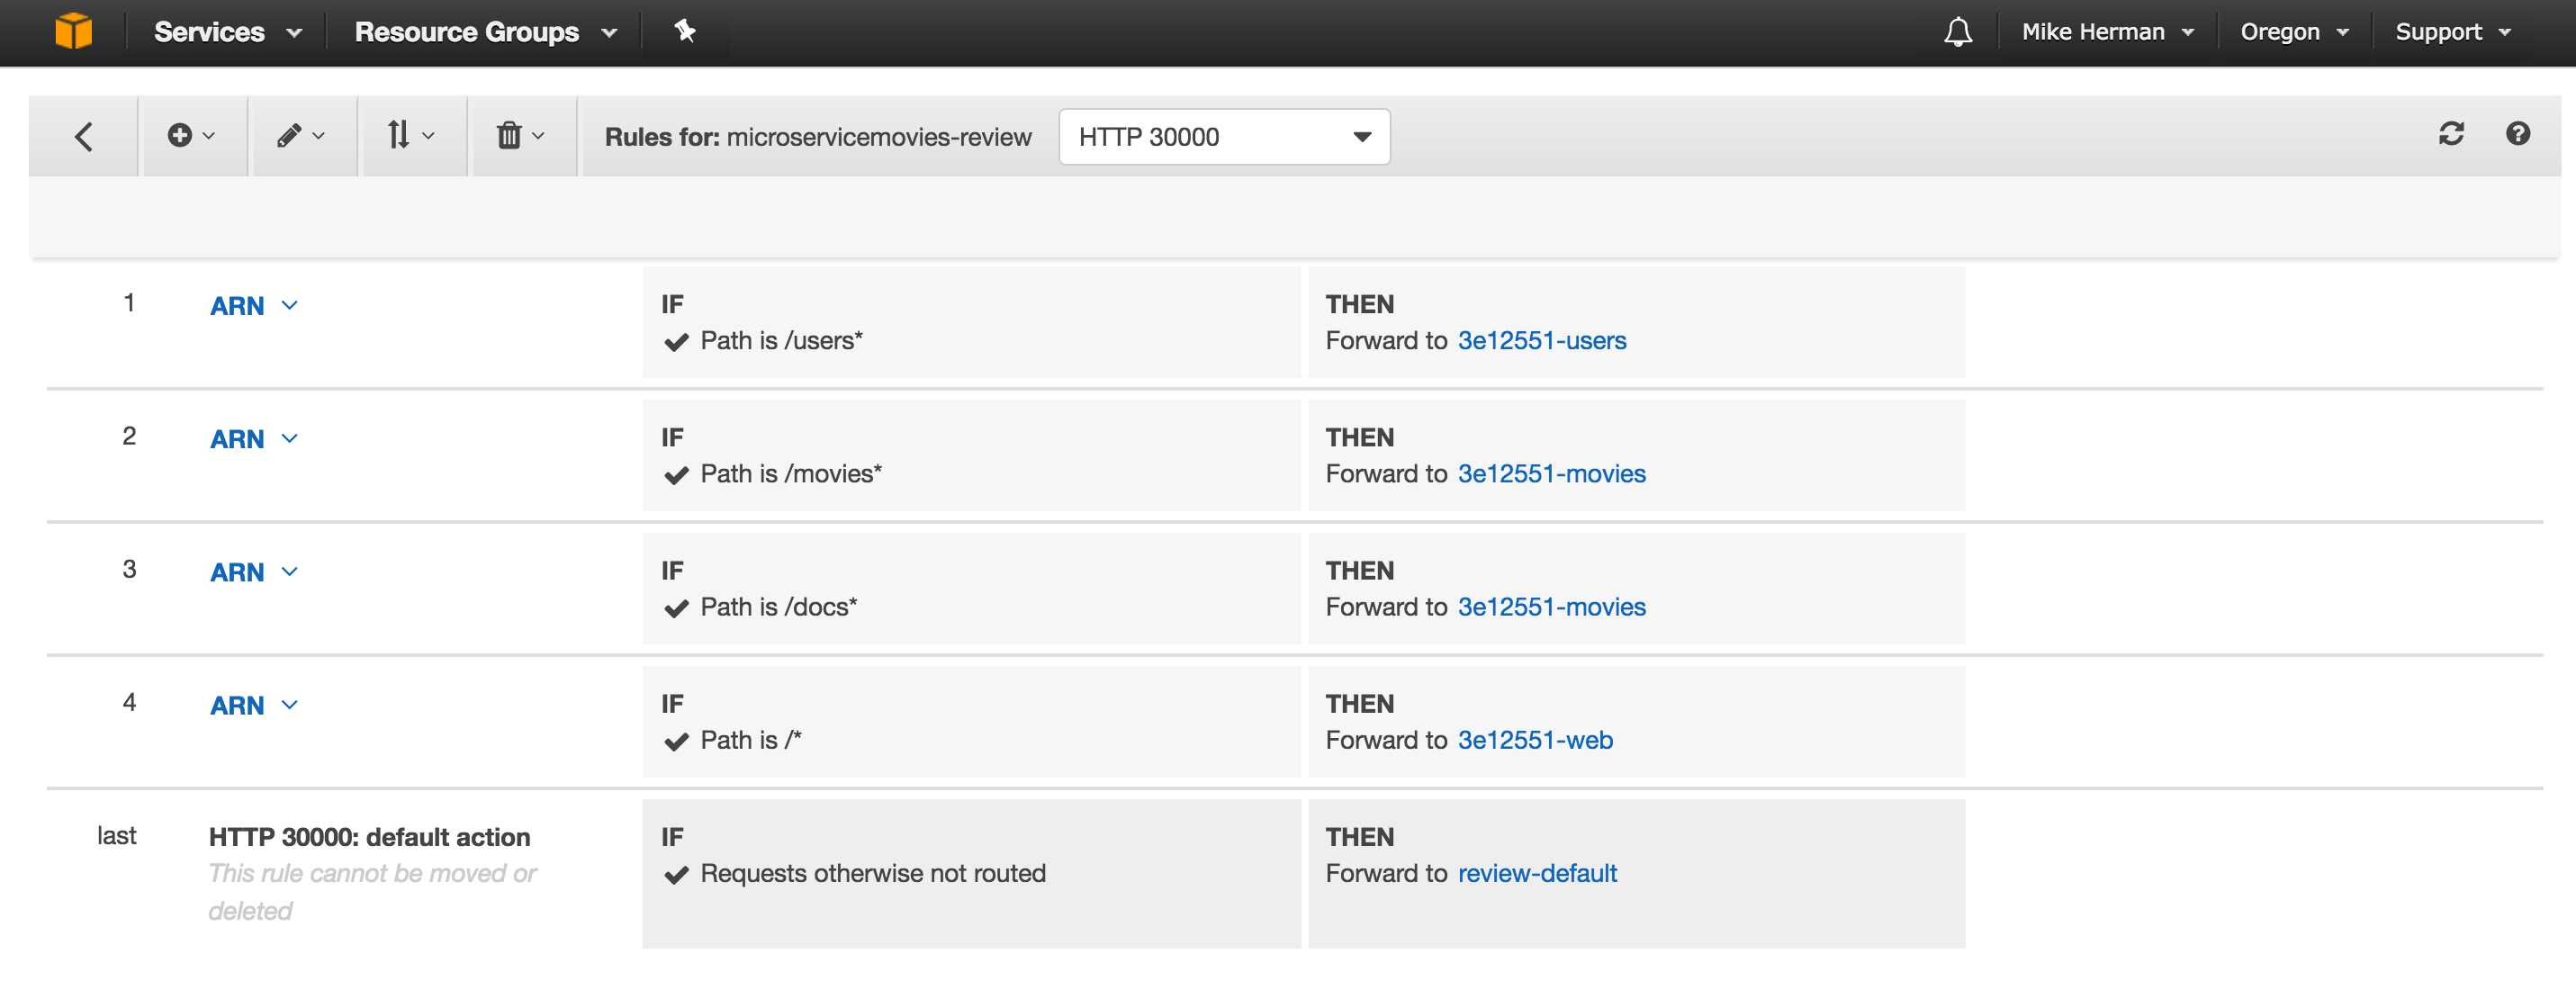
Commit and push your changes. After the build passes, make sure the Listener was added to the Application Load Balancer:

Also, make sure the Listener has four Rules:
(6) Create a new Service
A Service is used to spin up and run a number of Tasks within the ECS Cluster. Since we’ve already pre-configured the Cluster and assigned EC2 instances to it, we can simply create a new Service that uses the Cluster resources.
Start by adding a new file called services.js to “ecs/scripts”:
const AWS = require('aws-sdk');


// globals

const AWS_ACCOUNT_ID = process.env.AWS_ACCOUNT_ID;
const AWS_ACCESS_KEY_ID = process.env.AWS_ACCESS_KEY_ID;
const AWS_SECRET_ACCESS_KEY = process.env.AWS_SECRET_ACCESS_KEY;
const AWS_USERNAME = process.env.AWS_USERNAME;
const AWS_CONFIG_REGION = 'us-west-2';
const SHORT_GIT_HASH = process.env.CIRCLE_SHA1.substring(0, 7);


// config

AWS.config = new AWS.Config();
AWS.config.accessKeyId = AWS_ACCESS_KEY_ID;
AWS.config.secretAccessKey = AWS_SECRET_ACCESS_KEY;
AWS.config.region = AWS_CONFIG_REGION;


// init aws services

const ecs = new AWS.ECS();
const iam = new AWS.IAM();


// methods

function ensureAuthenticated() {
  return new Promise((resolve, reject) => {
    const params = { UserName: AWS_USERNAME };
    iam.getUser(params, (err, data) => {
      if (err) { reject(err); }
      resolve(data);
    });
  });
}

function addService(service) {
  return new Promise((resolve, reject) => {
    const params = service;
    ecs.createService(params, (err, data) => {
      if (err) { reject(err); }
      resolve(data);
    });
  });
}

// main

return ensureAuthenticated()
.then((data) => {
  console.log(`Welcome ${data.User.UserName}!`);
})
.catch((err) => { console.log(err); });
Next, add a new directory to “ecs” called “services”, and then add the following files:
- users-review_service.js
- movies-review_service.js
- web-review_service.js
Users - users-review_service.js
function createUsersService(cluster, name, targetGroup) {
  const params = {
    cluster: cluster,
    serviceName: name,
    taskDefinition: 'microservicemovies-review-users-td',
    loadBalancers: [
      {
        targetGroupArn: targetGroup,
        containerName: "users-service-review",
        containerPort: 3000
      }
    ],
    desiredCount: 1,
    role: "ecsServiceRole"
  };
  return params;
}

module.exports = {
  createUsersService
};
Movies - movies-review_service.js
function createMoviesService(cluster, name, targetGroup) {
  const params = {
    cluster: cluster,
    serviceName: name,
    taskDefinition: 'microservicemovies-review-movies-td',
    loadBalancers: [
      {
        targetGroupArn: targetGroup,
        containerName: "movies-service-review",
        containerPort: 3000
      }
    ],
    desiredCount: 1,
    role: "ecsServiceRole"
  };
  return params;
}

module.exports = {
  createMoviesService
};
Web - web-review_service.js
function createWebService(cluster, name, targetGroup) {
  const params = {
    cluster: cluster,
    serviceName: name,
    taskDefinition: 'microservicemovies-review-web-td',
    loadBalancers: [
      {
        targetGroupArn: targetGroup,
        containerName: "web-service-review",
        containerPort: 9000
      }
    ],
    desiredCount: 1,
    role: "ecsServiceRole"
  };
  return params;
}

module.exports = {
  createWebService
};
Update services.js:
const AWS = require('aws-sdk');

const createUsersService = require('../services/users-review_service').createUsersService;
const createMoviesService = require('../services/movies-review_service').createMoviesService;
const createWebService = require('../services/web-review_service').createWebService;


// globals

const AWS_ACCOUNT_ID = process.env.AWS_ACCOUNT_ID;
const AWS_ACCESS_KEY_ID = process.env.AWS_ACCESS_KEY_ID;
const AWS_SECRET_ACCESS_KEY = process.env.AWS_SECRET_ACCESS_KEY;
const AWS_USERNAME = process.env.AWS_USERNAME;
const AWS_CONFIG_REGION = 'us-west-2';
const SHORT_GIT_HASH = process.env.CIRCLE_SHA1.substring(0, 7);
const LOAD_BALANCER_ARN = 'arn:aws:elasticloadbalancing:us-west-2:046505967931:loadbalancer/app/microservicemovies-review/493be740ee6aea54';
const CLUSTER_NAME = 'microservicemovies-review';

let USERS_TARGET_GROUP_ARN;
let MOVIES_TARGET_GROUP_ARN;
let WEB_TARGET_GROUP_ARN;


// config

AWS.config = new AWS.Config();
AWS.config.accessKeyId = AWS_ACCESS_KEY_ID;
AWS.config.secretAccessKey = AWS_SECRET_ACCESS_KEY;
AWS.config.region = AWS_CONFIG_REGION;


// init aws services

const ecs = new AWS.ECS();
const iam = new AWS.IAM();
const elbv2 = new AWS.ELBv2();


// methods

function ensureAuthenticated() {
  return new Promise((resolve, reject) => {
    const params = { UserName: AWS_USERNAME };
    iam.getUser(params, (err, data) => {
      if (err) { reject(err); }
      resolve(data);
    });
  });
}

function addService(service) {
  return new Promise((resolve, reject) => {
    const params = service;
    ecs.createService(params, (err, data) => {
      if (err) { reject(err); }
      resolve(data);
    });
  });
}

function getTargetGroups() {
  return new Promise((resolve, reject) => {
    var params = {
      LoadBalancerArn: LOAD_BALANCER_ARN
    };
    elbv2.describeTargetGroups(params, (err, data) => {
      if (err) { reject(err); }
      resolve(data);
    });
  });
}


// main

return ensureAuthenticated()
.then((data) => {
  console.log(`Welcome ${data.User.UserName}!`);
  return getTargetGroups();
})
.then((res) => {
  const groups = res.TargetGroups.filter((group) => {
    return group.TargetGroupName.includes(SHORT_GIT_HASH);
  });
  for (const group of groups) {
    if (group.TargetGroupName.includes('users')) {
      USERS_TARGET_GROUP_ARN = group.TargetGroupArn;
    }
    if (group.TargetGroupName.includes('movies')) {
      MOVIES_TARGET_GROUP_ARN = group.TargetGroupArn;
    }
    if (group.TargetGroupName.includes('web')) {
      WEB_TARGET_GROUP_ARN = group.TargetGroupArn;
    }
  }
  const userServiceParams = createUsersService(
    CLUSTER_NAME, `${SHORT_GIT_HASH}-users`, USERS_TARGET_GROUP_ARN);
  return addService(userServiceParams);
})
.then((res) => {
  console.log('Service Added!');
  const moviesServiceParams = createMoviesService(
    CLUSTER_NAME, `${SHORT_GIT_HASH}-movies`, MOVIES_TARGET_GROUP_ARN);
  return addService(moviesServiceParams);
})
.then((res) => {
  console.log('Service Added!');
  const webServiceParams = createWebService(
    CLUSTER_NAME, `${SHORT_GIT_HASH}-web`, WEB_TARGET_GROUP_ARN);
  return addService(webServiceParams);
})
.then((res) => {
  console.log('Service Added!');
})
.catch((err) => { console.log(err); });
Update the Deploy command in .circle/config.yml:
- run:
    name: Deploy
    command: |
      npm install
      node ecs/scripts/setup.js
      sh ecs/scripts/ecr.sh
      node ecs/scripts/tasks.js
      node ecs/scripts/alb.js
      node ecs/scripts/services.js
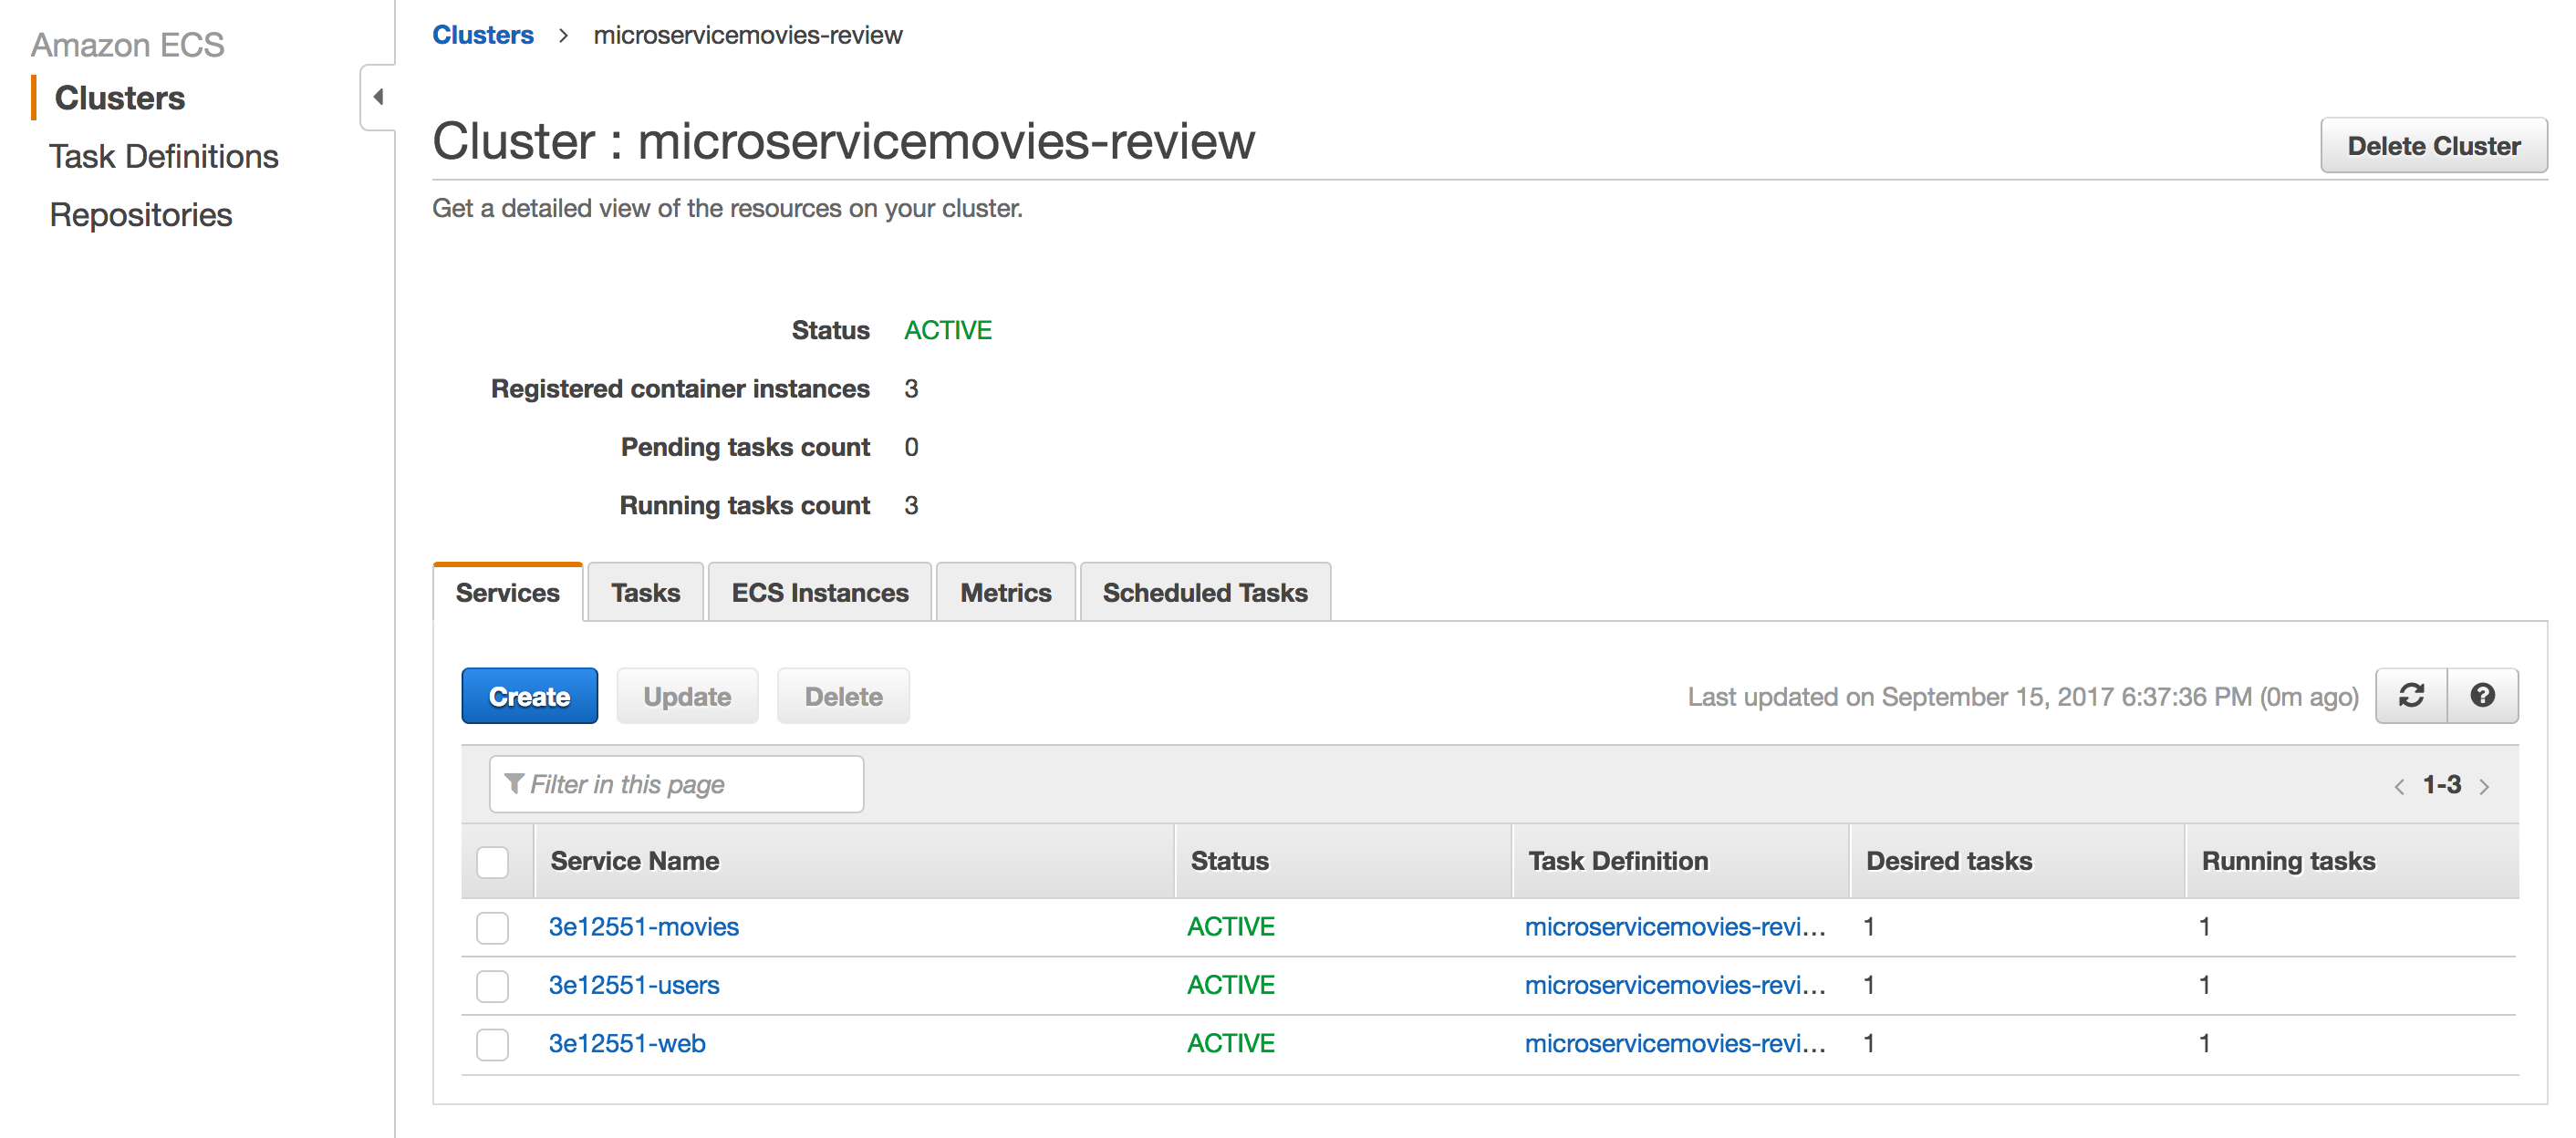
Again, commit and push to GitHub, and then ensure:
- The Circle build passes
- The Services were created on the
microservicemovies-reviewCluster - Each Service has a running Task associated with it
- Three Target Groups were created, each with health targets
- A Listener was added to the Application Load Balancer with four Rules
- Logs were added to CloudWatch
- The following endpoints work-
- http://LOAD_BALANCER_DNS:LISTENER_PORT
- http://LOAD_BALANCER_DNS:LISTENER_PORT/users/ping
- http://LOAD_BALANCER_DNS:LISTENER_PORT/movies/ping
Testing
To run the end-to-end tests, first change each of the URLs in tests/sample.test.js from http://localhost:3007 to http://LOAD_BALANCER_DNS:LISTENER_PORT, and then run the tests locally:
$ testcafe firefox tests/**/*.js
They should pass.
Teardown
Next, let’s add a script to handle the tearing down of the AWS resources after testing is complete.
Main Steps:
- Remove Listener
- Remove Target Groups
- Remove Services
Start by adding a new script called teardown.js to “ecs/scripts”.
(1) Remove Listener
const AWS = require('aws-sdk');


// globals

const AWS_ACCOUNT_ID = process.env.AWS_ACCOUNT_ID;
const AWS_ACCESS_KEY_ID = process.env.AWS_ACCESS_KEY_ID;
const AWS_SECRET_ACCESS_KEY = process.env.AWS_SECRET_ACCESS_KEY;
const AWS_USERNAME = process.env.AWS_USERNAME;
const AWS_CONFIG_REGION = 'us-west-2';
const LOAD_BALANCER_ARN = 'UPDATE_ME';

const ARGS = process.argv.slice(2);
const USAGE_MESSAGE = '\nusage:\n  teardown.js LISTENER_PORT COMMIT_SHA\n';

if (!ARGS[0] || !ARGS[1]) {
  console.log(USAGE_MESSAGE);
  return;
}

const SHORT_GIT_HASH = ARGS[1].substring(0, 7);


// config

AWS.config = new AWS.Config();
AWS.config.accessKeyId = AWS_ACCESS_KEY_ID;
AWS.config.secretAccessKey = AWS_SECRET_ACCESS_KEY;
AWS.config.region = AWS_CONFIG_REGION;


// init aws services

const iam = new AWS.IAM();
const elbv2 = new AWS.ELBv2();


// methods

function ensureAuthenticated() {
  return new Promise((resolve, reject) => {
    const params = { UserName: AWS_USERNAME };
    iam.getUser(params, (err, data) => {
      if (err) { reject(err); }
      resolve(data);
    });
  });
}

function getListeners() {
  return new Promise((resolve, reject) => {
    var params = {
      LoadBalancerArn: LOAD_BALANCER_ARN
    };
    elbv2.describeListeners(params, (err, data) => {
      if (err) { reject(err); }
      resolve(data);
    });
  });
}

function removeListener(listener) {
  return new Promise((resolve, reject) => {
    var params = {
      ListenerArn: listener
    };
    elbv2.deleteListener(params, (err, data) => {
      if (err) { reject(err); }
      resolve(data);
    });
  });
}


// main

return ensureAuthenticated()
.then((data) => {
  console.log(`Welcome ${data.User.UserName}!`);
  return getListeners();
})
.then((res) => {
  const listener = res.Listeners.filter((listener) => {
    return parseInt(listener.Port) === parseInt(ARGS[0]);
  })[0];
  if (!listener) {
    throw new Error('Listener does not exist.');
  }
  return removeListener(listener.ListenerArn);
})
.then((res) => {
  console.log('Listener Removed!');
})
.catch((err) => { console.log(err); });
Here, we grabbed all Listeners in getListeners and then filtered them by the provided listener port. From there, we deleted the listener. Be sure to update LOAD_BALANCER_ARN before continuing.
Test this out:
$ node ecs/scripts/teardown.js LISTENER_PORT COMMIT_SHA
(2) Remove Target Groups
Add the following two functions to teardown.js:
function getTargetGroups() {
  return new Promise((resolve, reject) => {
    var params = {};
    elbv2.describeTargetGroups(params, (err, data) => {
      if (err) { reject(err); }
      resolve(data);
    });
  });
}

function removeTargetGroup(targetgroup) {
  return new Promise((resolve, reject) => {
    var params = { TargetGroupArn: targetgroup };
    elbv2.deleteTargetGroup(params, (err, data) => {
      if (err) { reject(err); }
      resolve(data);
    });
  });
}
Then update the promise chain:
// main

return ensureAuthenticated()
.then((data) => {
  console.log(`Welcome ${data.User.UserName}!`);
  return getListeners();
})
.then((res) => {
  const listener = res.Listeners.filter((listener) => {
    return parseInt(listener.Port) === parseInt(ARGS[0]);
  })[0];
  if (!listener) {
    throw new Error('Listener does not exist.');
  }
  return removeListener(listener.ListenerArn);
})
.then((res) => {
  console.log('Listener Removed!');
  return getTargetGroups();
})
.then((res) => {
  const targets = res.TargetGroups.filter((group) => {
    return group.TargetGroupName.includes(SHORT_GIT_HASH);
  });
  if (!targets.length) {
    throw new Error('Targets do not exist.');
  }
  const promises = targets.map((target) => {
    return removeTargetGroup(target.TargetGroupArn);
  });
  return Promise.all(promises);
})
.then(() => {
  console.log('Target Groups Removed!');
})
.catch((err) => { console.log(err); });
(3) Remove Services
Finally, add the following functions to remove the Services:
function updateServiceCount(serviceName) {
  return new Promise((resolve, reject) => {
    var params = {
      service: serviceName,
      desiredCount: 0,
      cluster: CLUSTER_NAME
    };
    ecs.updateService(params, (err, data) => {
      if (err) { reject(err); }
      resolve(data);
    });
  });
}

function removeService(serviceName) {
  return new Promise((resolve, reject) => {
    var params = {
      service: serviceName,
      cluster: CLUSTER_NAME
    };
    ecs.deleteService(params, (err, data) => {
      if (err) { reject(err); }
      resolve(data);
    });
  });
}
Add the variables to the top:
const CLUSTER_NAME = 'microservicemovies-review';
const ecs = new AWS.ECS();
Then, update the promise chain:
// main

return ensureAuthenticated()
.then((data) => {
  console.log(`Welcome ${data.User.UserName}!`);
  return getListeners();
})
.then((res) => {
  const listener = res.Listeners.filter((listener) => {
    return parseInt(listener.Port) === parseInt(ARGS[0]);
  })[0];
  if (!listener) {
    throw new Error('Listener does not exist.');
  }
  return removeListener(listener.ListenerArn);
})
.then((res) => {
  console.log('Listener Removed!');
  return getTargetGroups();
})
.then((res) => {
  const targets = res.TargetGroups.filter((group) => {
    return group.TargetGroupName.includes(SHORT_GIT_HASH);
  });
  if (!targets.length) {
    throw new Error('Targets do not exist.');
  }
  const promises = targets.map((target) => {
    return removeTargetGroup(target.TargetGroupArn);
  });
  return Promise.all(promises);
})
.then(() => {
  console.log('Target Groups Removed!');
  return updateServiceCount(`${SHORT_GIT_HASH}-users`);
})
.then(() => {
  console.log('Service Updated!');
  return removeService(`${SHORT_GIT_HASH}-users`);
})
.then(() => {
  console.log('Service Removed!');
  return updateServiceCount(`${SHORT_GIT_HASH}-movies`);
})
.then(() => {
  console.log('Service Updated!');
  return removeService(`${SHORT_GIT_HASH}-movies`);
})
.then((res) => {
  console.log('Service Removed!');
  return updateServiceCount(`${SHORT_GIT_HASH}-web`);
})
.then((res) => {
  console.log('Service Updated!');
  return removeService(`${SHORT_GIT_HASH}-web`);
})
.then((res) => {
  console.log('Service removed!');
})
.catch((err) => { console.log(err); });
Test it out again:
$ node ecs/scripts/teardown.js LISTENER_PORT COMMIT_SHA
You should see:
Welcome AWS_USERNAME!
Listener Removed!
Target Groups Removed!
Service Updated!
Service Removed!
Service Updated!
Service Removed!
Service Updated!
Service removed!
Make sure all associated AWS Resources were removed as well.
Conclusion and Next Steps
That’s it!
Development Workflow
Let’s quickly review the development workflow…
- Local development
- Create a new feature branch from the master branch
- Make code changes
- Commit and push code to GitHub
- Continuous integration
- Open a new PR against the development branch
- A new build is then triggered on Circle CI
- If the build passes, manually merge the PR
- A new build is triggered again on Circle CI
- If the build passes, deployment occurs…
- Deployment on AWS via deployment scripts
- Testing
- Update then run the end-to-end tests
- Teardown
- Run the teardown script
What’s next?
Did you test out the Swagger docs? They don’t work. What’s happening? Fix this on your own.
Developers will inevitably forget to run the teardown script. Configure an AWS Lambda function to run nightly to tear down all AWS resources associated with the on-demand test environments.
Add Vault and Consul into the mix to handle secrets and environment variables.
Grab the final code from the v4 tag of the microservice-movies repo. Please add questions and/or comments below. Cheers!