Node Twitter Sentiment - Part 2
This is for the Node-js-Denver-Boulder Meetup <3 Cheers!
Miss part 1? Check it out here.
Contents
Let’s begin…
Before adding additional functionality to the Node Twitter Sentiment Analysis application, we need to refactor the code. Frankly, there are some mistakes that were made on purpose to highlight an issue that many new developers overlook when first working with Node.
Remember this function from index.js in the routes folder:
exports.search = function(req, res) {
  // grab the request from the client
  var choices = JSON.parse(req.body.choices);
  // grab the current date
  var today = new Date();
  // establish the twitter config (grab your keys at dev.twitter.com)
  var twitter = new twit({
    consumer_key: config.consumer_key,
    consumer_secret: config.consumer_secret,
    access_token: config.access_token,
    access_token_secret: config.access_token_secret
  });
  // set highest score
  var highestScore = -Infinity;
  // set highest choice
  var highestChoice = null;
  // create new array
  var array = [];
  // set score
  var score = 0;
  console.log("----------")

  // iterate through the choices array from the request
  for(var i = 0; i < choices.length; i++) {
    (function(i) {
    // add choice to new array
    array.push(choices[i])
    // grad 20 tweets from today
    twitter.get('search/tweets', {q: '' + choices[i] + ' since:' + today.getFullYear() + '-' +
      (today.getMonth() + 1) + '-' + today.getDate(), count:20}, function(err, data) {
        // perform sentiment analysis (see below)
        score = performAnalysis(data['statuses']);
        console.log("score:", score)
        console.log("choice:", choices[i])
        //  determine winner
        if(score > highestScore) {
          highestScore = score;
          highestChoice = choices[i];
          console.log("winner:",choices[i])
        }
        console.log("")
      });
    })(i)
  }
  // send response back to the server side; why the need for the timeout?
  setTimeout(function() { res.end(JSON.stringify({'score': highestScore, 'choice': highestChoice})) }, 5000);
};
Essentially we’re grabbing the user inputted data, pulling tweets based on the inputs, and then calculating the sentiment of those tweets. The timeout is necessary because of how Node works. Because Node is asynchronous, functions do not block other functions from running. Without the 5 second time-out, the next function will append the results to the DOM without waiting for the function to finish running. Essentially, nothing is appended. Make sense?
Put another way, when functions run that are blocking, they wait there for the result to come back before another function fires. Node, on the other hand, will continue executing the code that comes after it (because it’s functions are non-blocking(, then jump back when the result is available.
So, why won’t a timeout work then?
Again, the code has a function that sends the results in 5 seconds, regardless as to the execution state of the call to twitter. What happens though, if we run the program without a network connection? Or if Twitter is down? Or if we pulled in 10,000 tweets instead of 20?
It’s still going to return results after 5 seconds. This is not what we want, obviously. So, how do we fix it? There’s a number of different methods, none of which fully solve it in an elegant manner. In this post, we’ll look at:
| Method | URL | Library |
|---|---|---|
| Async | node-twitter-sentiment-async | https://github.com/caolan/async |
| Promises | node-twitter-sentiment-promises | </td>https://github.com/kriskowal/q |
| Generators | n/a | n/a |
| IcedCoffeeScript | n/a | https://github.com/maxtaco/coffee-script |
Async
Thanks to Manish Vachharajani for developing the code for this example.
One solution is to use the Async. This is often the go-to solution, since the syntax is simple, it’s totally straightforward, and it uses call backs. In fact, in order to use Async, you must follow the convention of providing the callback as the last argument of the Async function. Thus, for users used to callbacks, this is an extremely easy solution.
Basics
Start by installing the package:
$ npm install async
In our code we will be using the map() helper method, which takes an array, a filter function, and a callback. The filter function is an async function that takes a callback.
Simple example:
var async = require('async');

var names = ["michael", "richard", "john", "jennifer", "ben", "julie"];

async.map(names, getInfo, function (err, result) {
  if(!err) {
    console.log('Finished: ' + result);
  } else {
    console.log('Error: ' + err);
  }
});

function getInfo(name, callback) {
  setTimeout(function() {
    callback(null, name.toUpperCase());
  }, 1000);
}
Basically, we have an array of names, in lower case, which we are converted to uppercase, then outputted via a console.log. Let’s say that another function depended on the results of getInfo. Well, if getInfo was long-running, then the other function could fire before getInfo returned the results. Thus, the need to suspend the function until the results are returned.
Update Node-Twitter-Sentiment
We just need to update the index.js file in the “routes” folder:
"use strict";

var path = require("path");
var twit = require('twit');
var sentimental = require('Sentimental');
var config = require("../config");
var async = require('async');

exports.index = function(req, res){
  res.render('index', { title: "Twit-Decision"});
};

exports.ping = function(req, res){
  res.send("pong!", 200);
};

exports.search = function(req, res) {
  // grab the request from the client
  var choices = JSON.parse(req.body.choices);
  // grab the current date
  var today = new Date();
  // establish the twitter config (grab your keys at dev.twitter.com)
  var twitter = new twit({
    consumer_key: config.consumer_key,
    consumer_secret: config.consumer_secret,
    access_token: config.access_token,
    access_token_secret: config.access_token_secret
  });
  console.log("----------")

  // grade 20 tweets from today with keyword choice and call callback
  // when done
  function getAndScoreTweets(choice, callback) {
    twitter.get('search/tweets', {q: '' + choice + ' since:' + today.getFullYear() + '-' +
      (today.getMonth() + 1) + '-' + today.getDate(), count:20}, function(err, data) {
        // perform sentiment analysis (see below)
      if(err) {
        console.log(err);
        callback(err.message, undefined);
        return;
      }
      var score = performAnalysis(data['statuses']);
      console.log("score:", score)
      console.log("choice:", choice)
      callback(null, score);
    });
  }
  //Grade tweets for each choice in parallel and compute winner when
  //all scores are collected
  async.map(choices, getAndScoreTweets, function(err, scores) {
    if(err) {
      console.log("Unable to score all tweets");
      res.end(JSON.stringify(err));
    }
    var highestChoice = choices[0];
    var highestScore = scores.reduce(function(prev, cur, index) {
      if(prev < cur) {
        highestChoice = choices[index];
        return cur;
      } else {
        return prev;
      }
    });
    res.end(JSON.stringify({'score': highestScore, 'choice': highestChoice}));
  });
}

function performAnalysis(tweetSet) {
  //set a results variable
  var results = 0;
  // iterate through the tweets, pulling the text, retweet count, and favorite count
  for(var i = 0; i < tweetSet.length; i++) {
    var tweet = tweetSet[i]['text'];
    var retweets = tweetSet[i]['retweet_count'];
    var favorites = tweetSet[i]['favorite_count'];
    // remove the hashtag from the tweet text
    tweet = tweet.replace('#', '');
    // perform sentiment on the text
    var score = sentimental.analyze(tweet)['score'];
    // calculate score
    results += score;
    if(score > 0){
      if(retweets > 0) {
        results += (Math.log(retweets)/Math.log(2));
      }
      if(favorites > 0) {
        results += (Math.log(favorites)/Math.log(2));
      }
    }
    else if(score < 0){
      if(retweets > 0) {
        results -= (Math.log(retweets)/Math.log(2));
      }
      if(favorites > 0) {
        results -= (Math.log(favorites)/Math.log(2));
      }
    }
    else {
      results += 0;
    }
  }
  // return score
  results = results / tweetSet.length;
  return results
}
What’s going on?
Let’s look at the specific changes:
// grade 20 tweets from today with keyword choice and call callback
// when done
function getAndScoreTweets(choice, callback) {
  twitter.get('search/tweets', {q: '' + choice + ' since:' + today.getFullYear() + '-' +
    (today.getMonth() + 1) + '-' + today.getDate(), count:20}, function(err, data) {
      // perform sentiment analysis (see below)
    if(err) {
      console.log(err);
      callback(err.message, undefined);
      return;
    }
    var score = performAnalysis(data['statuses']);
    console.log("score:", score)
    console.log("choice:", choice)
    callback(null, score);
  });
}
//Grade tweets for each choice in parallel and compute winner when
//all scores are collected
async.map(choices, getAndScoreTweets, function(err, scores) {
  if(err) {
    console.log("Unable to score all tweets");
    res.end(JSON.stringify(err));
  }
  var highestChoice = choices[0];
  var highestScore = scores.reduce(function(prev, cur, index) {
    if(prev < cur) {
      highestChoice = choices[index];
      return cur;
    } else {
      return prev;
    }
  });
  res.end(JSON.stringify({'score': highestScore, 'choice': highestChoice}));
});
We pass in the choices array, the getAndScoreTweets() function (which handles the calculating of sentiment), then the results are serialized and sent back to the client. async.map() suspends the getAndScoreTweets() function until it’s done running. Thus, the results are not sent back to the client until Sentiment is done.
Further, async.map() allows you to do a long delay operation on each array element because of the fact that the mapped function must call “callback” - which happens in the getInfo() function.
Simple, right?
Check out the final code here: https://github.com/mjhea0/node-twitter-sentiment-async
Promises
Thanks to Richard Lucas for developing the code and writing the following explanation.
Promises are not the easiest JavaScript concept to wrap your head around, so do not feel bad if this concept takes time to understand. It certainly has taken a lot of time for myself, and I still get caught up and confused in using some of the methods. In this example, I tried to just use a simple (and hopefully easy to understand) pattern of deferreds using the Q promise library. You may also have experience with jQuery deferreds via the $.Deferred object. They are very similar.
What are promises (from the Q documentation)
If a function cannot return a value or throw an exception without blocking, it can return a promise instead. A promise is an object that represents the return value or the thrown exception that the function may eventually provide. A promise can also be used as a proxy for a remote object to overcome latency.
Here are some great resources for learning more about promises
- Promises A+ Spec
- Q Library
- Promisesjs.org - Great introduction
- Promises by Nodeschool.io
- Javascript Promises in Wicked Detail
- Promises in Node.js
- Using Promises with Q
- Using jQuery Deferreds - Book from O’Reilly
Pattern used
Here the deferred pattern was used, which goes something like this:
var promise = function(err, result) {
  var deferred = Q.defer();
  if (err) {
    deferred.reject(new Error(err));
  } else {
    deferred.resolve(result);
  }
  return deferred.promise;
}
You then go on to using the then and done methods:
promise.then(function(data) {
  return doSomething(data);
}).done(function(data) {
  return finishSomething(data);
});
How they were implemented
var searchTweets = function(choice) {
  var deferred = Q.defer(), // declare the deferred
     ...

  twitter.get('search/tweets',
  {
    q: '' + choice + ' since:' + dateString,
    count: 20
  }, function(err, data) {
      if (err) {
        deferred.reject(new Error(err)); //reject it in the callback
      } else {
        ...
        choiceData['choice'] = choice;
        choiceData['score'] = score;
        deferred.resolve(choiceData); //resolve it in the callback
      }
      console.log("");
    });
  return deferred.promise; //return the promise object
};
The search function. Note the promise chain:
exports.search = function(req, res) {
  var choices = JSON.parse(req.body.choices),
      choiceArray = [];

  var promise = function(choices) {
    var deferred = Q.defer();
    choices.forEach(function(choice, index) {
      searchTweets(choice)
        .fail(function(error) {
          throw new Error(error);
        })
        .done(function(data) {
          choiceArray.push(data);
          if (choiceArray.length === choices.length) {
            deferred.resolve(choiceArray);
          }
        });
    });
    return deferred.promise;
  };

  promise(choices).then(function(data) {
      return scoreCompare(data);
    }).done(function(result) {
      console.log('final_result', result);
      res.send(result);
    });

};
Have Fun!
Generators
Generators are the new kid on the block, but they look the most promising. Essentially, they make it easy to suspend/pause a function then resume it with the yield function.
Make sure you are using a browser that supports ES6: http://kangax.github.io/es5-compat-table/es6/#Generators_(yield). I personally use Chrome Canary, with experimental Javascript enabled: “chrome://flags/#enable-javascript-harmony”.
… also …
As of Node v0.11.3, you must use the
--harmony_generatorsflag for running applications that contain generator examples in order to enable ES6 experimental features - e.g.,node --harmony_generators app.js.
Let’s look at a quick example.
Example
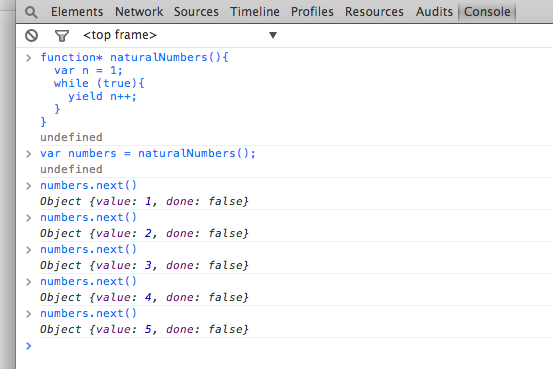
Open the Javascript console, then enter this generator function:
function* naturalNumbers(){
  var n = 1;
  while (true){
    yield n++;
  }
}
Next, you can call the function with this line:
var numbers = naturalNumbers();
Finally, you can generate an object with the returned values by calling numbers.next()
So, how do we add this to our Sentiment project? I’m not sure. :)
IcedCoffeeScript
Example
et = require 'errTo'
{get} = require 'request'
fn = (done) ->
  await get 'http://foo.com', et done, defer resp, body
  await get 'http://bar.com', et done, defer resp, body
  do done
await fn defer err
throw err if err
So, how do we ad this to our Sentiment project? I’m not sure. :)
Data Binding
This isn’t a method of handling the non-blocking function issue, but it instead shows how easily update the front end. We are using Async again to address the function issue. Check out the code here.
Thanks to Aaron Vandrey for developing the code and writing the following explanation.
Although there are a number of front-end MV* frameworks that could be used, we chose the KnockoutJS data binding library for simplicity. KnockoutJS uses “observables” to enable two-way data binding from the View (HTML) back to the View-model (JavaScript).
From [10 things to know about KnockoutJS on day one])http://www.knockmeout.net/2011/06/10-things-to-know-about-knockoutjs-on.html)”:
Observables are functions. The actual value and subscribers to the observable are cached internally by the function. You set an observable’s value by passing the new value as the only argument to the function and you read the value by passing no arguments.
We can use these functions to read the values from the form directly, hide and expose DIVs and change text on the screen.
From the KnockoutJS data-binding page:
Knockout’s declarative binding system provides a concise and powerful way to link data to the UI. It’s generally easy and obvious to bind to simple data properties or to use a single binding. … A binding consists of two items, the binding name and value, separated by a colon.
Server Side Code
Views
Combining the functions in our main.js (more on this later), on the client side, with Knockout’s declarative data-binding syntax, we can set up the Jade template in the manner shown below.
In the original Jade template there are placeholder DIVs set up that we then use jQuery to interact with - to display the error messages and results. We also used jQuery to update the styles applied to the DIVs. Since we are using data binding in this example, we will go ahead and set up the DIVs for errors and results and have their HTML and styles in the DOM at all times. Then using the “visible” data binding on the DIVs we can hide and expose them as needed. In the example below we have a couple of data-bind attributes that KnockoutJS will use to handle the two-way communication from the View to the ViewModel and vise-versa.
.form-container
  form(action='', method='post', data-bind='submit: formSubmit')
    input#choice1.choice(type='text', placeholder='Choice #1...', name='choice1', data-bind='value: inputOne')
    input#choice2.choice(type='text', placeholder='Choice #2...', name='choice2', data-bind='value: inputTwo')
    input#decision.btn.btn-success.btn-lg(type='submit', value='Submit' data-bind='enable: !hasResults()')
.decision-container
  p(class='alert alert-danger' data-bind='visible: error, text: error')
  div(class='progress progress-striped active' data-bind='visible: isProcessing()')
    div(class='progress-bar progress-bar-primary' role='progressbar' aria-valuenow='100' aria-valuemin='0' aria-valuemax='100' style='width: 100%')
      span(class='sr-only')
  div(class='panel panel-lg panel-success' data-bind='visible: hasResults()')
    div(class='panel-heading')
      h3(class='panel-title') Decision Results
    div(class='panel-body')
      p(class='decision-text', data-bind='html: results')
      div(class='text-center')
        input#decision.btn.btn-success.btn-sm.text-center(type='button', value='Again?' data-bind='click: tryAgain')
In the highlighted text we can see just a few of the many data-binding possibilities.
The submit binding will handle both the “click” event of the submit button as well as a user hitting the “enter” key. In the background KnockoutJS will also perform a “preventDefault” so that the form does not attempt to submit the form to the server.
The value binding will update the ViewModel with the values entered into the text boxes. A form submit is not needed to consume these values, though in this case we are using a form submit. Alternatively we could use KnockoutJS to subscribe to the change event for these form values and begin our processing when our inputs passed validation.
The text binding will both display values in the View propagated from the ViewModel, as well and send values from the View back to the ViewModel.
The enable binding will disable the submit button when the ViewModel reports back to the View that it has results back from the Twitter Sentiment Analysis.
Client Side Code
Client Side Javascript (main.js)
The biggest difference to /public/javascripts/main.js is to create a ViewModel, and at the ViewModels closure, call KnockoutJS’s applyBindings method to enable all the two-way data binding goodness.
function ViewModel() {

    …

}
ko.applyBindings(new ViewModel());
In order to grab the two choices from the form we write a small method that will take use the KnockoutJS observable’s ‘no parameter’ signature to return the values.
self.formSubmit = function(){
    // some error handling
    if(!self.inputOne() || !self.inputTwo()){
        self.error(getError('requiredInputsError'));
    } else if(self.inputOne() === self.inputTwo()) {
        self.error(getError('sameInputError'));
    } else {
        choices.push(self.inputOne());
        choices.push(self.inputTwo());
        getDecision();
        self.error('');
        self.isProcessing(true);
    }
};
The error handling will remain the same, however in the data-binding example we set the value of our error() observable. The act of setting the value of the error observable causes it to change from being a “falsey” value to being a “truthy” value, which cause the visible data binding to also change from visible = false to visible = true. This changes the visibility of the DIV formatted for error reporting as well as set the text of the specific error we encountered.
p(class='alert alert-danger' data-bind='visible: error, text: error')
If no errors are encountered on subsequent submissions we can set up the array we need in the call to Twitter. We also blank out the error() observable that will hide the error reporting DIV and also set the isProcessing() observable to true which will expose the “processing” animation.
We finish up processing the results. This logic to this is essentially unchanged, however, it is shown here to further exemplify how values are set and retrieved in KnockoutJS.
function getDecision(){
    $.post('/search', { 'choices': JSON.stringify(choices) }, function(data) {
        choices.length = 0;
        var results = JSON.parse(data);

        self.results(RESULTS_START_HTML + results.choice + RESULTS_END_HTML + results.score);
        self.hasResults(true);
        self.isProcessing(false);
    });
}
The logic required to turn off the “processing” animation, expose the DIV formatted to successful results, and display the results are achieved by manipulating more observables. The isProcssing() observable is set to false to hide the animation, the hasResults() observable is set to true to expose the results DIV and finally, by setting the results() observable to some friendly copy we let the user know the outcome of the sentiment analysis. When writing this value out the page we use the html binding rather than the text binding so that we can inject HTML into the copy we are writing to the screen. If the text binding had been used, rather than the html binding, the HTML would have been encoded and we would have had the literal string <strong> written to the screen - which obviously is not what we want in this case.
main.js:
self.RESULTS_START_HTML = 'and the winner is ... <strong>';
self.RESULTS_END_HTML = '</strong> ... with a score of ';
index.jade:
p(class='decision-text', data-bind='html: results')
Refactor
After submitting this code it we determined that the data-binding could have been used even better by not having an error DIV and a results DIV. By taking advantage of the css binding and a KnockoutJS computed observable (an observable that can watch multiple observables and return one value) the Bootstrap class could have easily been changed from danger to success and the title and copy changed using existing observables.
Here shouldShowMessages is a computed observable that will return true if either we have an error or if we have results, otherwise it will return false. Similarly, messageType is a computed observable that will return “error” unless we have successfully received results, at which point it will return “success”.
index.jade
div(class='panel panel-lg' data-bind='visible: shouldShowMessages, css: "panel-" + messageType()')
  div(class='panel-heading')
    h3(class='panel-title' data-bind='text: messageTitle')
  div(class='panel-body')
    p(class='decision-text', data-bind='html: results')
    p(class='text-danger', data-bind='text: error')
    div(class='text-center')
      input#decision.btn.btn-success.btn-sm.text-center(type='button', value='Again?' data-bind='visible: hasResults(), click: tryAgain')
main.js:
self.shouldShowMessages = ko.computed(function(){
    var returnValue = false;

    if (!self.isProcessing() && (self.hasResults() || self.error() > '')) {
        returnValue = true;
    }

    return returnValue;
});
self.messageType = ko.computed(function(){
    var returnValue = 'danger';

    self.messageTitle(ERROR_TITLE);
    if (self.hasResults()) {
        returnValue = 'success';
        self.messageTitle(SUCCESS_TITLE);
    }

    return returnValue;
});
It should be noted that most data-bindings will make a call to ko.utils.unwrapObservable() behind the scenes. This allows us to make the data-bind safely on both observables and non-observables. However, if you take a look at where the messageType observable is used you will notice that we are referencing the observable as a function (with parentheses). This is because we are accessing the observable inside an expression.
Conclusion
Thanks to John Rosendahl for help with writing the intro.
Pull requests are welcomed/encouraged/needed. Enjoy!