Docker on AWS: from containerization to orchestration
In this post, we’ll take a number of containerized microservices running on a single EC2 instance and scale them out to Amazon’s container orchestration service, EC2 Container Service (ECS).
We’ll be using the following tools…
| Tool | Use Cases | Version |
|---|---|---|
| Docker | Containerization and distribution | 17.09.0-ce |
| AWS ECS | Container orchestration and management | 1.15.0 (service agent) |
Updates:
- Nov 25, 2017: Updated the Inbound Rules on the Security Group.
Contents
Prerequisites
This post assumes prior knowledge of Docker and some experience working with a Docker-based microservice stack. You should also be familiar with the following AWS services - VPC, ELB, EC2, and IAM.
Refer to the following resources for more info:
- Developing Microservices - Node, React, and Docker
- Microservices with Docker, Flask, and React - full course, powered by the fine folks at testdriven.io!
Objectives
By the end of this tutorial, you will be able to…
- Explain what container orchestration is and why you may need to incorporate an orchestration tool into your deployment process
- Discuss the pros and cons of using EC2 Container Service (ECS) over other orchestration tools like Kubernetes, Mesos, and Docker Swarm
- Configure an Application Load Balancer (ALB) along with ECS to run a set of microservices
- Integrate Amazon EC2 Container Registry (ECR) into the deployment process
- Send container logs to CloudWatch
- Update a running container via a zero-downtime deployment strategy to not disrupt the current users or your application
- Explain the types of scaling that are available to you
Project Setup
Fork the microservice-ping-pong repo, clone it down, and then check out the v1 tag to the master branch:
$ git clone https://github.com/YOUR_GITHUB_NAME/microservice-ping-pong
$ cd microservice-ping-pong
$ git checkout tags/v1 -b master
Take note of the docker-compose.yml file to see an overview of the project structure:
version: '3.3'

services:

  node-john:
    container_name: node-john
    build:
      context: ./services/node
      dockerfile: Dockerfile
    image: node-base
    ...

  node-paul:
    container_name: node-paul
    image: node-base
    ...

  node-george:
    container_name: node-george
    image: node-base
    ...

  node-ringo:
    container_name: node-ringo
    image: node-base
    ...

  client:
    container_name: node-client
    build:
      context: ./services/client
      dockerfile: Dockerfile
    ...

  nginx:
    container_name: node-nginx
    build: ./services/nginx
    ...
So, that’s one Nginx container and one React container as well as four Node containers. Also, did you notice that we’re using the same image to build each of the Node containers?
| Container | Image | Tech |
|---|---|---|
| node-john | node-base | NodeJs |
| node-paul | node-base | NodeJS |
| node-george | node-base | NodeJS |
| node-ringo | node-base | NodeJS |
| client | client | ReactJS |
| nginx | nginx | Nginx |
Feel free to fire up the app locally:
$ docker build -t node-base ./services/node
$ export REACT_APP_BASE_URL=http://DOCKER_MACHINE_IP
$ docker-compose up -d --build

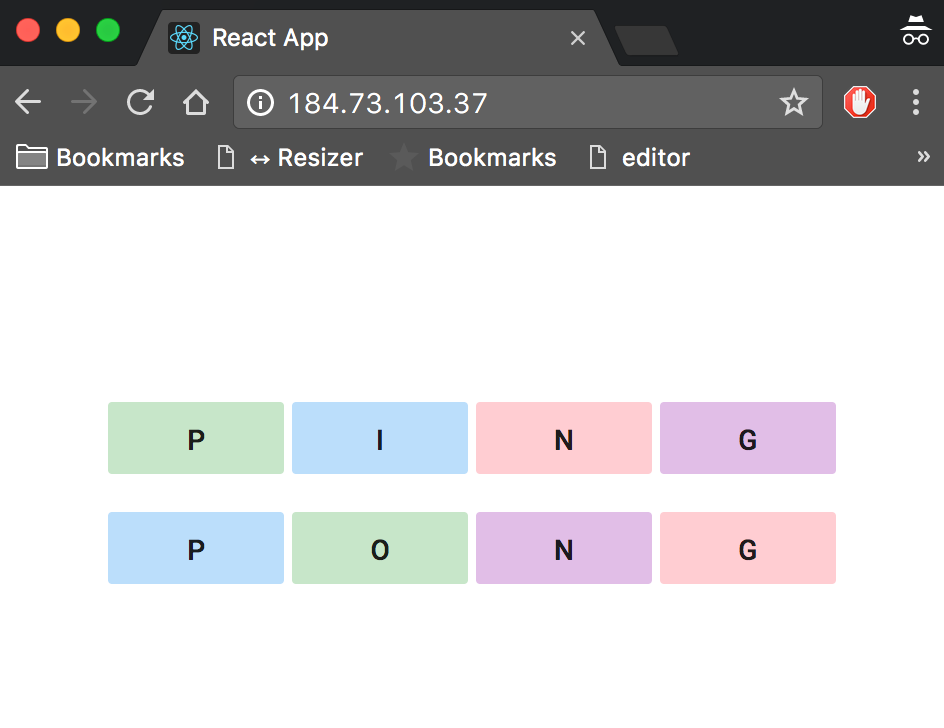
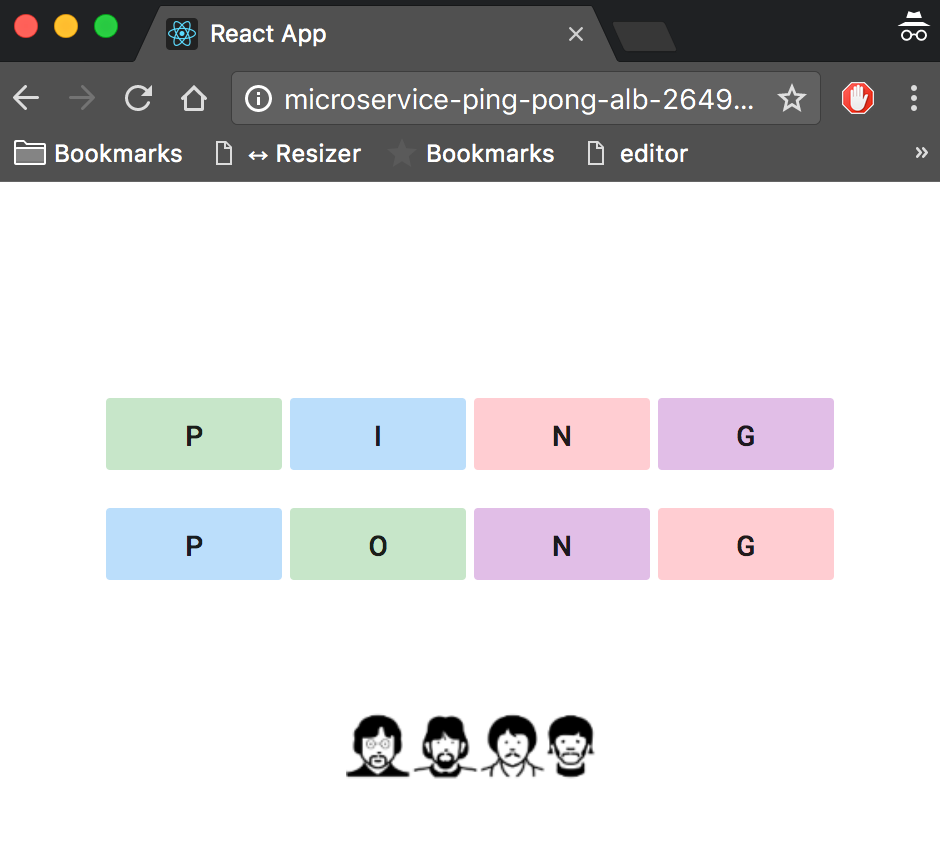
The functionality is quite simple: When the end user clicks on one of the letters, an AJAX request is sent to the node-john container, which then triggers a series of container-to-container requests:
node-johnrequestsnode-paulnode-paulrequestsnode-georgenode-georgerequestsnode-ringo
Once complete, a response is sent back to the client with the following array:
[
  "meow from node-paul:3000",
  "meow from node-george:3000",
  "meow from node-ringo:3000"
]
Nothing special. Just a basic app, meant to highlight some aspects of how networking works in Docker land.
Containerization
Next, let’s deploy the cluster to a single Amazon EC2 instance with Docker Compose and Machine.
Docker Machine
Assuming you already have an AWS account setup along with IAM and your AWS credentials are stored in an ~/.aws/credentials file, create a new host on an EC2 instance:
$ docker-machine create --driver amazonec2 ping-pong
For more, review the Amazon Web Services (AWS) EC2 example from Docker.
Once done, set it as the active host and point the Docker client at it:
$ docker-machine env ping-pong
$ eval $(docker-machine env ping-pong)
Grab the IP address associated with the new EC2 instance and use it to set the REACT_APP_BASE_URL environment variable:
$ docker-machine ip ping-pong
$ export REACT_APP_BASE_URL=http://DOCKER_MACHINE_IP
The
REACT_APP_BASE_URLenvironment variable must be set at the build-time, so it is available before we kick off Create React App’s production build process. See services/client/Dockerfile for more info.
Build and tag the node-base image:
$ docker build -t node-base ./services/node
Fire up the containers:
$ docker-compose up -d --build
Make sure to expose port 80 in the Security Group, and then test it out in the browser:
Back in your terminal, open the Docker logs with a follow flag:
$ docker-compose logs -f
Then, with your terminal window and browser side-by-side on your screen, click on of the letters:
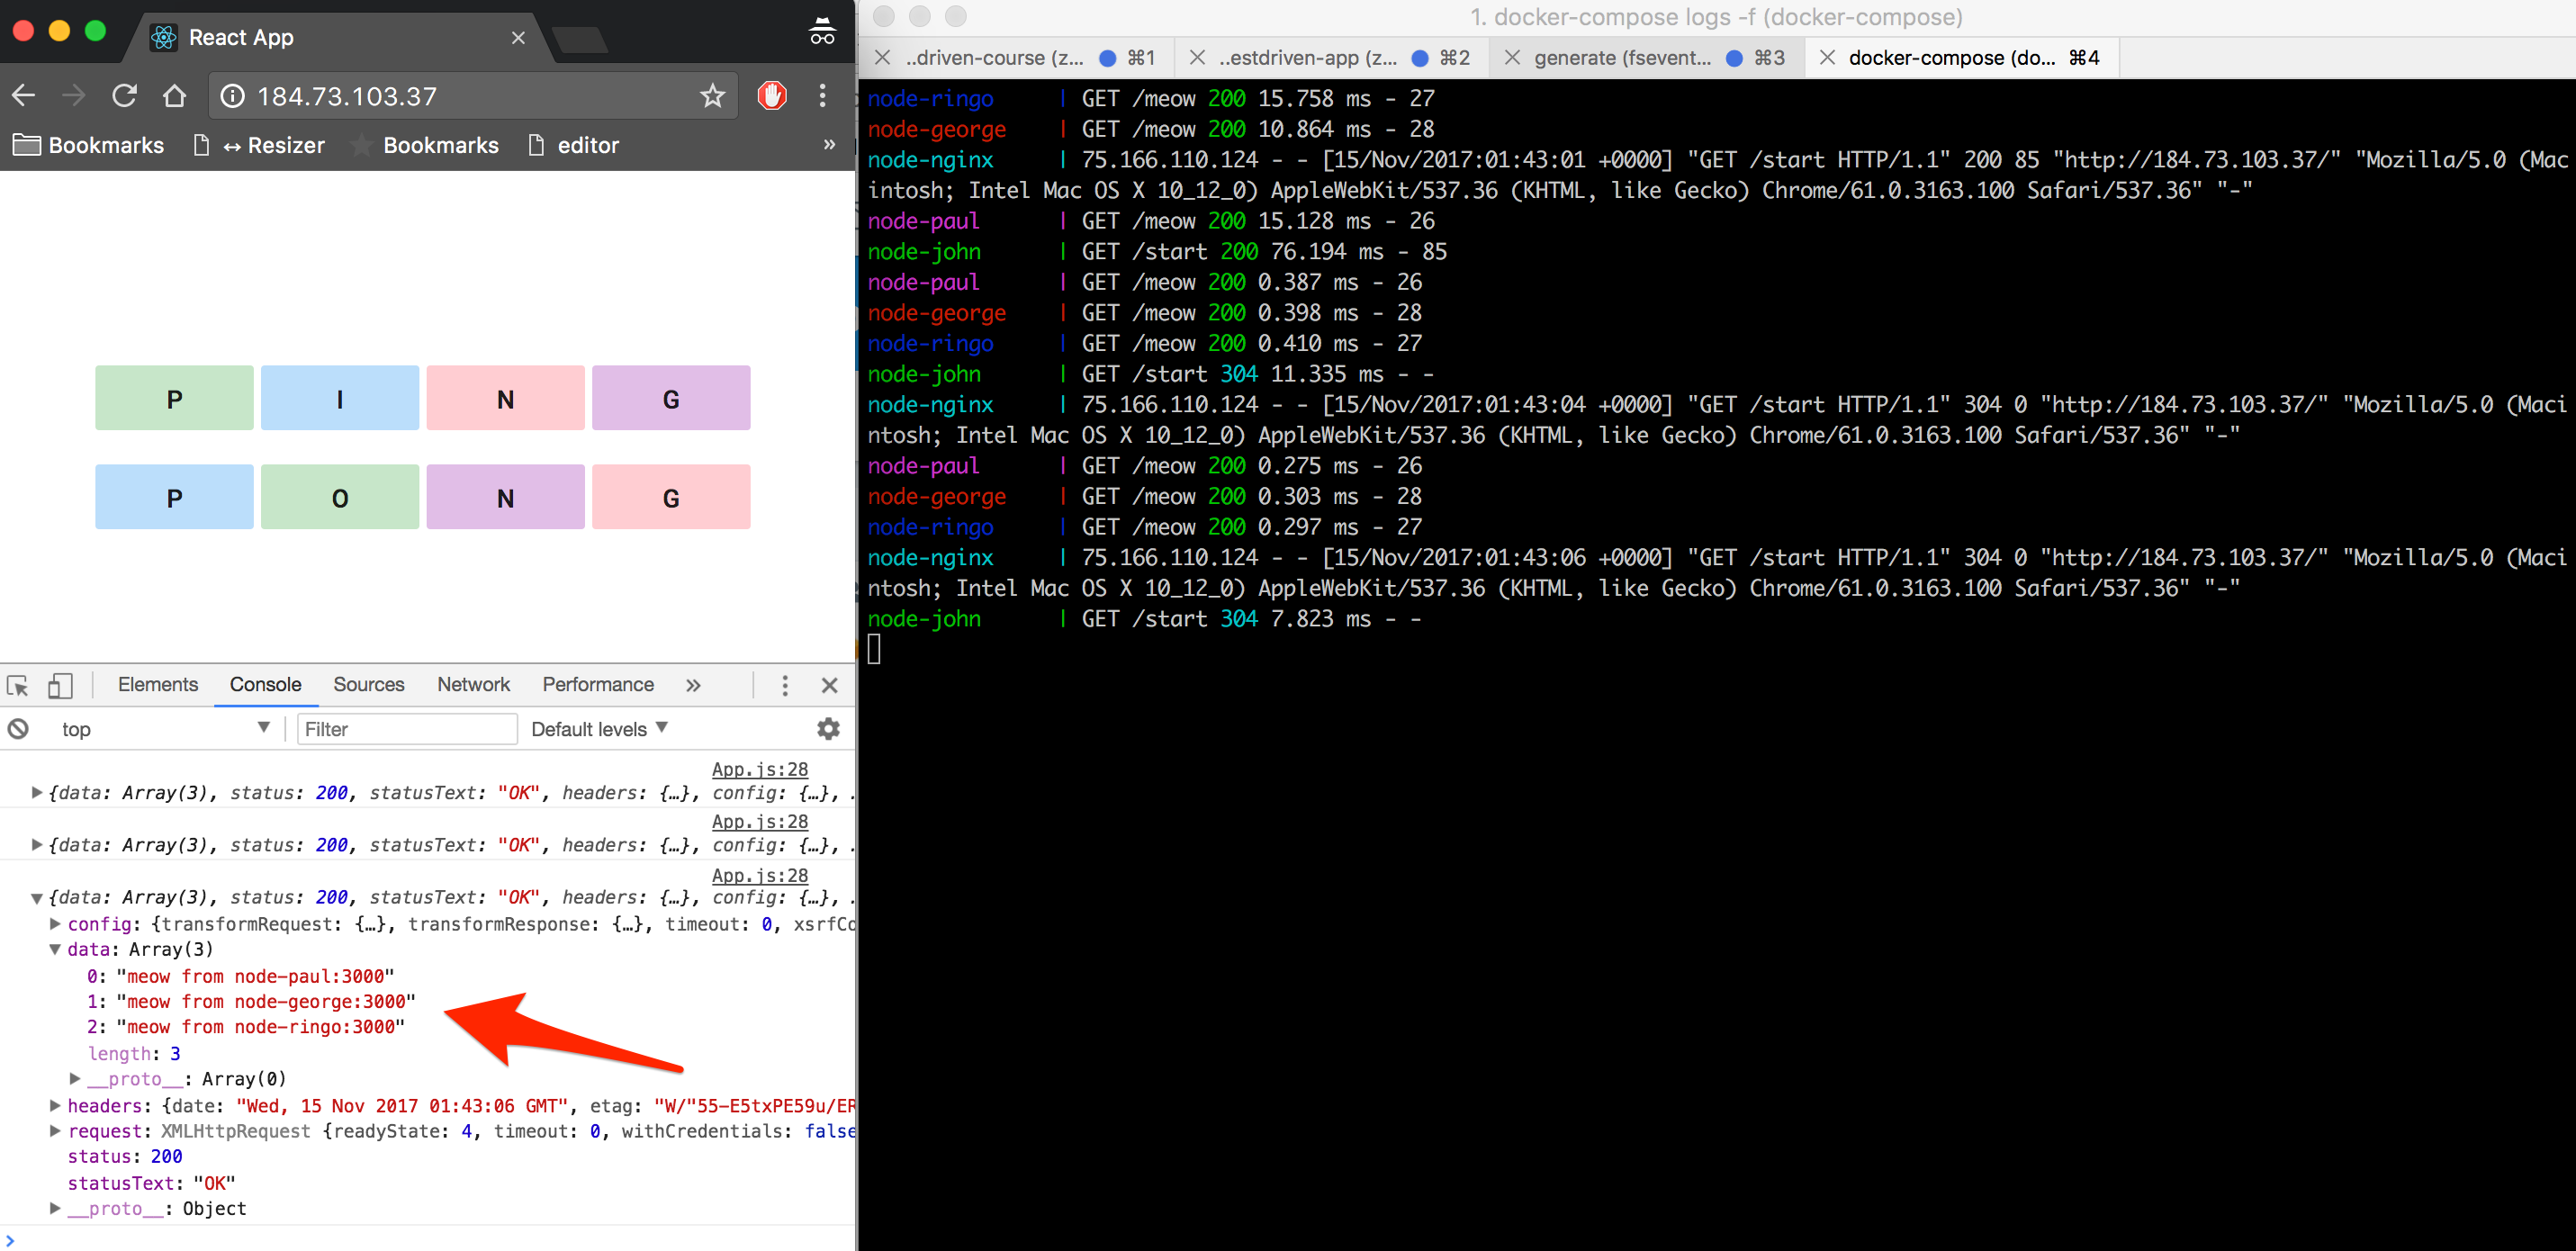
You should see a number of POST requests in the terminal, as the containers ping each other.
It’s important to note that the majority of your apps can live on a single instance like this. Spin up Postgres on RDS and possibly a message queue on SQS and you should be good for a while. As your app grows and you add feature after feature, you may that you need to create separate services and scale them independency from the whole. At that point, it may be time to start looking at ECS.
With that, let’s look at how scale this out to multiple EC2 instances with ECS…
Orchestration
If you’re completely new to ECS, please review the Getting Started with Amazon ECS guide.
What is container orchestration?
As you move from deploying containers on a single machine to deploying them across a number of machines, you need an orchestration tool to manage the arrangement and coordination of the containers across the entire system. This is where ECS fits in along with a number of other orchestration tools - like Kubernetes, Mesos, and Docker Swarm.
Why ECS?
ECS is simpler to set up and easier to use and you have the full power of AWS behind it, so you can easily integrate it into other AWS services (which we will be doing shortly). In short, you get scheduling, service discovery, load balancing, and auto-scaling out-of-the-box. Plus, you can take full advantage of EC2’s multiple availability-zones.
If you’re already on AWS and have no desire to leave, then it makes sense to use AWS.
Keep in mind, that ECS is often lagging behind Kubernetes, in terms of features, though. If you’re looking for the most features and portability and you don’t mind installing and managing the tool, then Kubernetes, Docker Swarm, or Mesos may be right for you.
One last thing to take note of is that since ECS is closed-source, there isn’t a true way to run an environment locally in order to achieve development-to-production parity.
For more, review the Choosing the Right Containerization and Cluster Management Tool blog post.
Orchestration feature wish-list
Most orchestration tools come with a core set of features. You can find those features below along with the associated AWS service…
| Feature | Info | AWS Service |
|---|---|---|
| Health checks | Verify when a task is ready to accept traffic | ALB |
| Path-based routing | Forward requests based on the URL path | ALB |
| Dynamic port-mapping | Ports are assigned dynamically when a new container is spun up | ALB |
| Zero-downtime deployments | Deployments do not disrupt the users | ALB |
| Service discovery | Automatic detection of new containers and services | ALB, ECS |
| High availability | Containers are evenly distributed across Availability Zones | ECS |
| Auto scaling | Automatically scaling resources up or down based on fluctuations in traffic patterns or metrics (like CPU usage) | ECS |
| Provisioning | New containers should select hosts based on resources and configuration | ECS |
| Container storage | Private image storage and management | ECR |
| Container logs | Centralized storage of container logs | CloudWatch |
| Monitoring | Ability to monitor basic stats like CPU usage, memory, I/O, and network usage as well as set alarms and create events | CloudWatch |
| Secrets management | Sensitive info should be encrypted and stored in a centralized store | Parameter Store, KMS, IAM |
Elastic Load Balancer
The Elastic Load Balancer distributes incoming application traffic and scales resources as needed to meet traffic needs.
A load balancer is one of (if not) the most important parts of your applications since it needs to always be up, routing traffic to healthy back-ends, and ready to scale at a moment’s notice.
There are currently three types of Elastic Load Balancers to choose from. We’ll be using the Application Load Balancer since it provides support for path-based routing and dynamic port-mapping and it also enables zero-downtime deployments. The Application Load Balancer is one of those AWS services that makes ECS so powerful. In fact, before it’s release, ECS was not a viable orchestration solution.
To set up, click “Load Balancers” in the EC2 Dashboard. Click “Create Load Balancer”, and then select the “Create” button under “Application Load Balancer”.
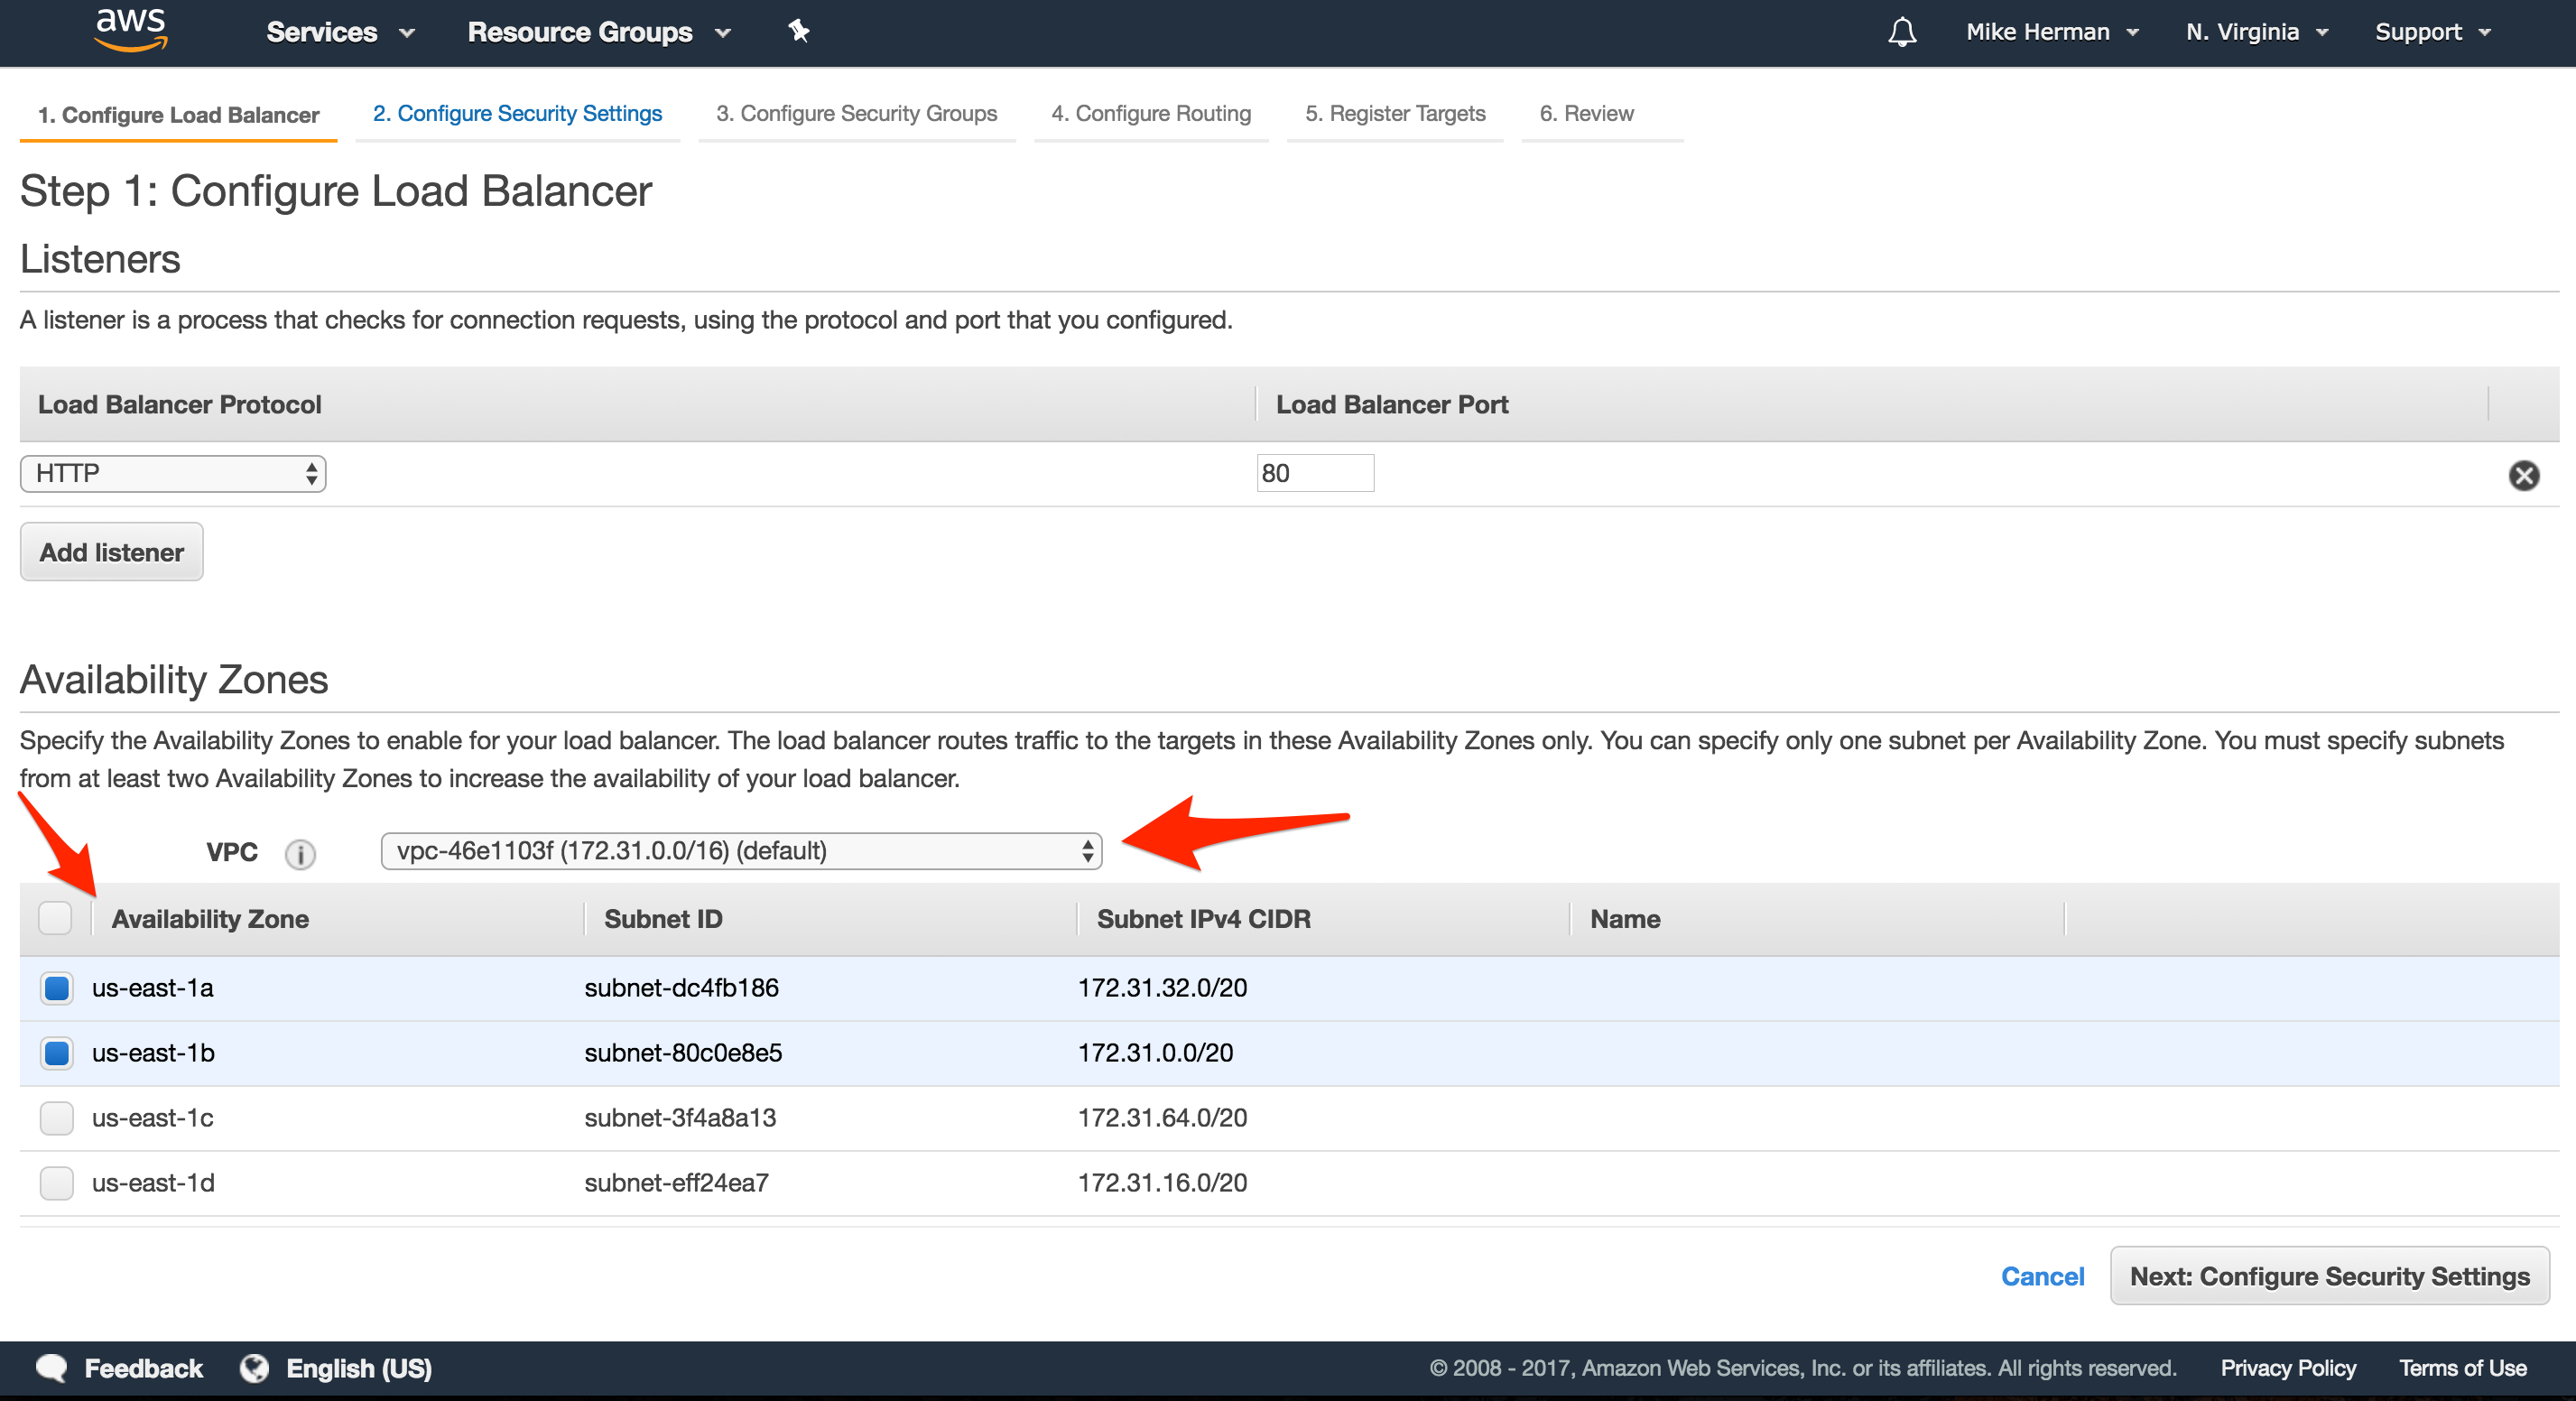
Configure Load Balancer
- “Name”:
microservice-ping-pong-alb - “VPC”: Select the default VPC to keep things simple
- “Availability Zones”: Select at least two available subnets
Configure Security Settings
Skip this for now.
Configure Security Groups
Create a new Security Group called microservice-ping-pong-security-group, making sure to open up port 80.

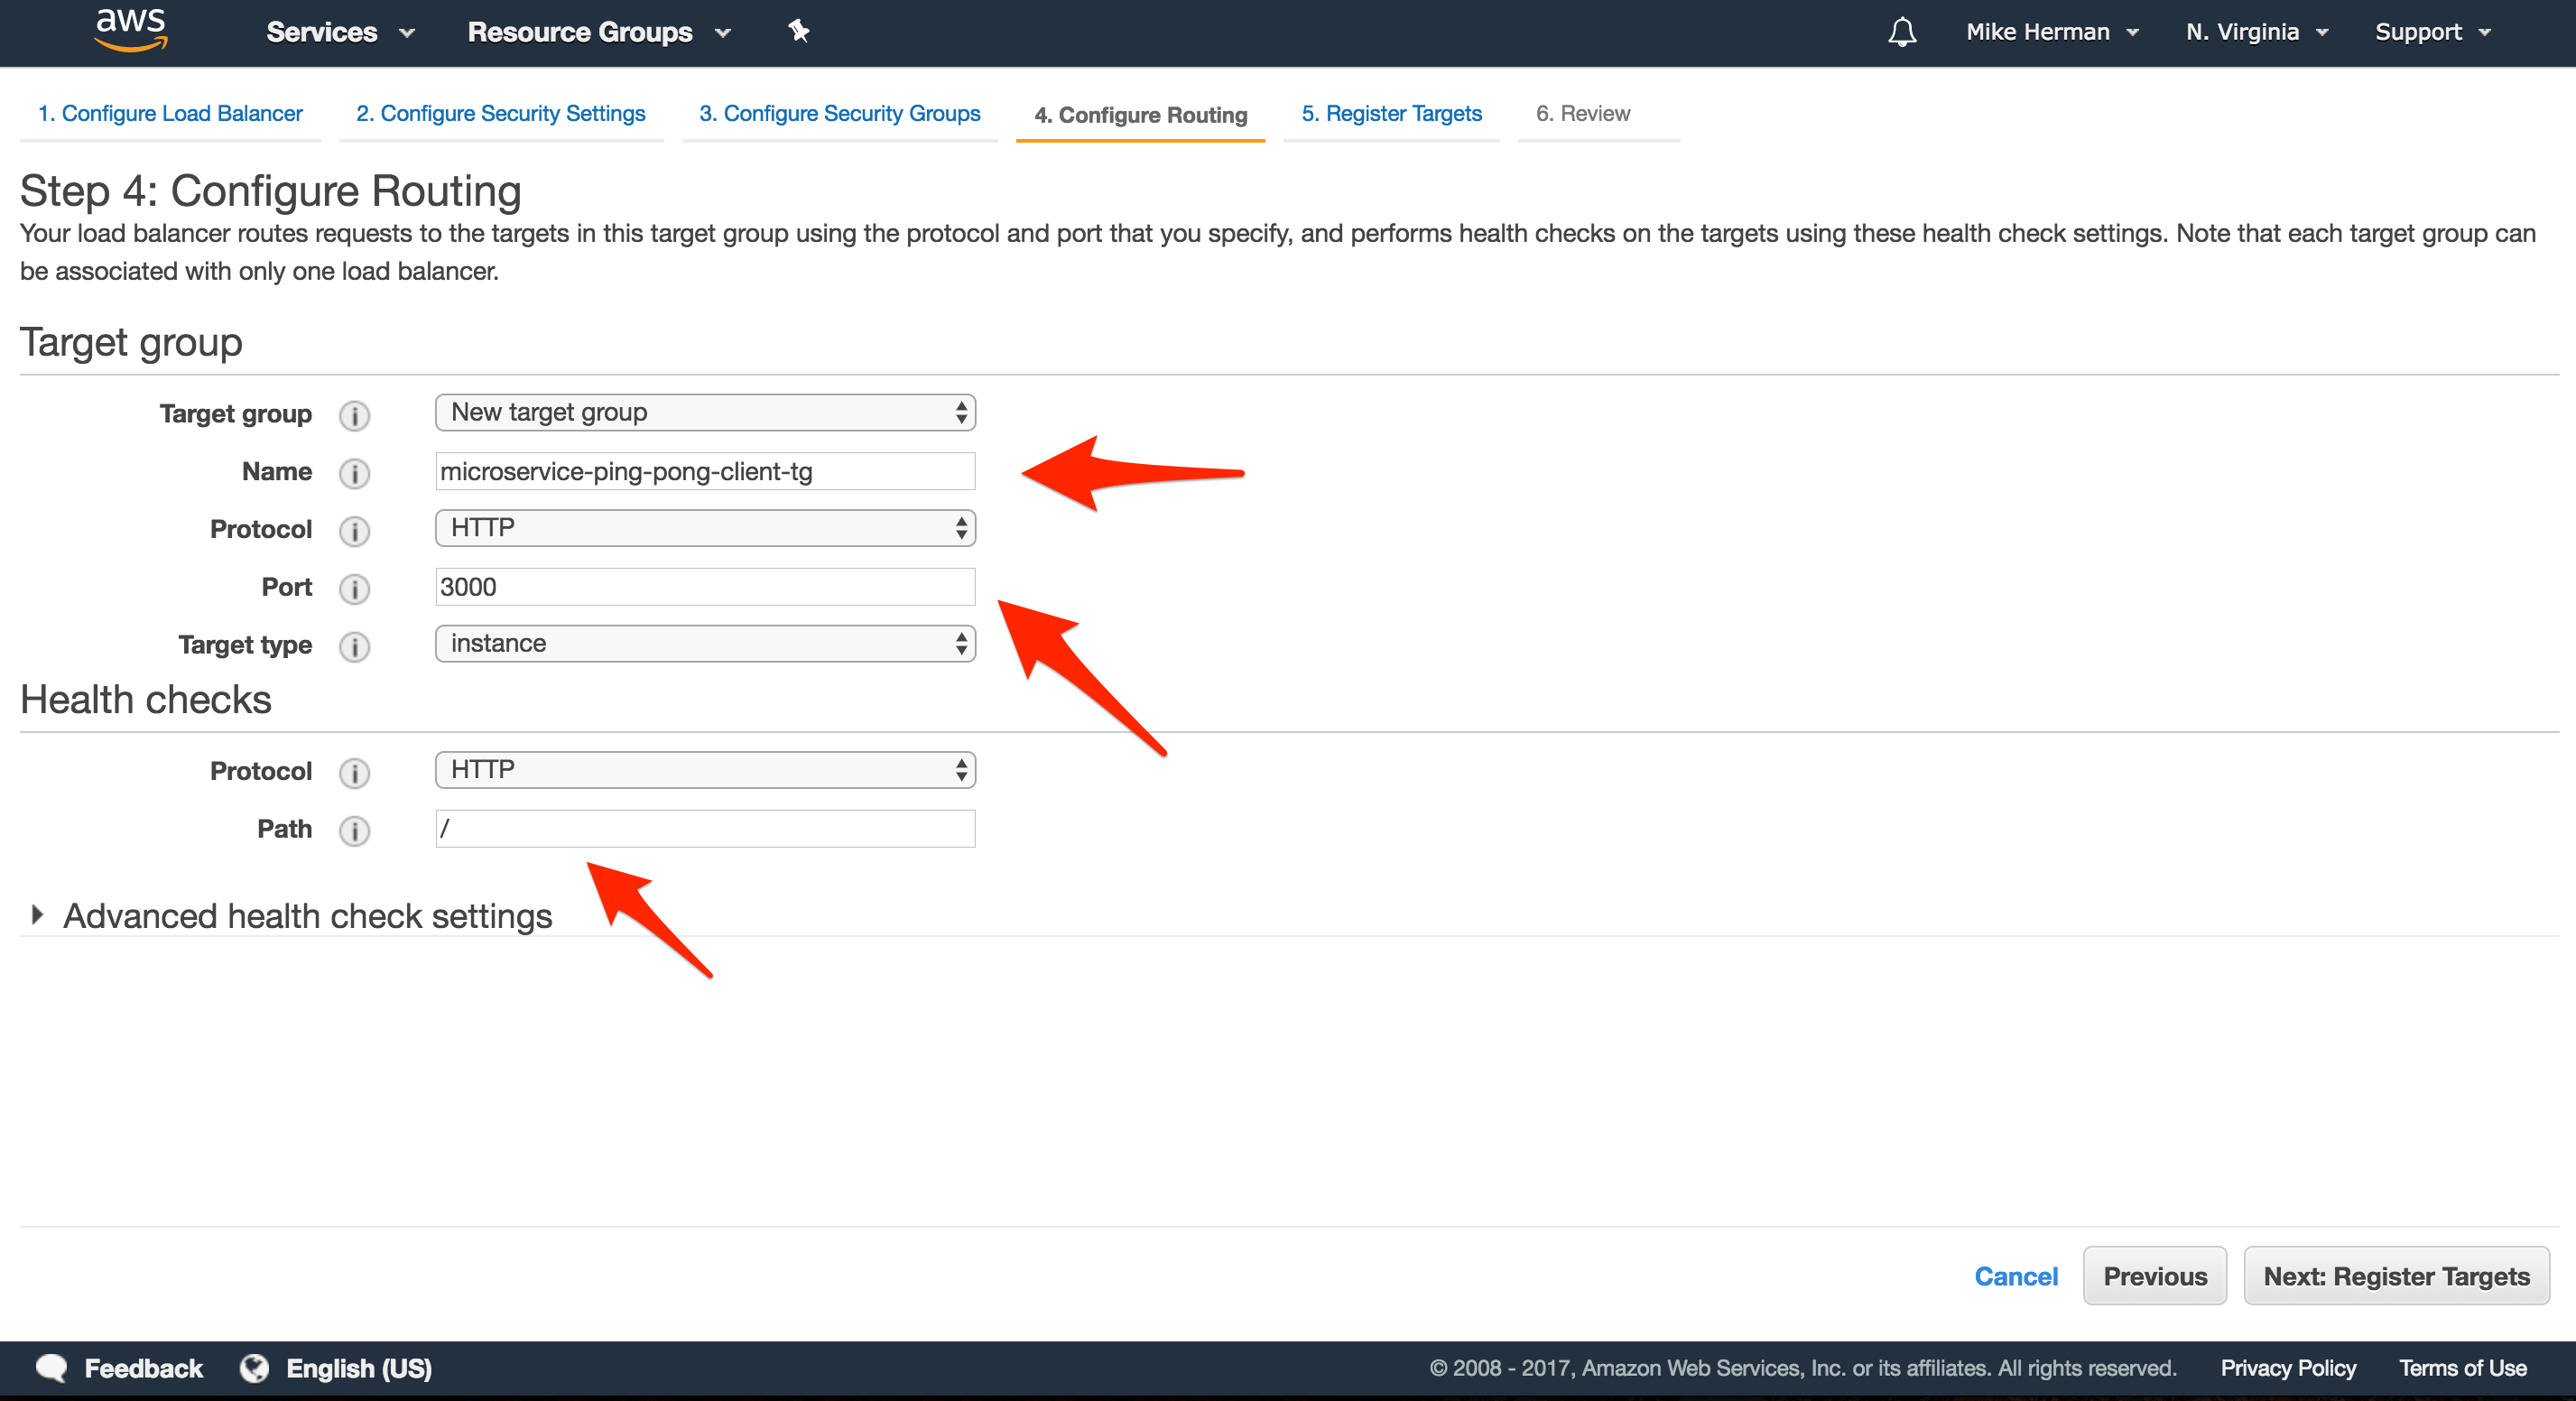
Configure Routing
- “Name”:
microservice-ping-pong-client-tg - “Port”:
3000 - “Path”: /
Register Targets
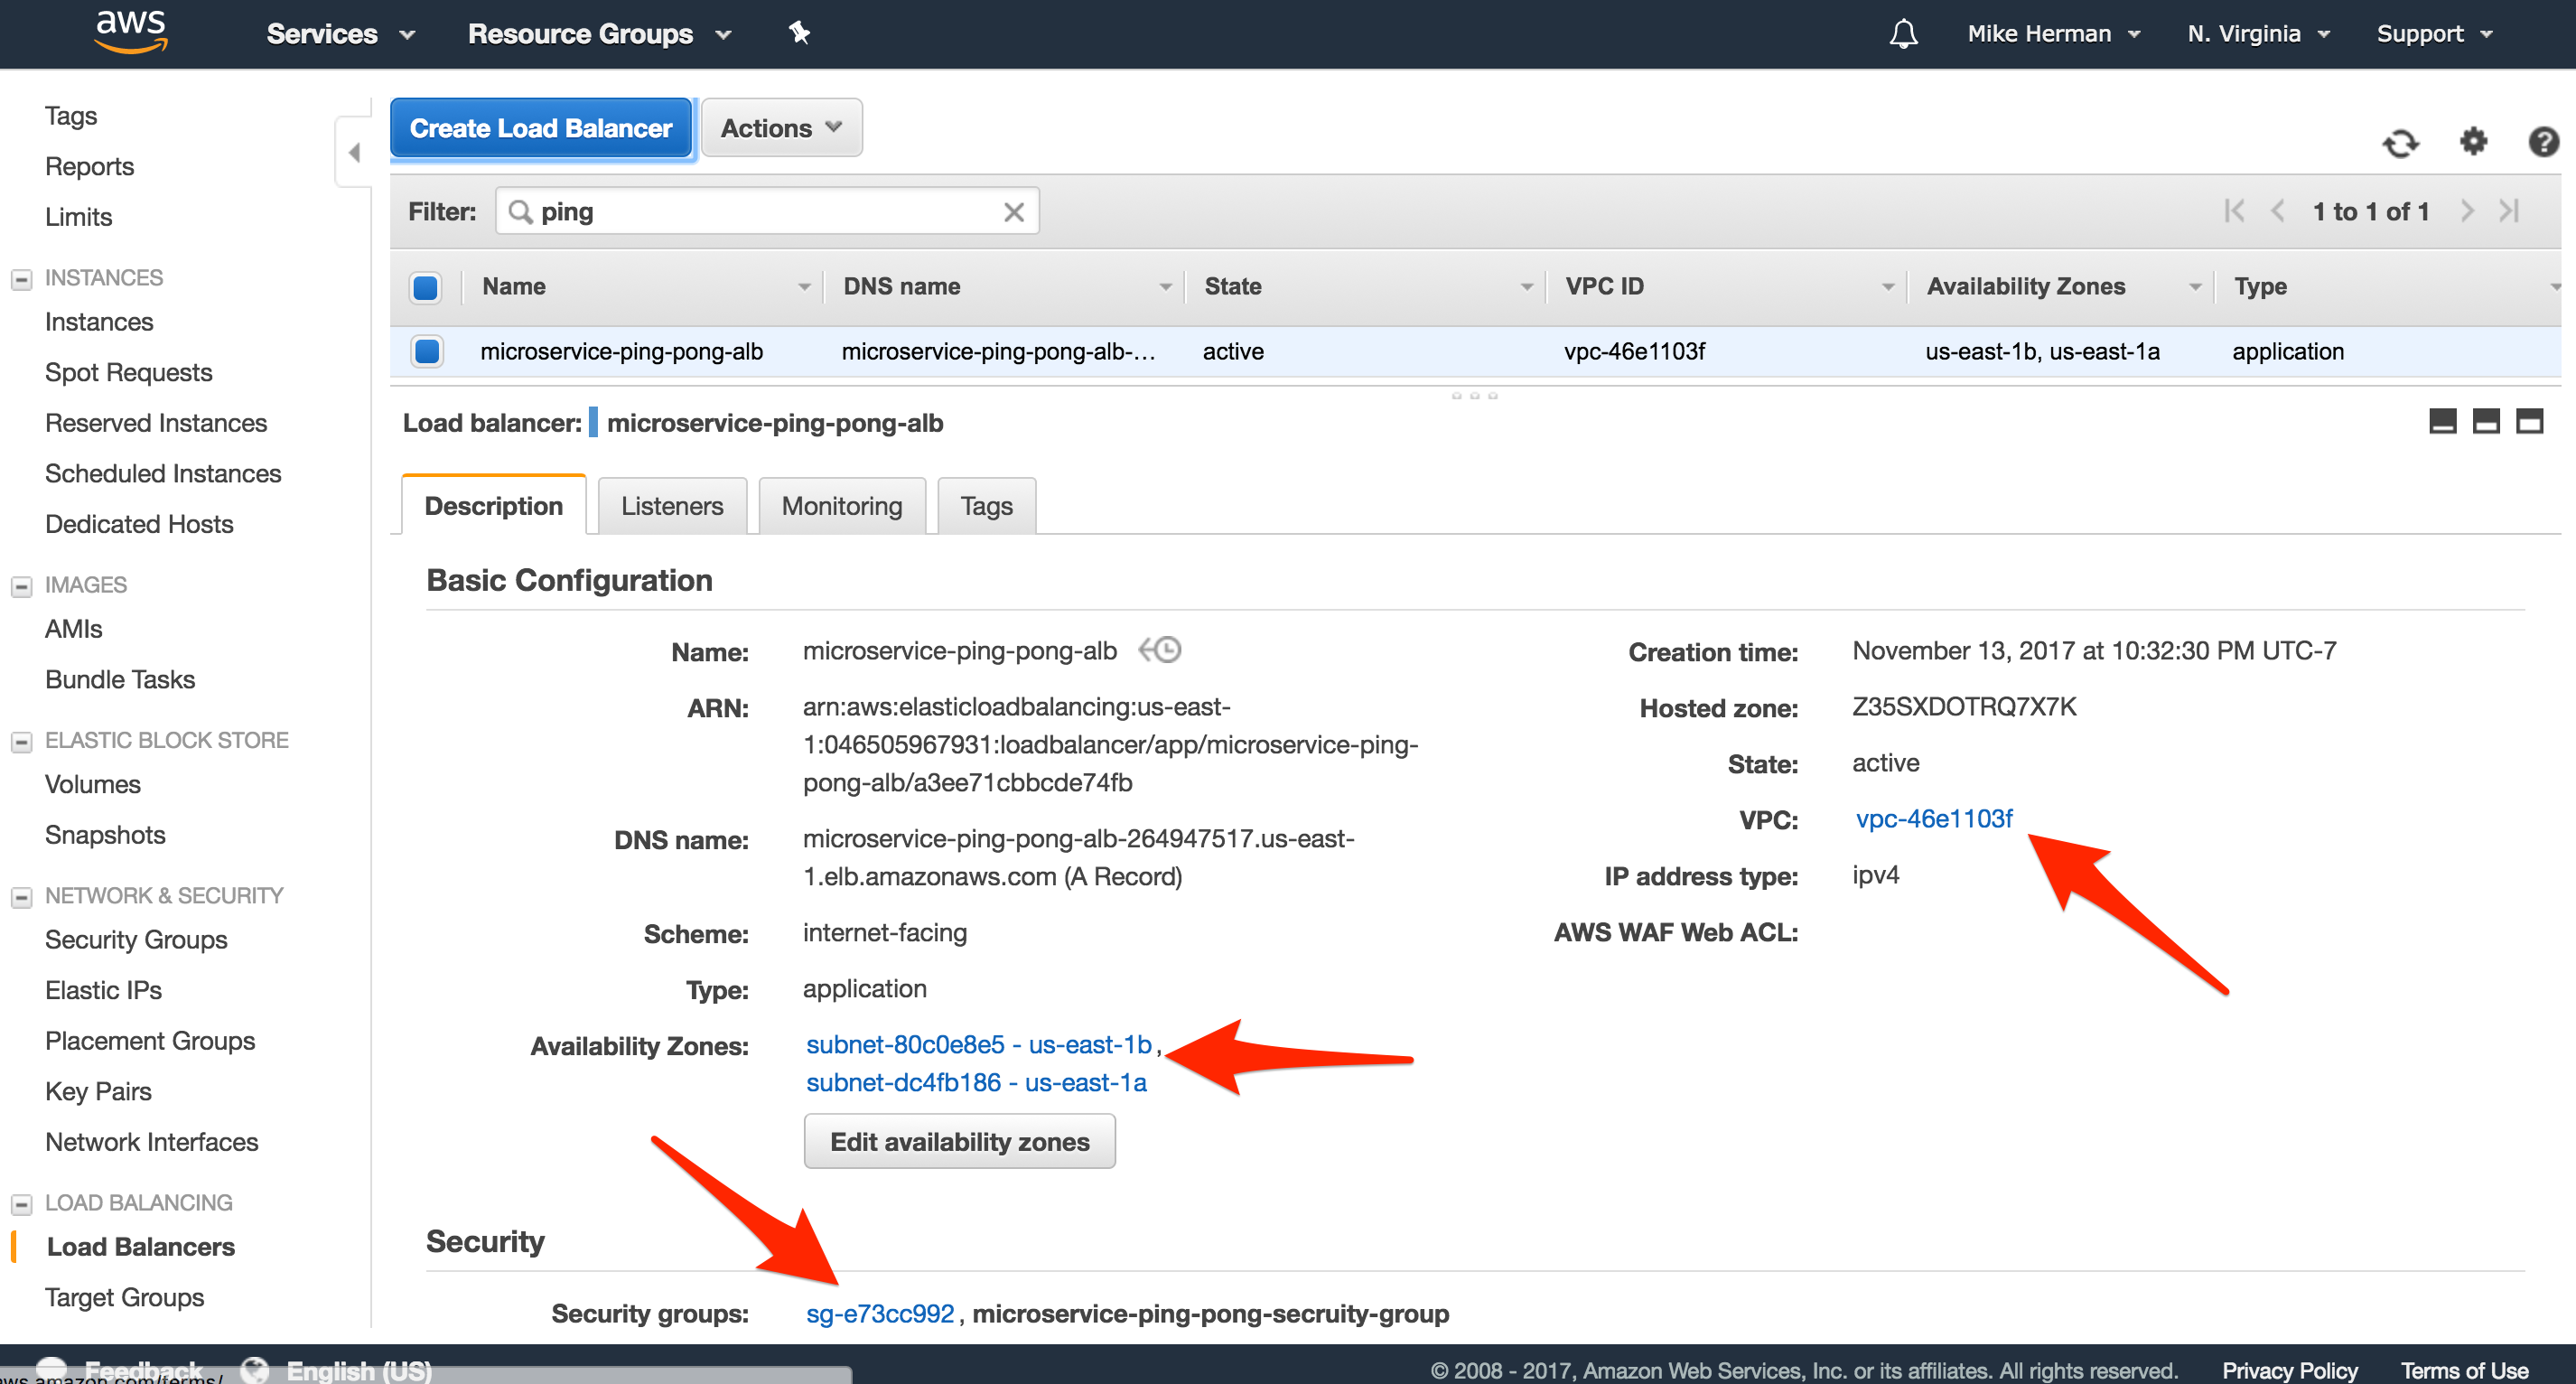
Do not assign any instances manually since this will be managed by ECS. Review and then create the new load balancer.
Once created, take note of the new Security Group:
With that, we also need to set up Target Groups and Listeners:

Target Groups
Target Groups are attached to the Application Load Balancer and are used to route traffic to the containers found in the ECS Service.
You may have already noticed, but a Target Group called microservice-ping-pong-client-tg was already created when we set up the Application Load Balancer, so we just need to set up one more.
Within the EC2 Dashboard, click “Target Groups”, and then create the following Target Group:
- “Target group name”:
microservice-ping-pong-node-tg - “Port”:
3000 - Then, under “Health check settings” set the “Path” to
/ping.

Listeners
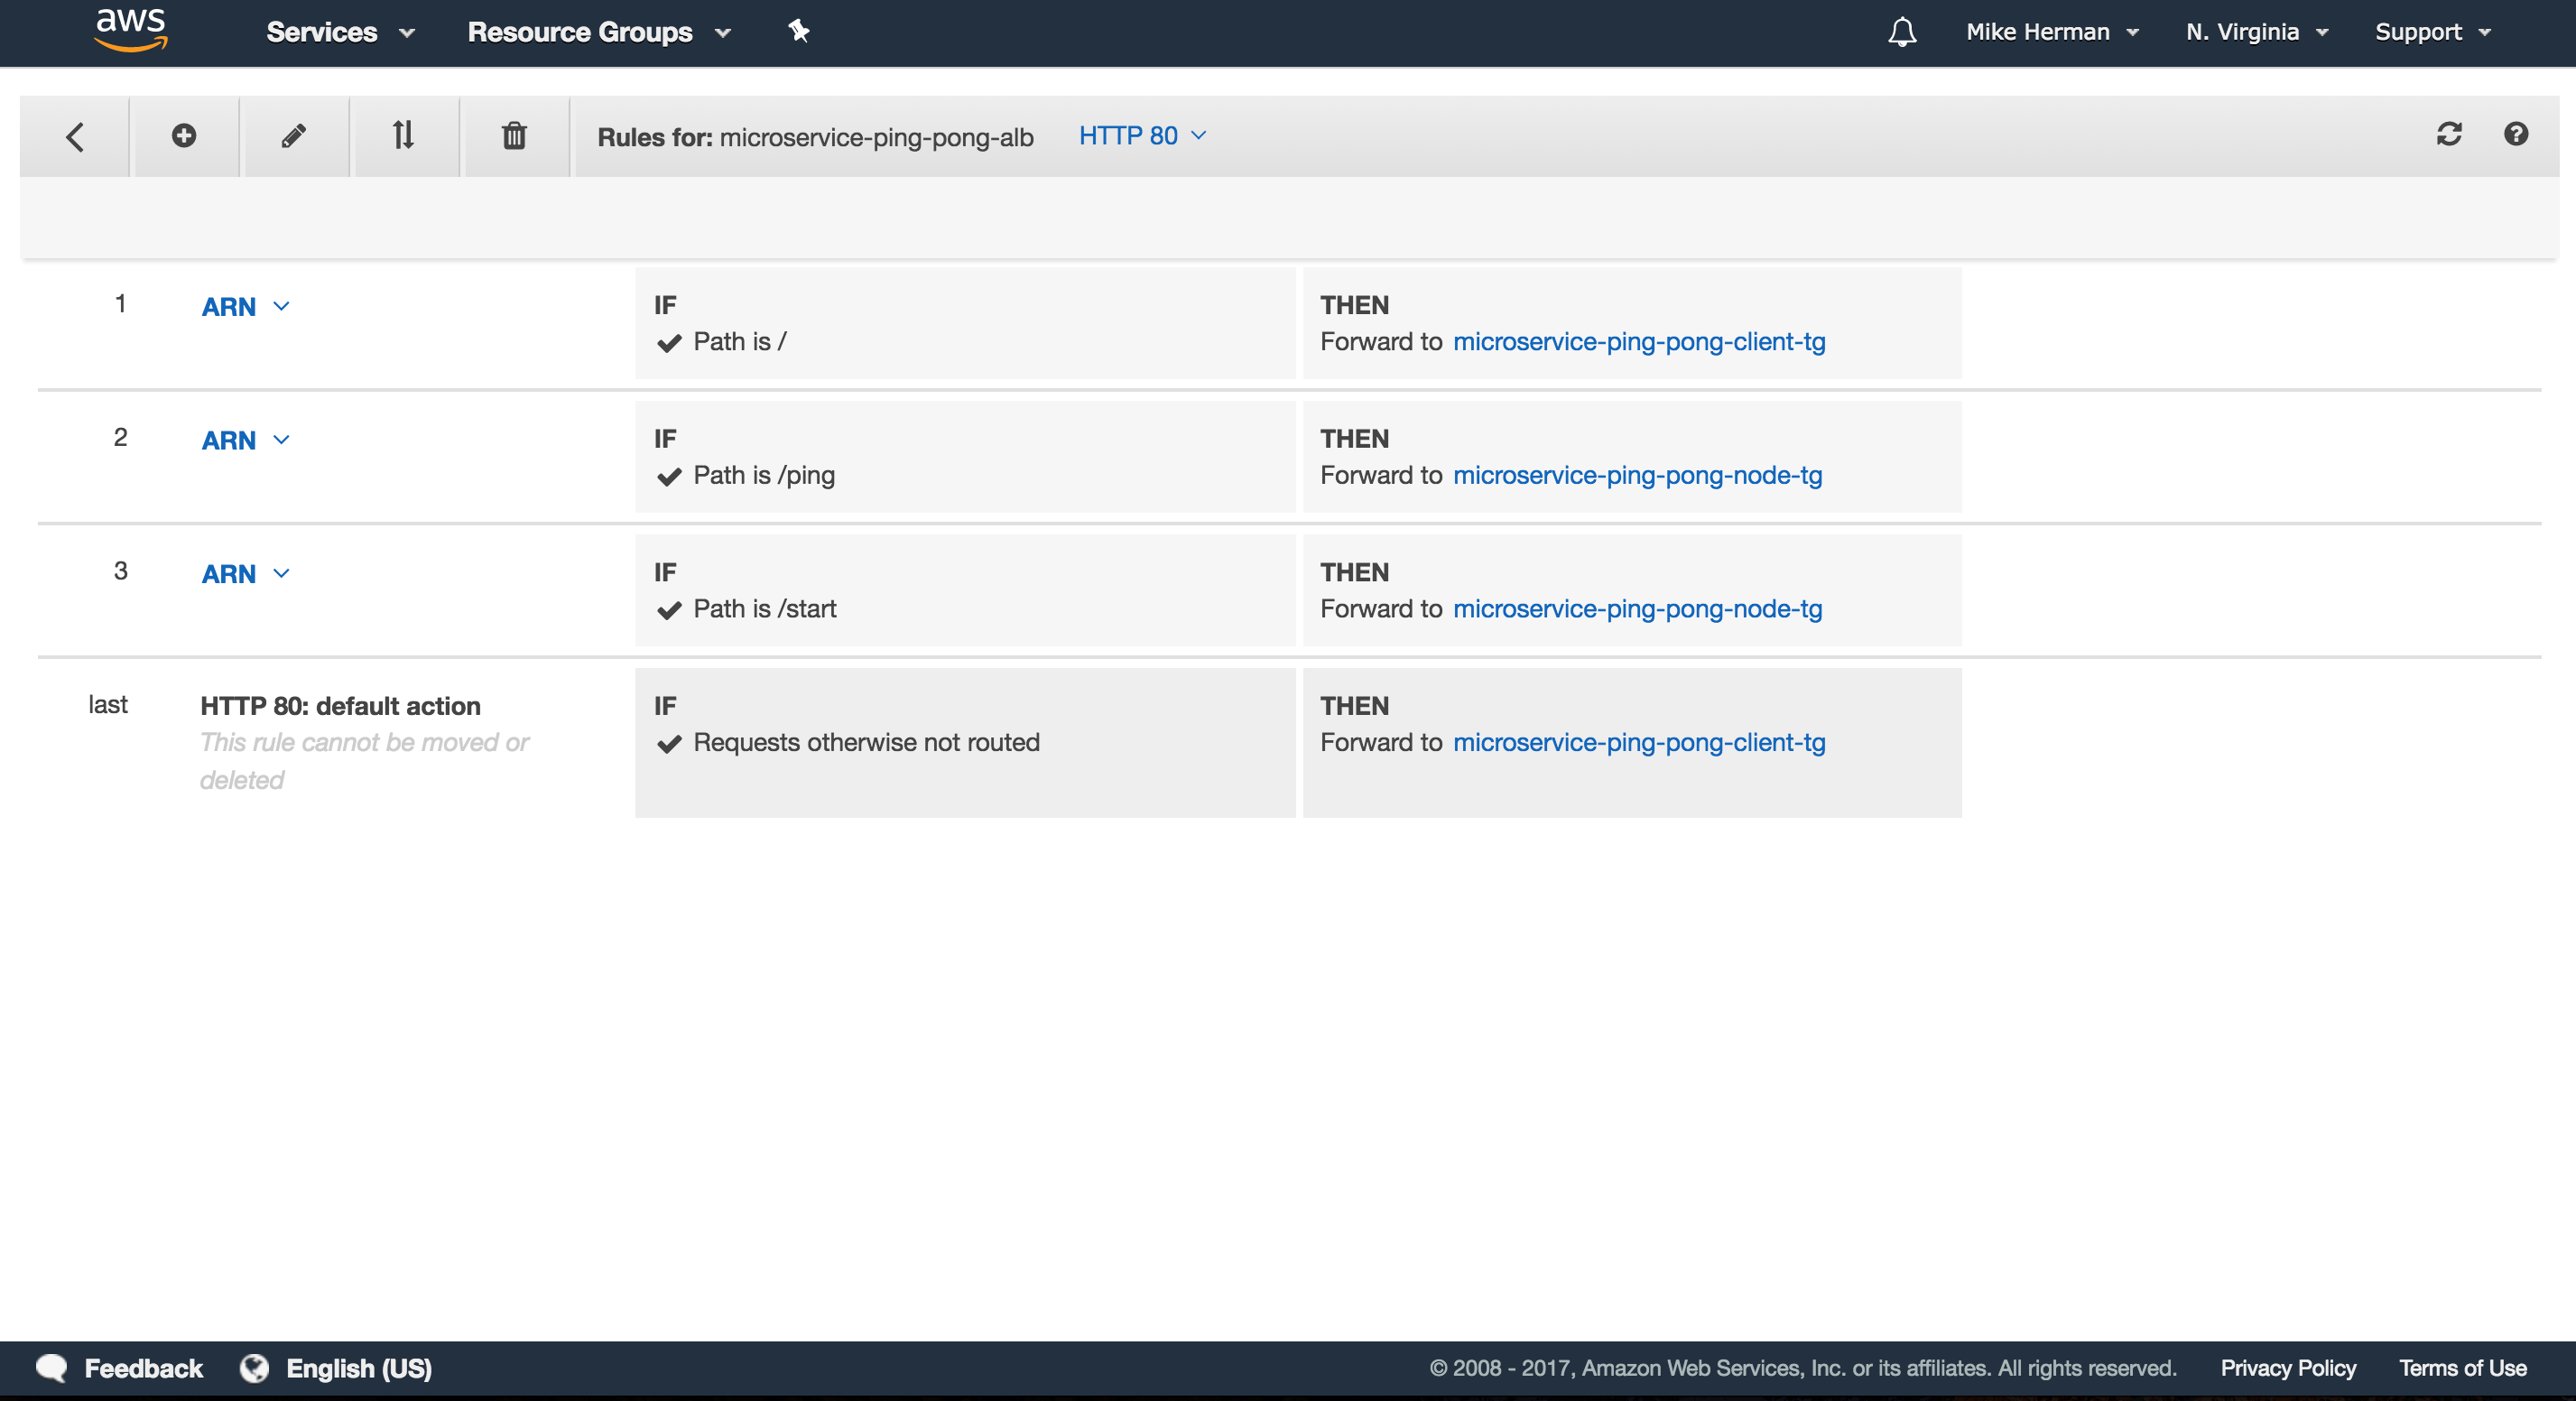
Back on the “Load Balancers” page on the EC2 Dashboard, click the microservice-ping-pong-alb Load Balancer, and then select the “Listeners” tab. Here, we can add Listeners to the load balancer, which are then forwarded to a specific Target Group.
There should already be a listener for “HTTP : 80”. Click the “View/edit rules >” link, and then insert three new rules:
- If
/, Thenmicroservice-ping-pong-client-tg - If
/ping, Thenmicroservice-ping-pong-client-tg - If
/start, Thenmicroservice-ping-pong-client-tg
ECR
Next, we’ll set up EC2 Container Registry (ECR), a private image registry.
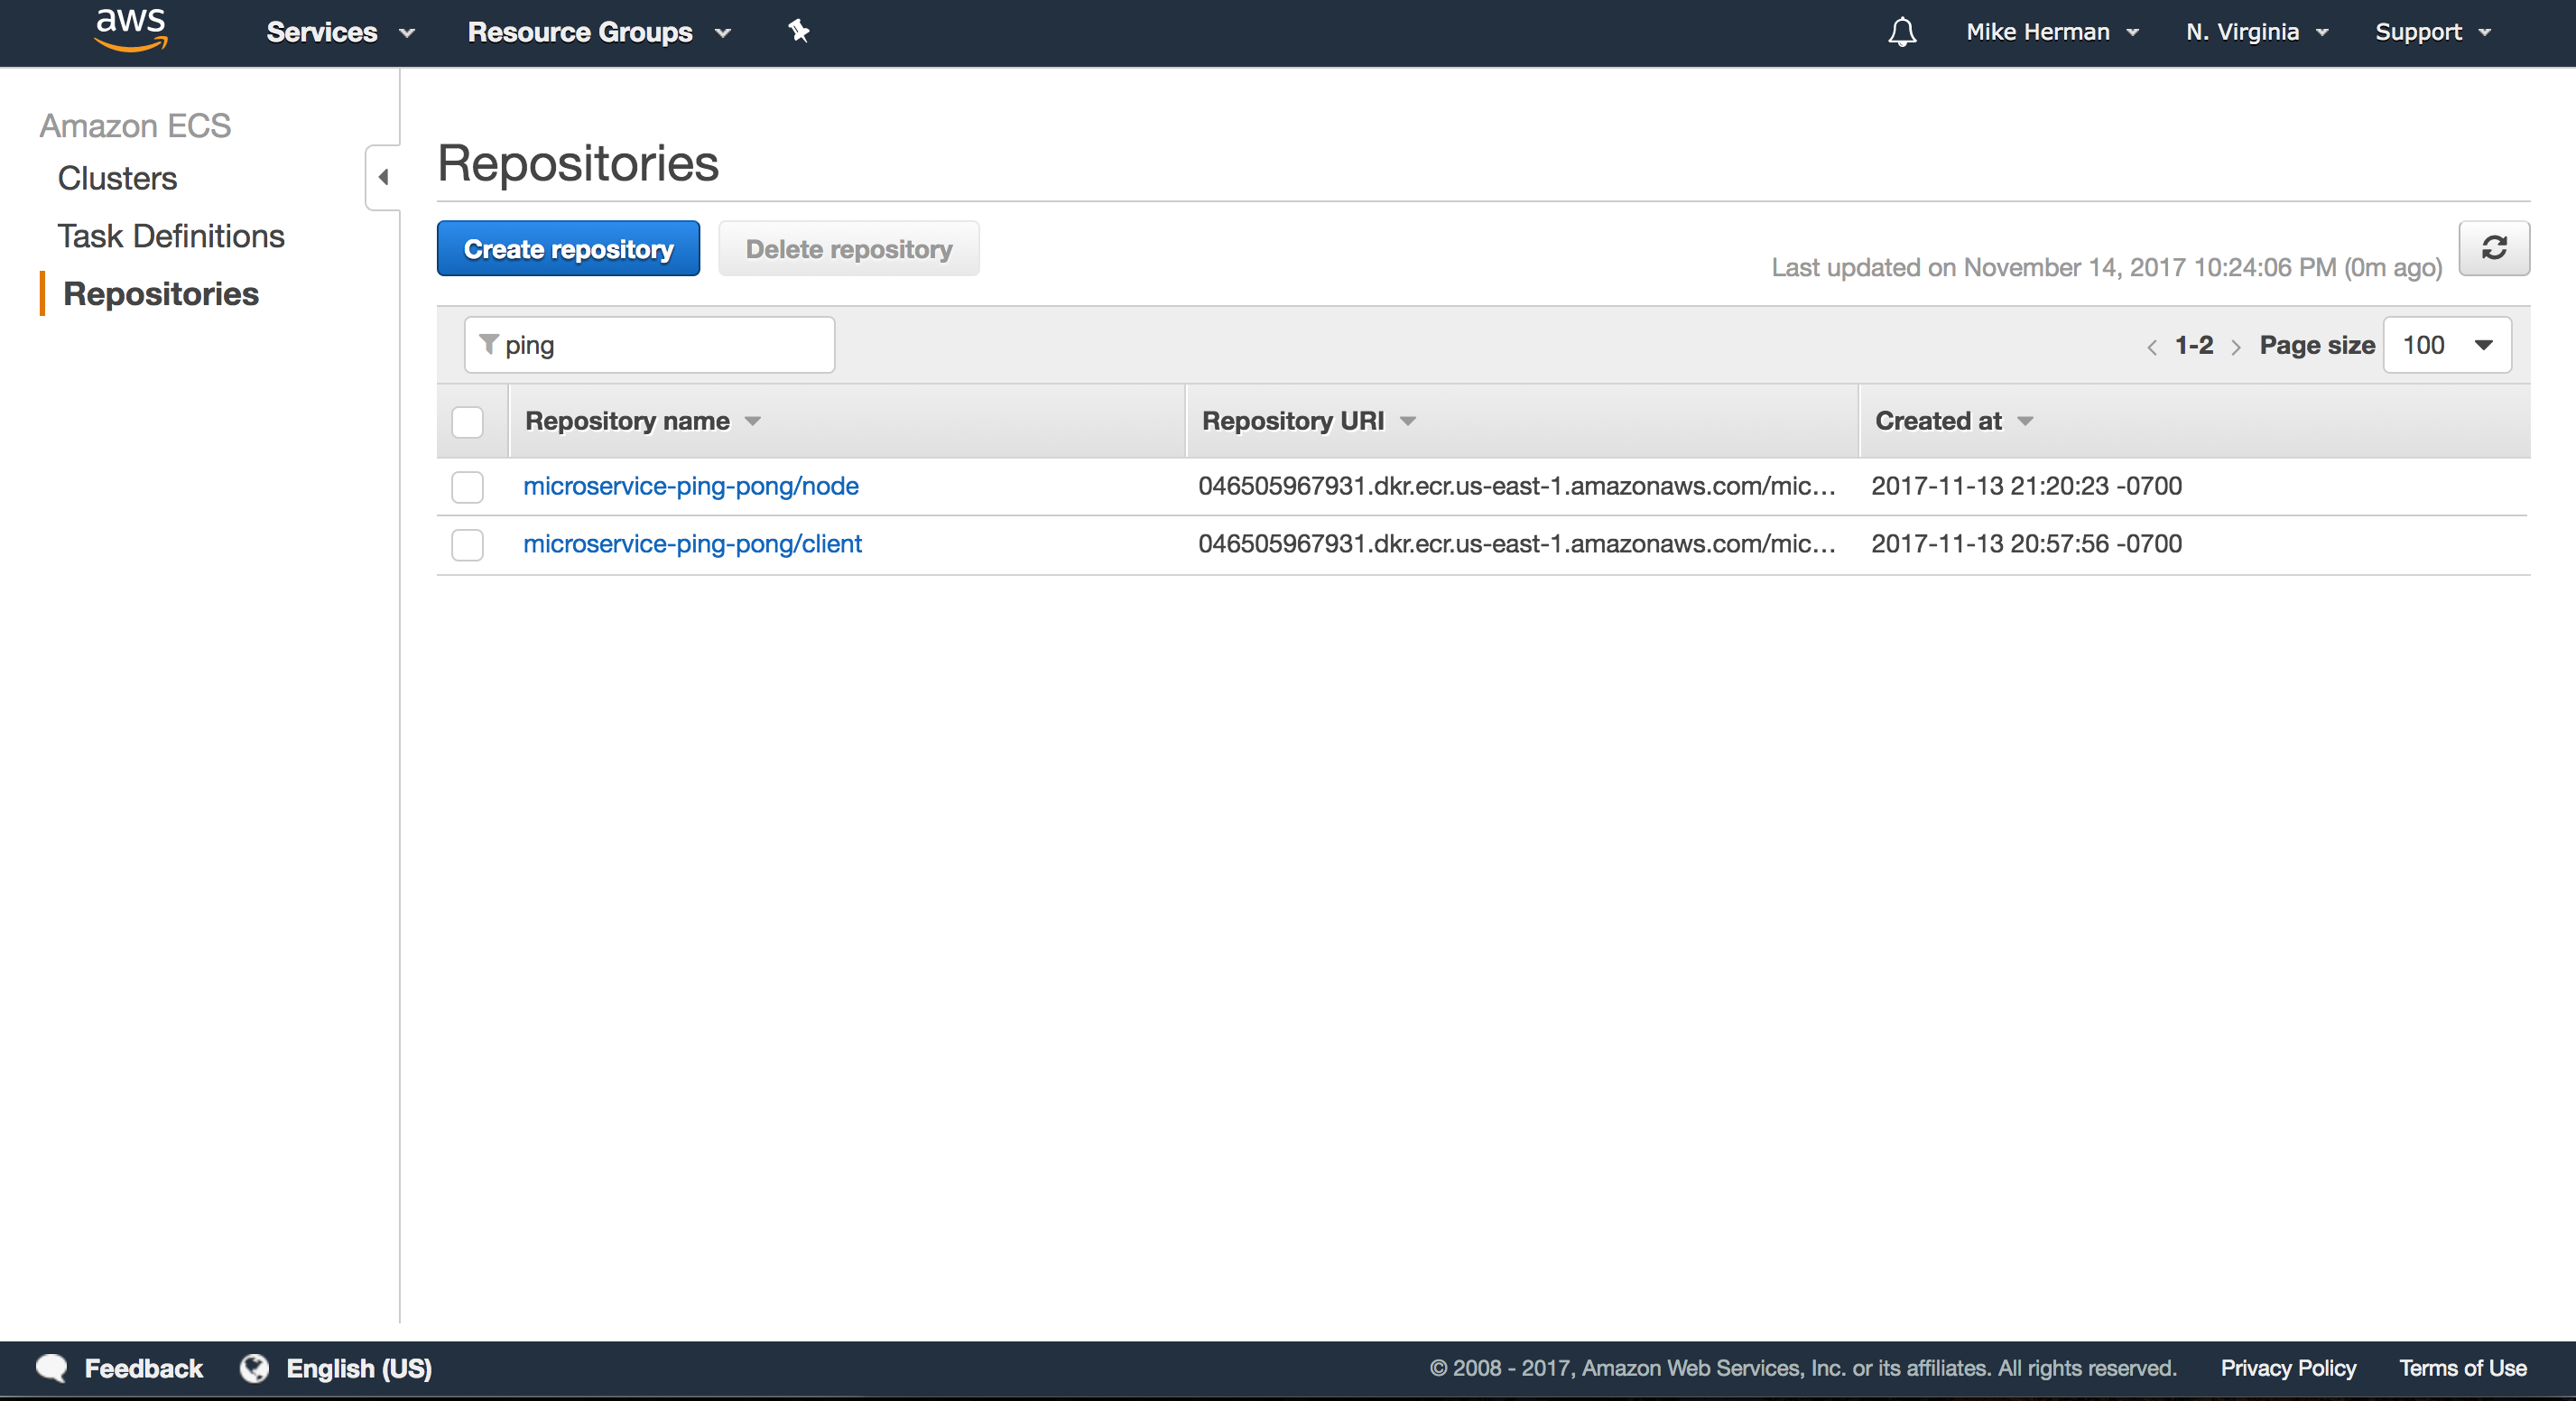
Navigate to the ECS Console, click “Repositories” on the navigation pane, and then click the “Create repository” button. Add the following repositories, making sure to follow the build, tag, and push commands after each is created:
microservice-ping-pong/clientmicroservice-ping-pong/node
Be sure to update the value of the
REACT_APP_BASE_URLenvironment variable to the Load Balancer’s “DNS name”.
Example build, tag, and push:
$ aws ecr get-login --no-include-email --region us-east-1
$ docker build -t microservice-ping-pong/client ./services/client
$ docker tag microservice-ping-pong/client:latest \
  AWS_ACCOUNT_ID.dkr.ecr.us-east-1.amazonaws.com/microservice-ping-pong/client:latest
$ docker push \
  AWS_ACCOUNT_ID.dkr.ecr.us-east-1.amazonaws.com/microservice-ping-pong/client:latest
Why only two images?
Well, we’ll use the Application Load Balancer instead of Nginx in our stack so we won’t need that image or container. For the Node containers, just like before, we can use one image to create all four containers since they are identical.
Did you notice that we tagged the image with latest in the example above? This is an anti-pattern. Tags can (and should) be used for version control as well as denoting which environment the image should belong to - like development, pre-prod/staging, or production.
For example, you could use both the commit git commit SHA1 hash (to associate the image back to a specific commit to help with debugging) along with and the environment name.
/$PROJECT/$ENVIRONMENT:$SHA1
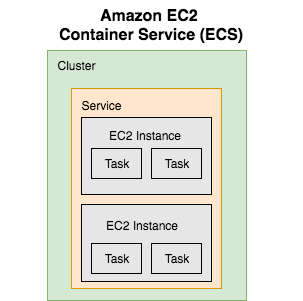
ECS
The EC2 Container Service (ECS) has four main components:
- Task Definitions
- Tasks
- Services
- Clusters
In short, Task Definitions are used to spin up Tasks that get assigned to a Service, which is then assigned to a Cluster.
Clusters
An ECS Cluster is just a group of EC2 container instances managed by ECS.
To create a Cluster, click “Clusters” on the ECS Console sidebar, and then click the “Create Cluster” button.
- “Cluster name”:
microservice-ping-pong-cluster - “EC2 instance type”:
t2.small - “Number of instances”:
2 - “Key pair”: Select an existing Key Pair or create a new one
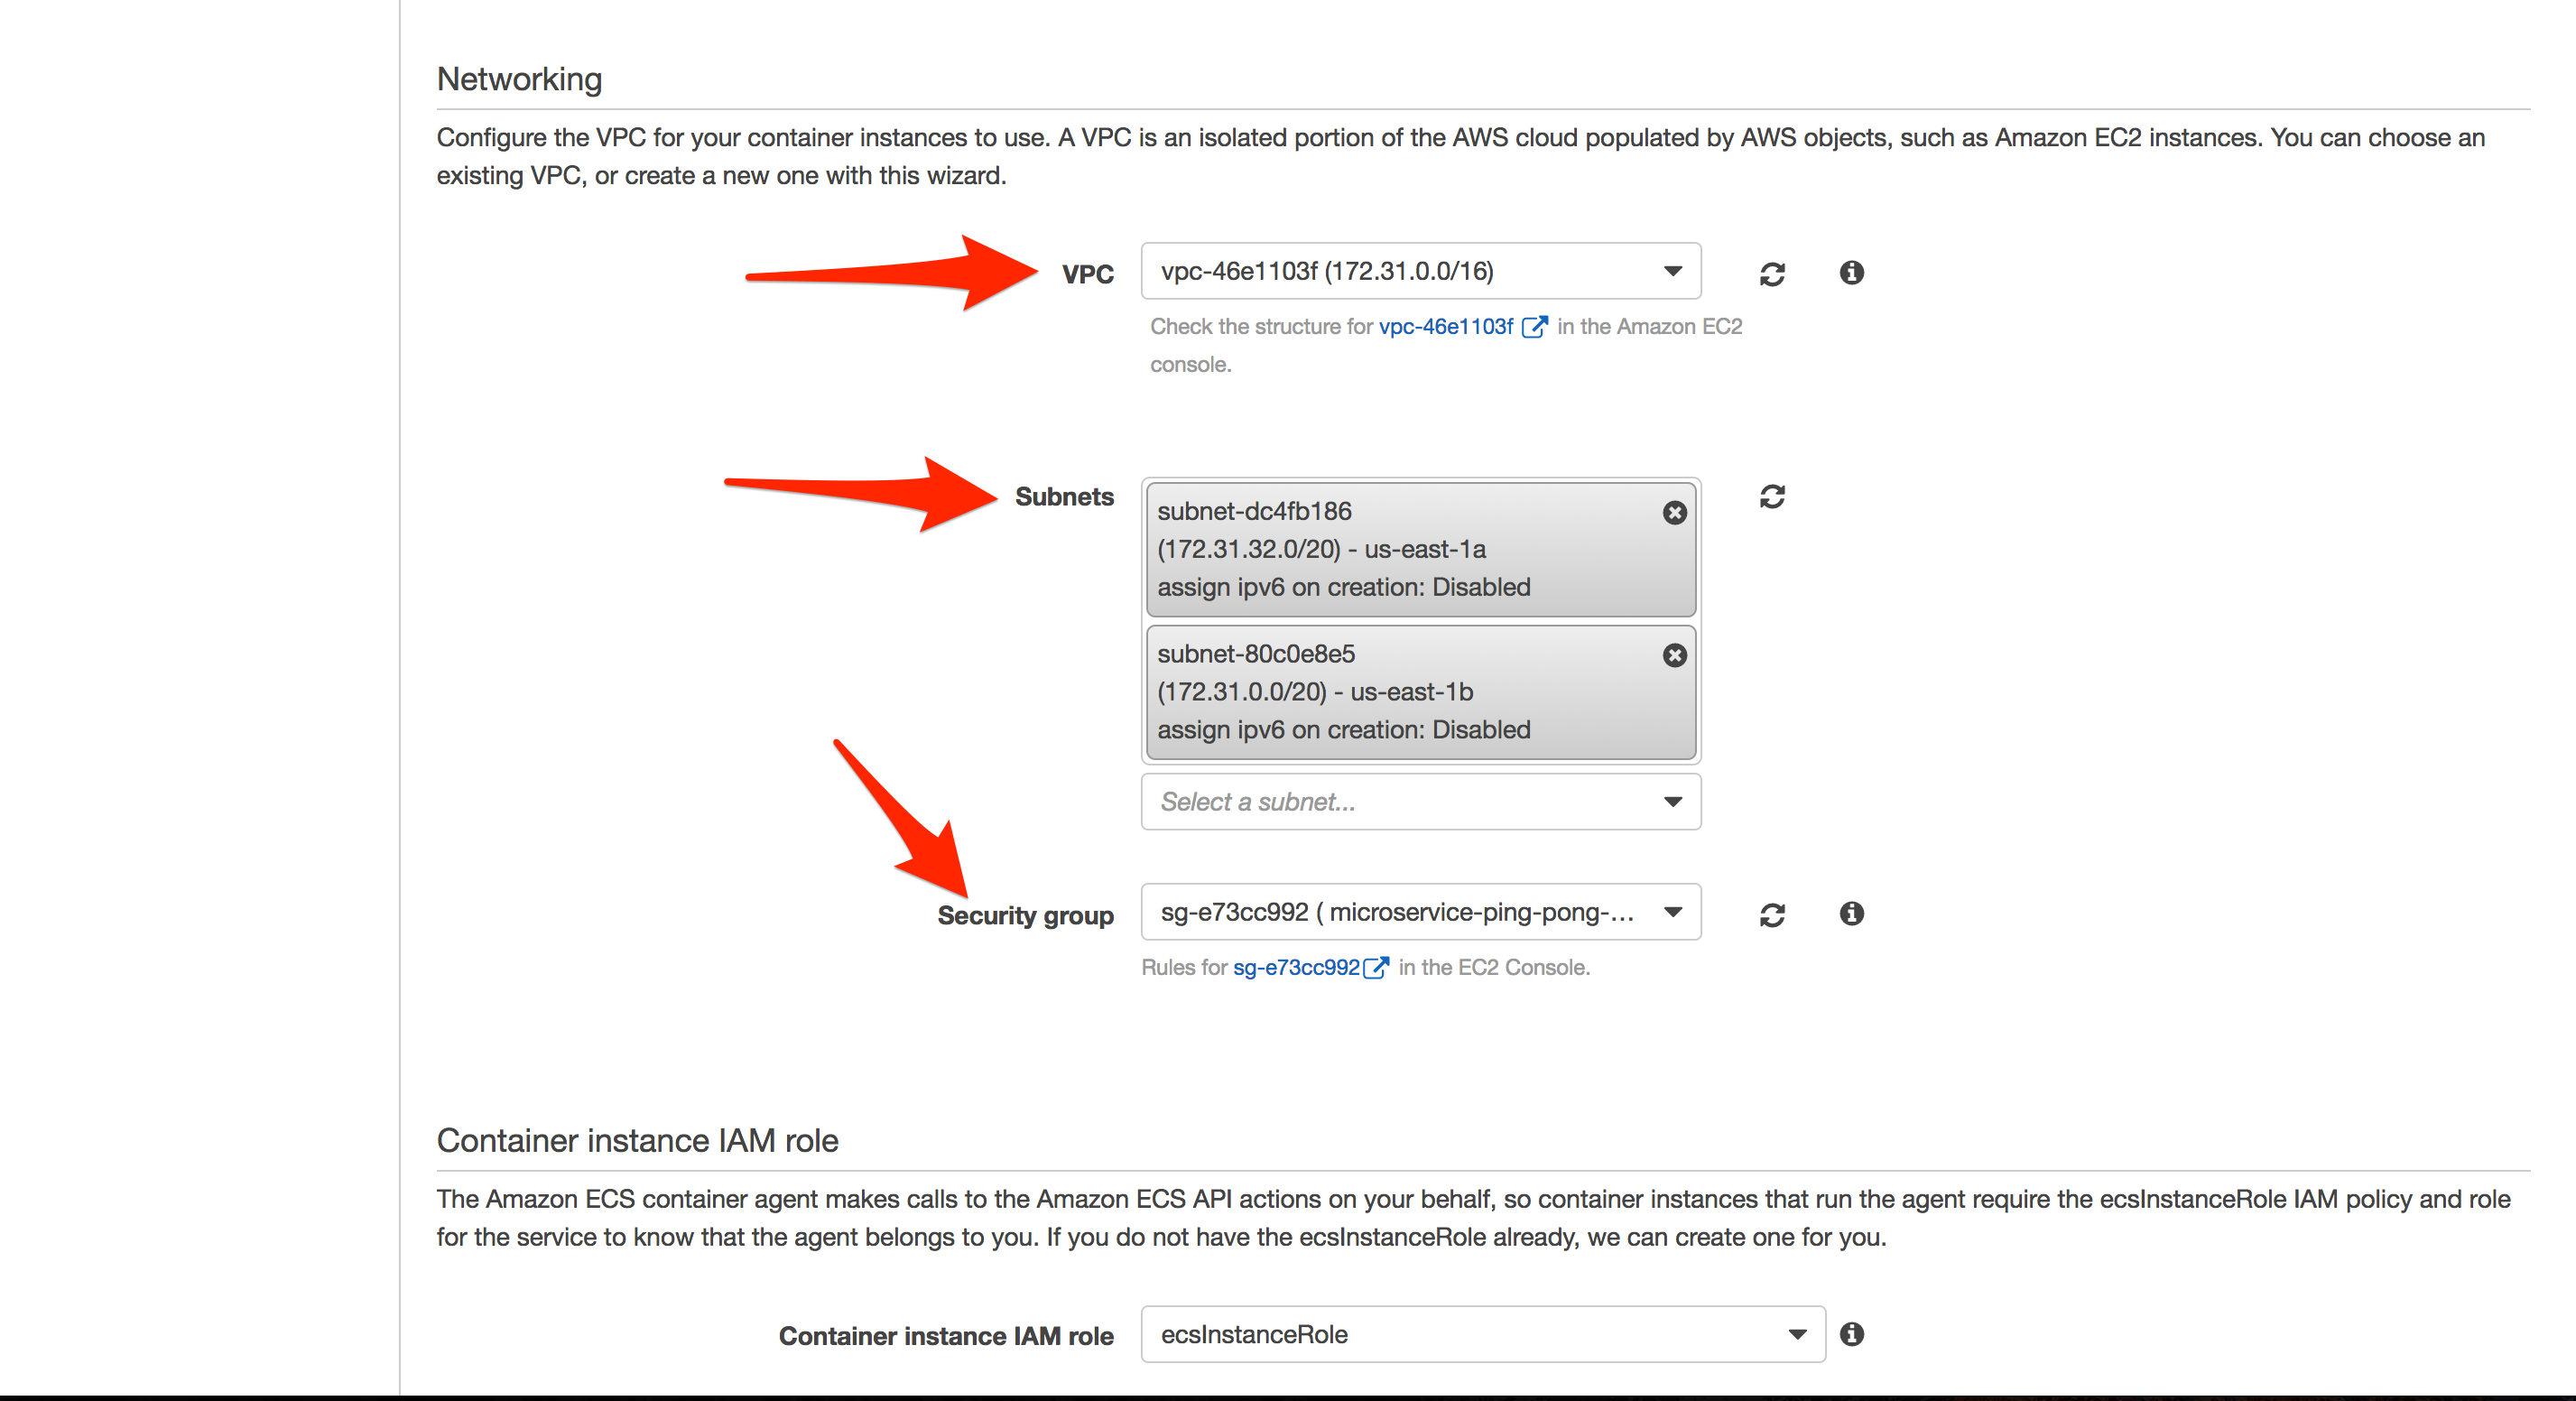
- Select the default VPC and the previously created Security Group along with the appropriate subnets
Navigate to the Cluster once it’s up, and then click the “ECS Instances” tab. From there, click the “Actions” dropdown and select “View Cluster Resources” to ensure all is well:

Task Definitions
Task Definitions define which containers make up the overall application and how much resources are allocated to each container. You can think of them as blueprints.
Within the ECS Console, click “Task Definitions” and then “Create new Task Definition”.
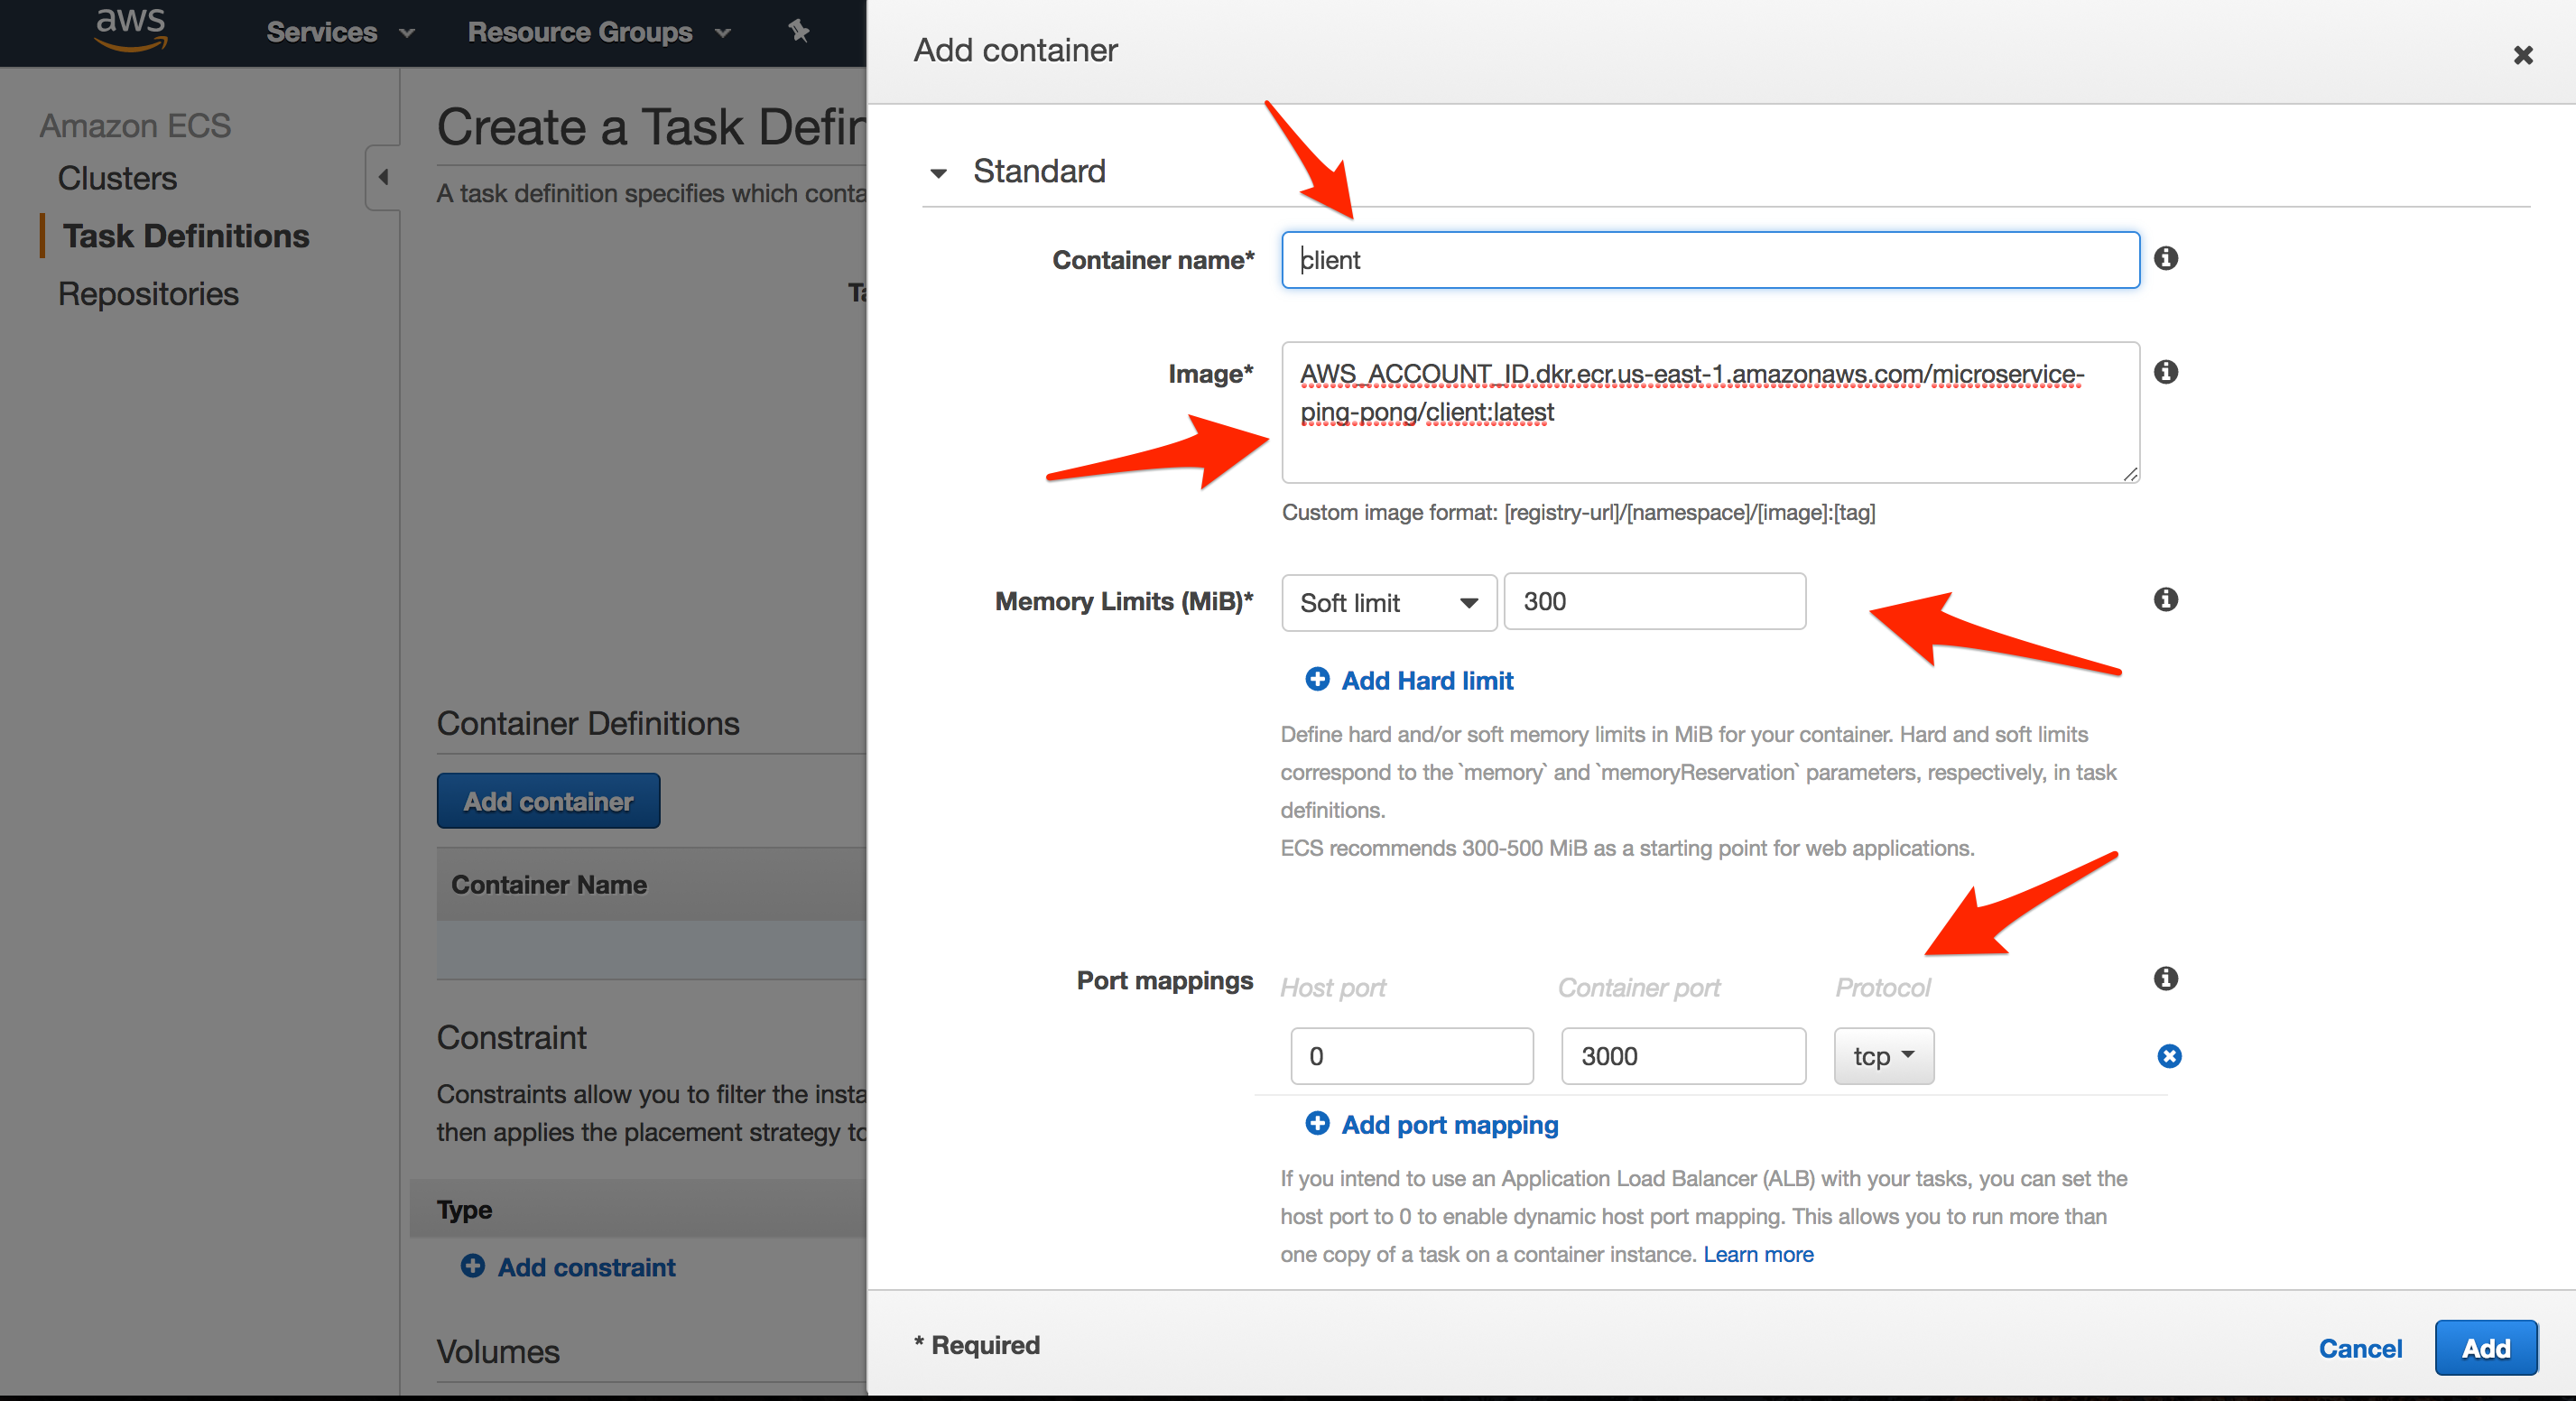
First, Update the “Task Definition Name” to microservice-ping-pong-client-td and then add a new container:
- “Container name”:
client - “Image”:
AWS_ACCOUNT_ID.dkr.ecr.us-east-1.amazonaws.com/microservice-ping-pong/client:latest - “Memory Limits (MB)”:
300soft limit - “Port mappings”:
0host,3000container
We set the host port for the client service to 0 so that a port is dynamically assigned when the Task is spun up.
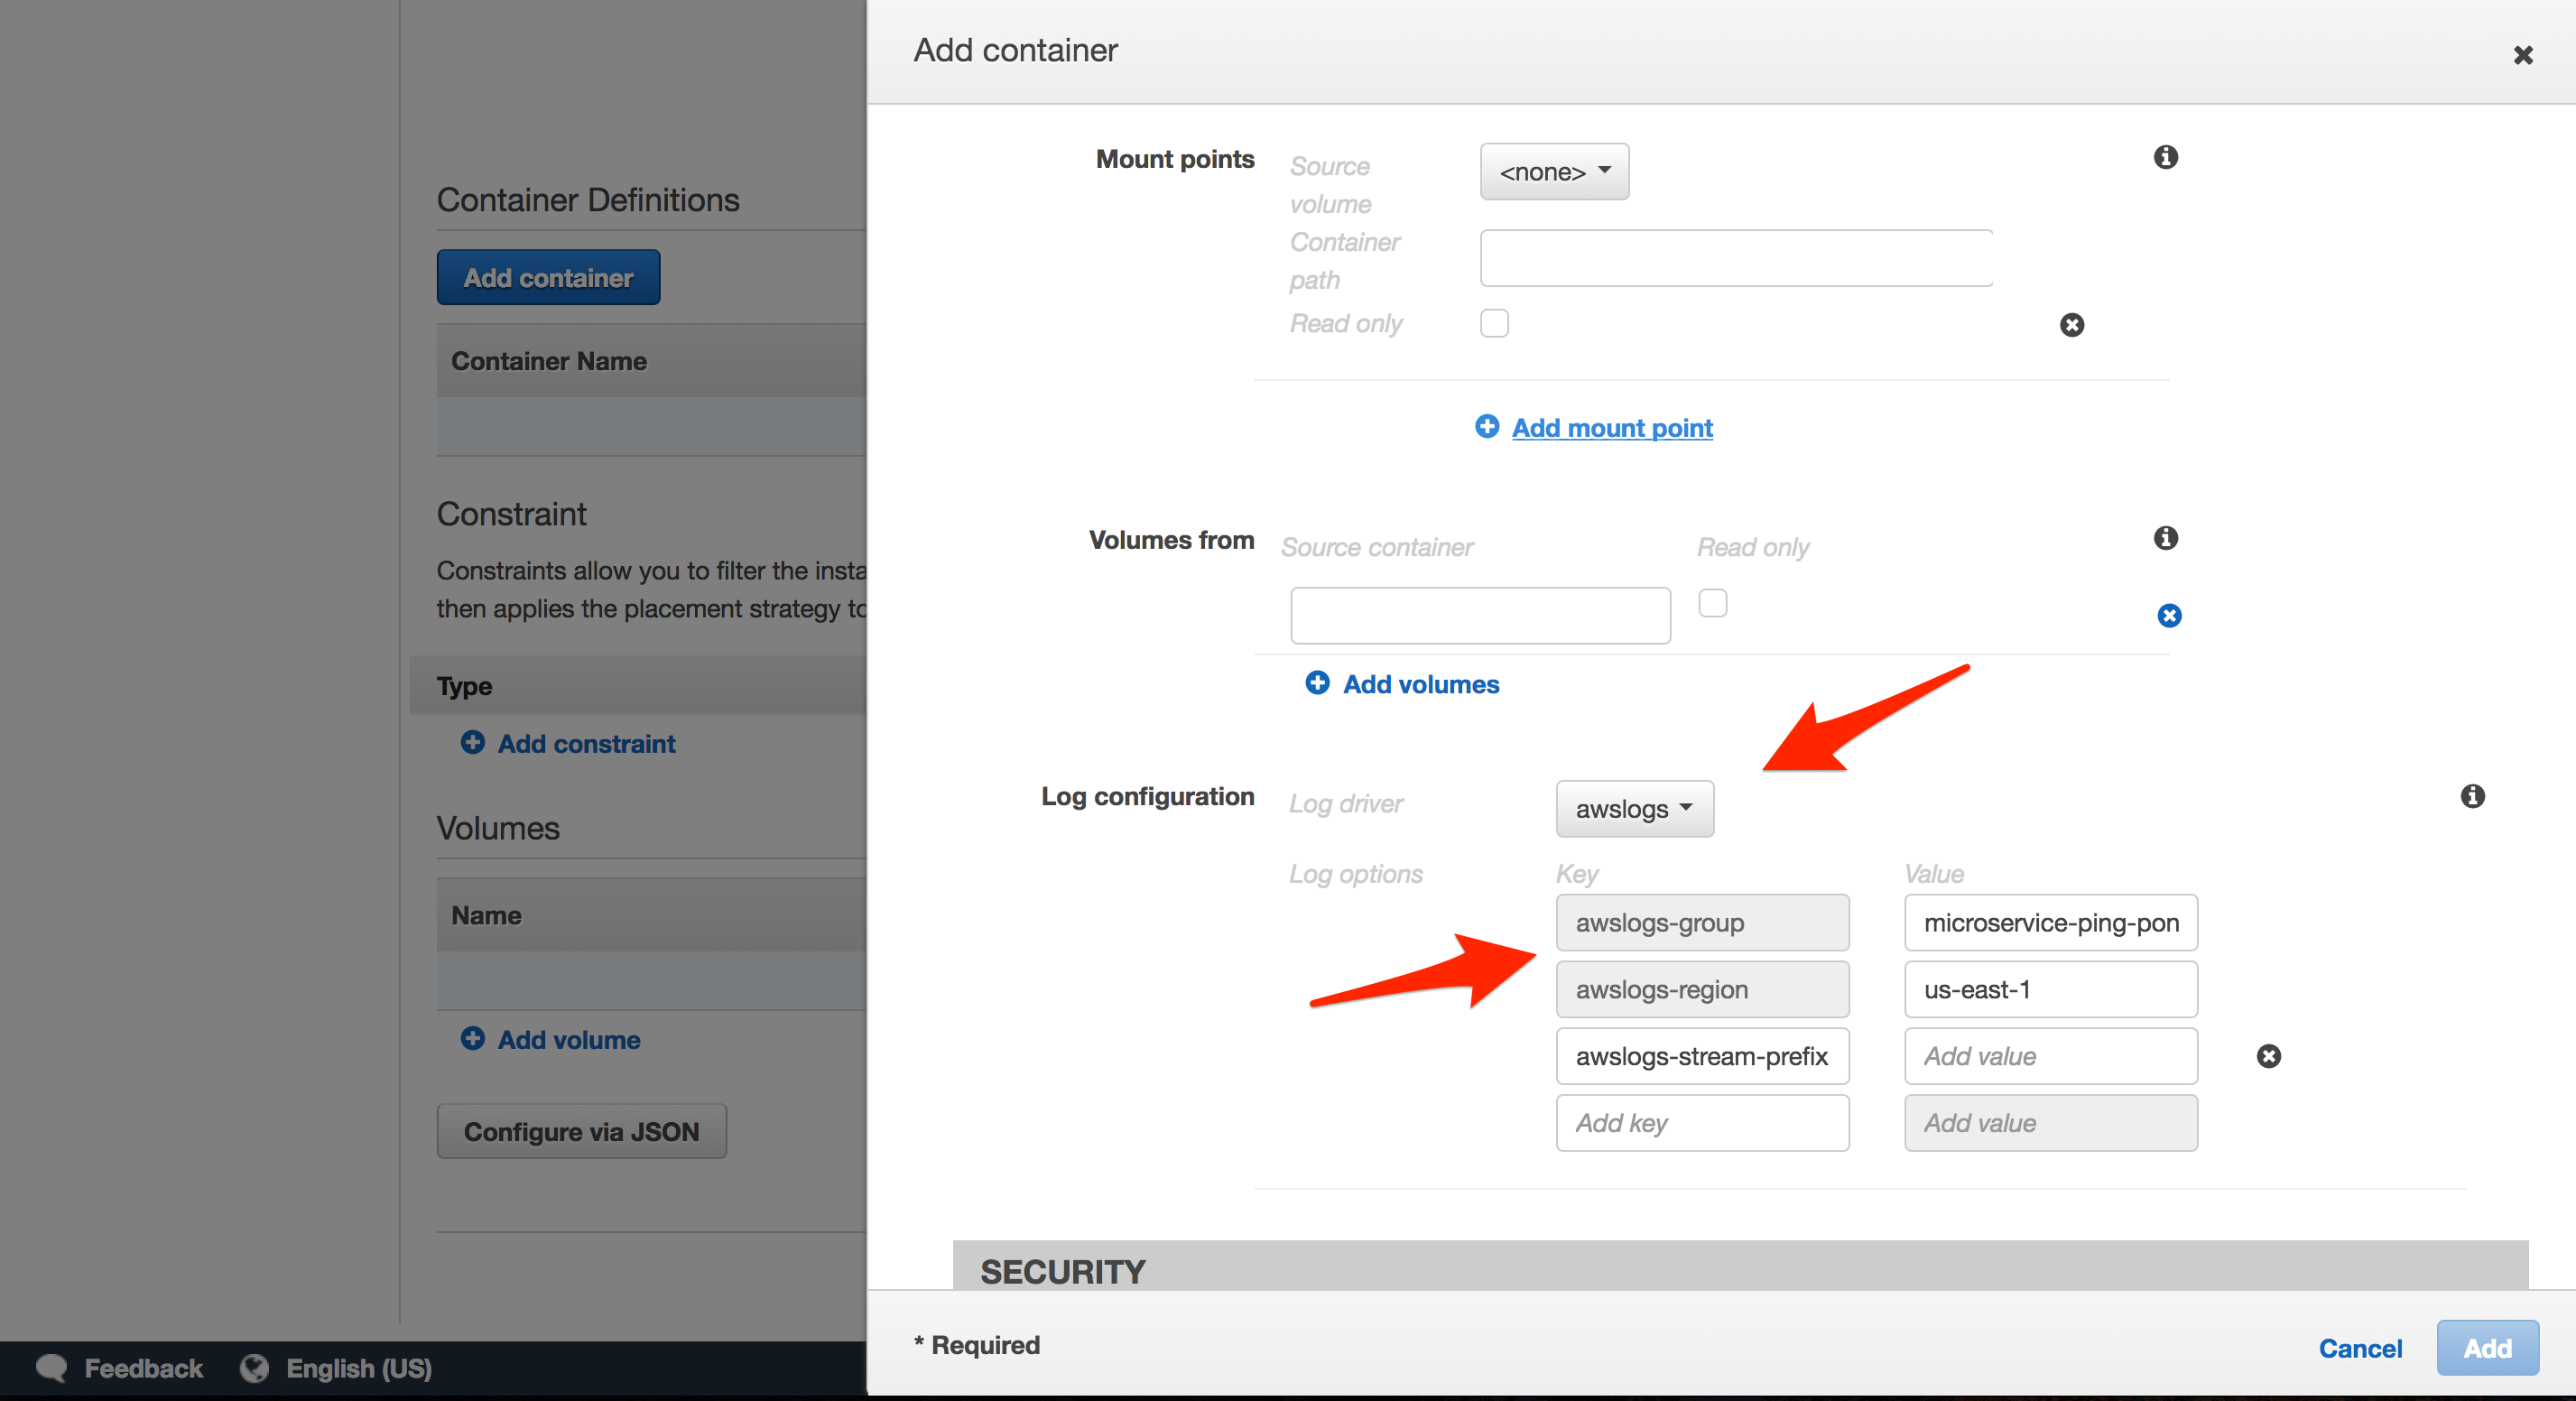
- “Log configuration”: It’s a good idea to configure logs, via LogConfiguration, to pipe logs to CloudWatch. To set up, we need to create a new Log Group. Simply navigate to CloudWatch, click “Logs” on the navigation pane, click the “Actions” drop-down button, and then select “Create log group”. Name the group
microservice-ping-pong-client.
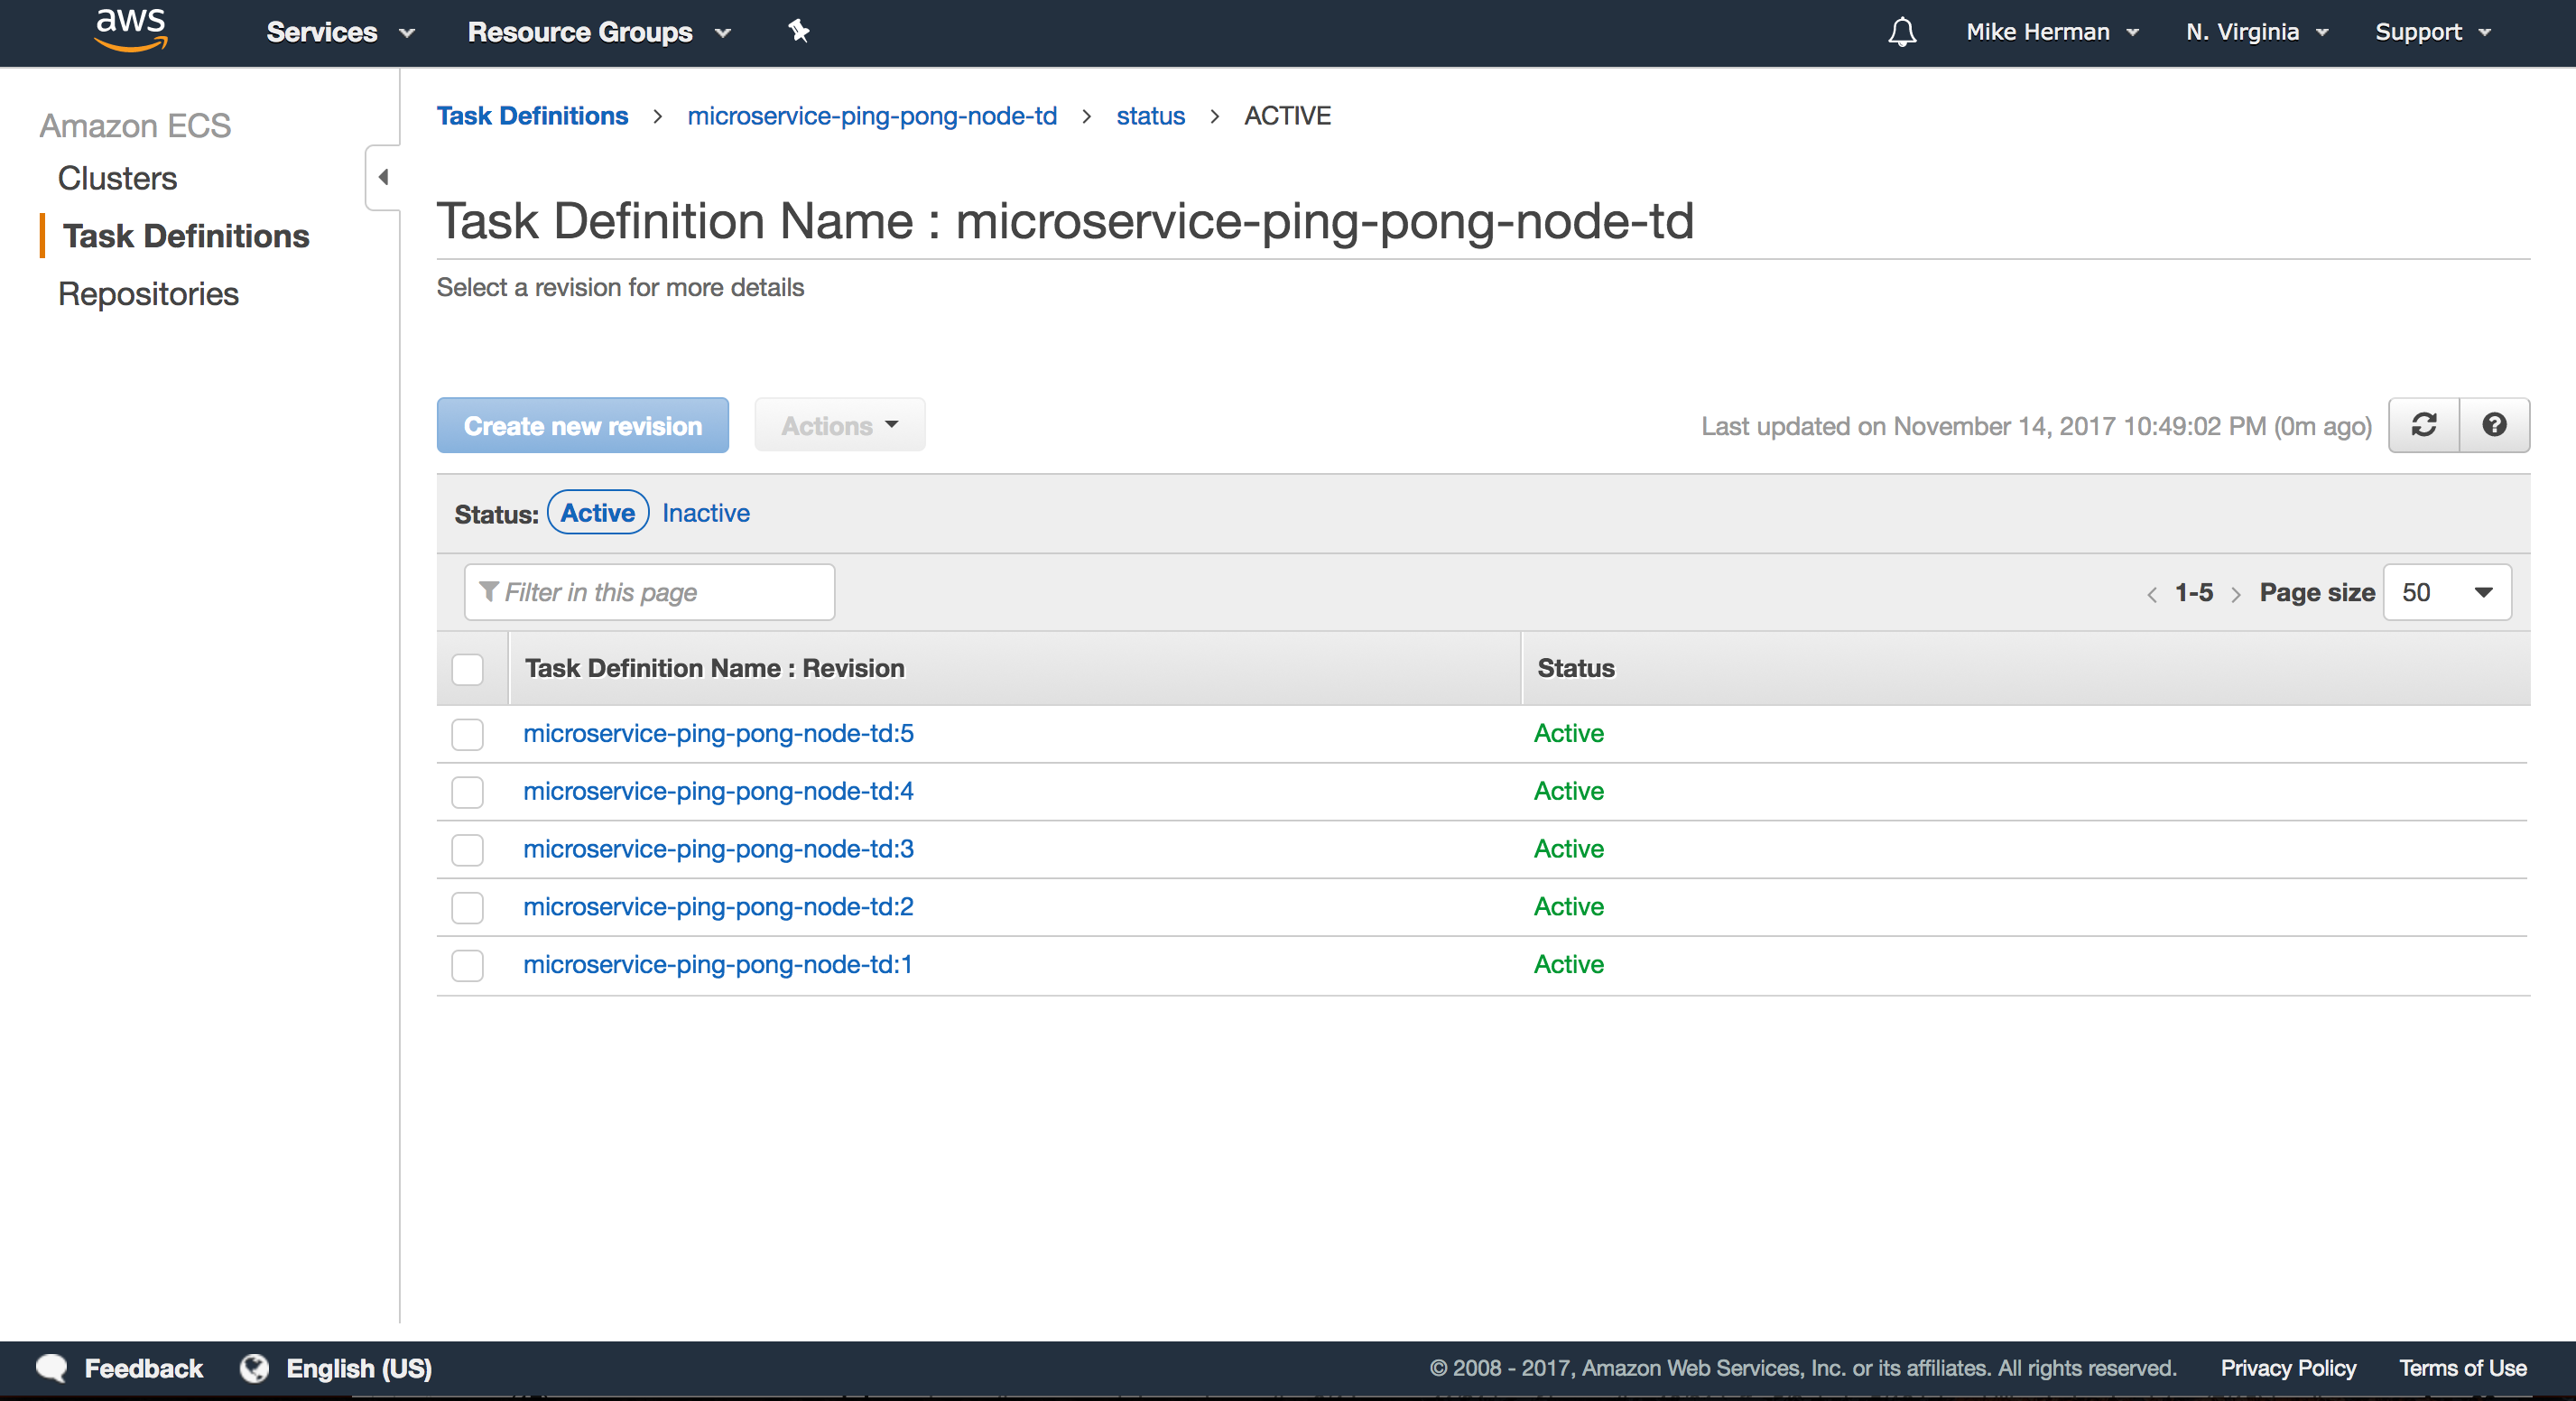
Then, set up a single Task Definition for each of the Node containers:
- “Name”:
microservice-ping-pong-node-td - “Container”:
- “Container name”:
node-john - “Image”:
AWS_ACCOUNT_ID.dkr.ecr.us-east-1.amazonaws.com/microservice-ping-pong/node:latest - “Memory Limits (MB)”:
300soft limit - “Port mappings”:
0host,3000container - “Links”:
node-paul,node-george,node-ringo - “Log configuration”:
microservice-ping-pong-node
- “Container name”:
- “Container”:
- “Container name”:
node-paul - “Image”:
AWS_ACCOUNT_ID.dkr.ecr.us-east-1.amazonaws.com/microservice-ping-pong/node:latest - “Memory Limits (MB)”:
300soft limit - “Port mappings”:
0host,3000container - “Log configuration”:
microservice-ping-pong-node
- “Container name”:
- “Container”:
- “Container name”:
node-george - “Image”:
AWS_ACCOUNT_ID.dkr.ecr.us-east-1.amazonaws.com/microservice-ping-pong/node:latest - “Memory Limits (MB)”:
300soft limit - “Port mappings”:
0host,3000container - “Log configuration”:
microservice-ping-pong-node
- “Container name”:
- “Container”:
- “Container name”:
node-ringo - “Image”:
AWS_ACCOUNT_ID.dkr.ecr.us-east-1.amazonaws.com/microservice-ping-pong/node:latest - “Memory Limits (MB)”:
300soft limit - “Port mappings”:
0host,3000container - “Log configuration”:
microservice-ping-pong-node
- “Container name”:
Services
Services instantiate the containers from the Task Definitions and run them on EC2 boxes within an ECS Cluster. Such instances are called Tasks. To create a new Service, on the “Services” tab within the newly created Cluster, click “Create”.
Add the following Services…
Client
- “Task Definition”:
microservice-ping-pong-client-td:LATEST_REVISION_NUMBER - “Service name”:
microservice-ping-pong-client-service - “Number of tasks”: 1

Click “Next”. On the “Configure network” step, select the “Application Load Balancer” under “Load balancer type”.
- “Load balancer name”:
microservice-ping-pong-alb - “Container name : port”:
client:0:3000

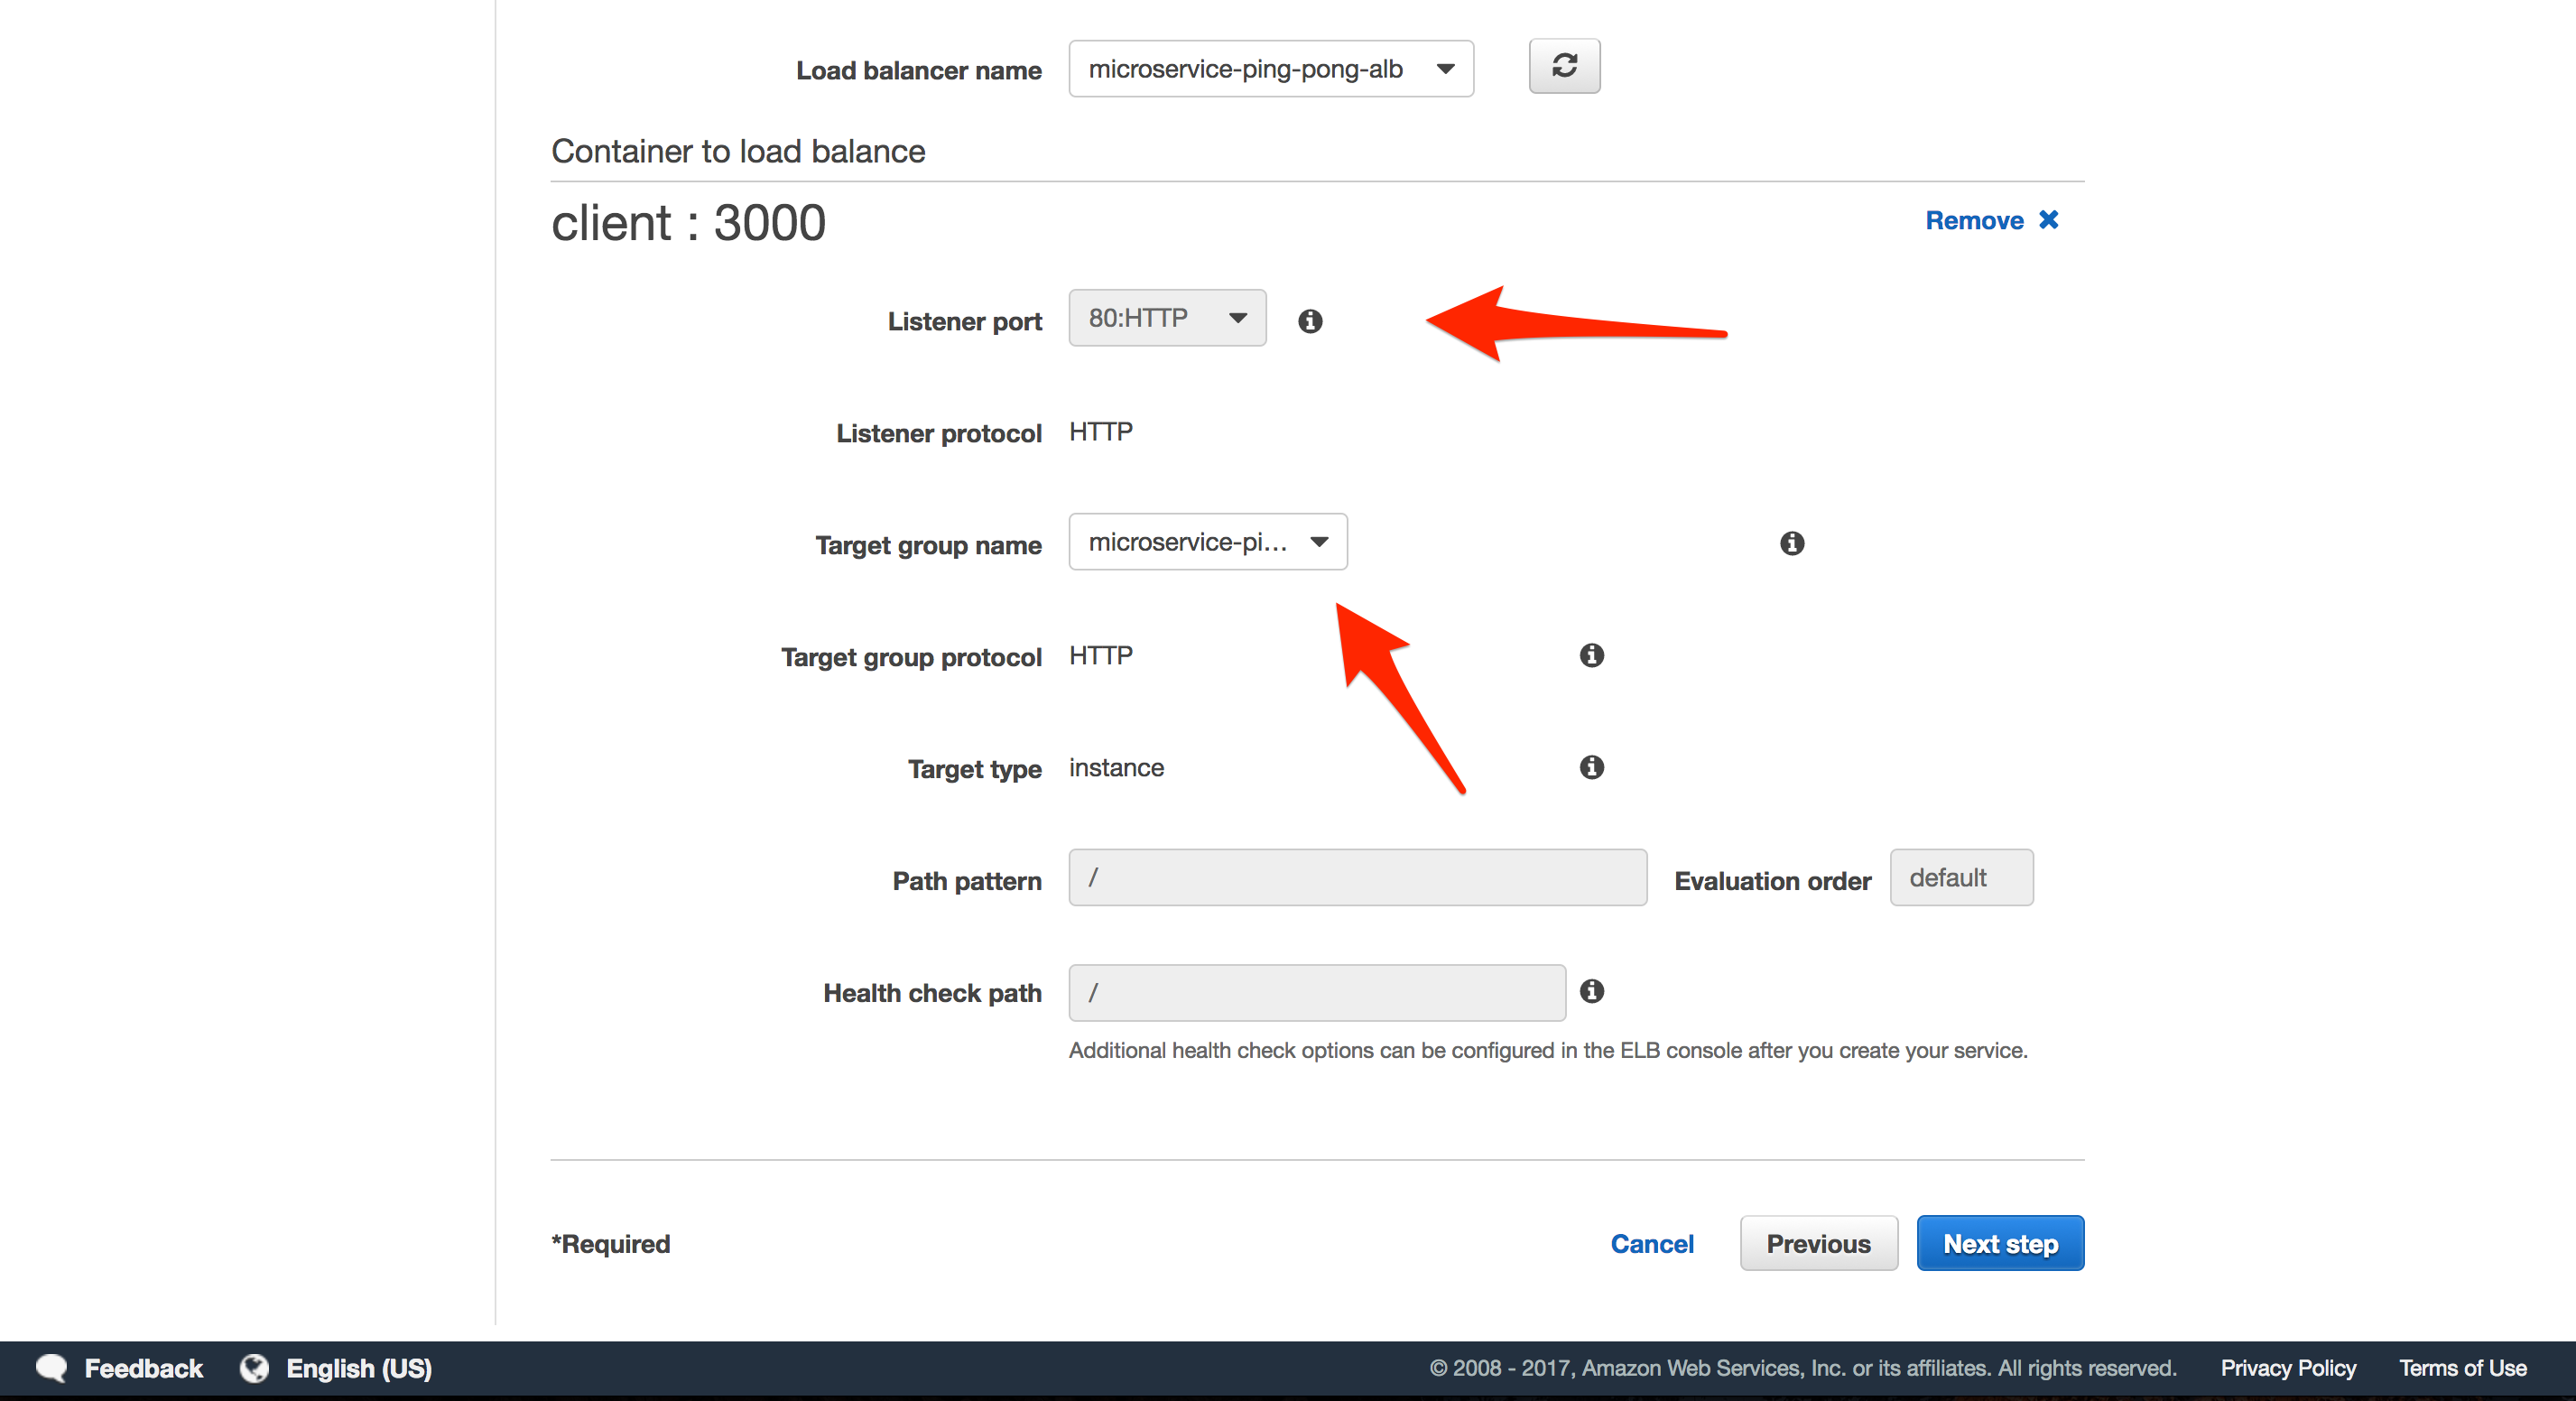
Click “Add to load balancer”.
- “Listener port”:
80:HTTP - “Target group name”:
microservice-ping-pong-client-tg
Click the next button a few times, and then “Create Service”.
Node
- “Task Definition”:
microservice-ping-pong-node-td:LATEST_REVISION_NUMBER - “Service name”:
microservice-ping-pong-node-service - “Number of tasks”: 1
Click “Next”. On the “Configure network” step, select the “Application Load Balancer” under “Load balancer type”.
- “Load balancer name”:
microservice-ping-pong-alb - “Container name : port”:
node-john:0:3000
Click “Add to load balancer”.
- “Listener port”:
80:HTTP - “Target group name”:
microservice-ping-pong-node-tg
Sanity Check
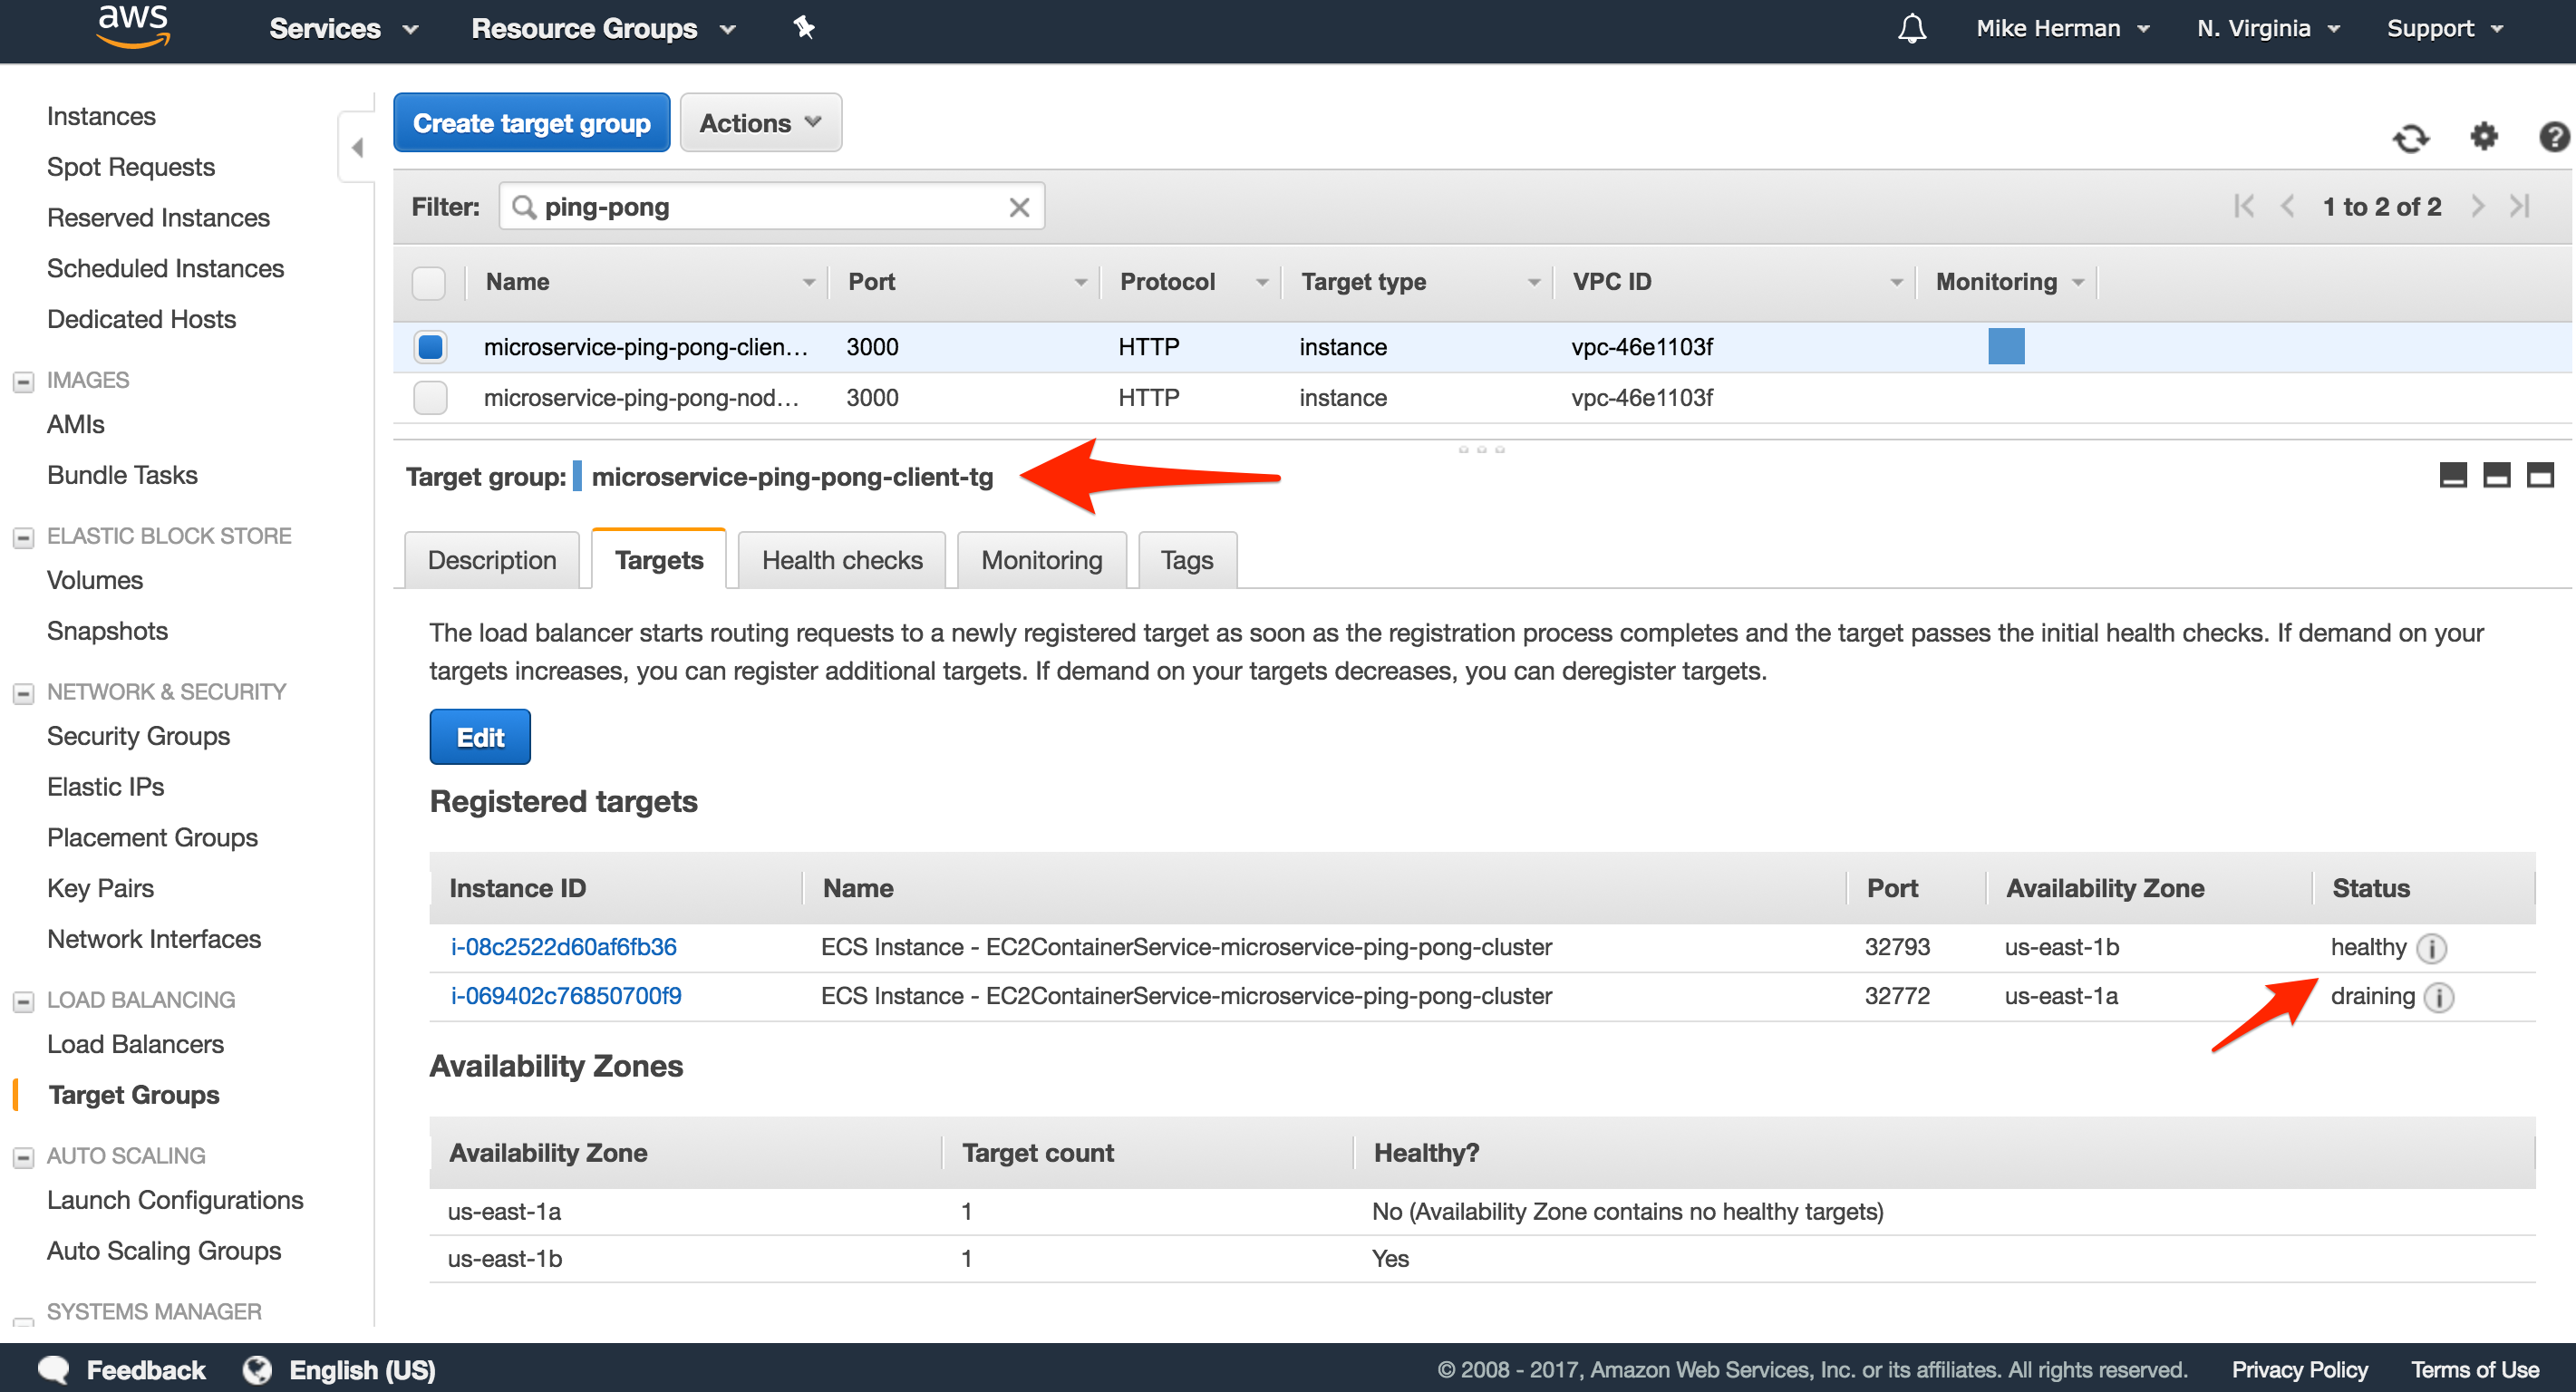
Navigate to the EC2 Dashboard, and click “Target Groups”. Make sure microservice-ping-pong-client-tg and microservice-ping-pong-node-tg have a single registered instance each. Both instances should also be unhealthy because they failed their respective health checks.
To get them to pass the health checks, we need to add another inbound rule to the Security Group associated with the containers (which we defined when we configured the Cluster), allowing traffic from the Load Balancer to reach the containers.
Inbound Rule
Within the EC2 Dashboard, click “Security Groups” and select the Security group associated with the containers, which is the same group assigned to the Load Balancer). Click the “Inbound” tab and then click “Edit”
Add a new rule:
- “Type”:
All traffic - “Port Range”:
0 - 65535 - “Source”: Choose
Custom, then add the Security Group ID
Once added, the next time a container is added to each of the Target Groups, the instance should be healthy:

Then, navigate back to the Load Balancer and grab the “DNS name” from the “Description” tab. Test each endpoint in your browser:
- http://LOAD_BALANCER_DNS_NAME
- http://LOAD_BALANCER_DNS_NAME/ping
- http://LOAD_BALANCER_DNS_NAME/start
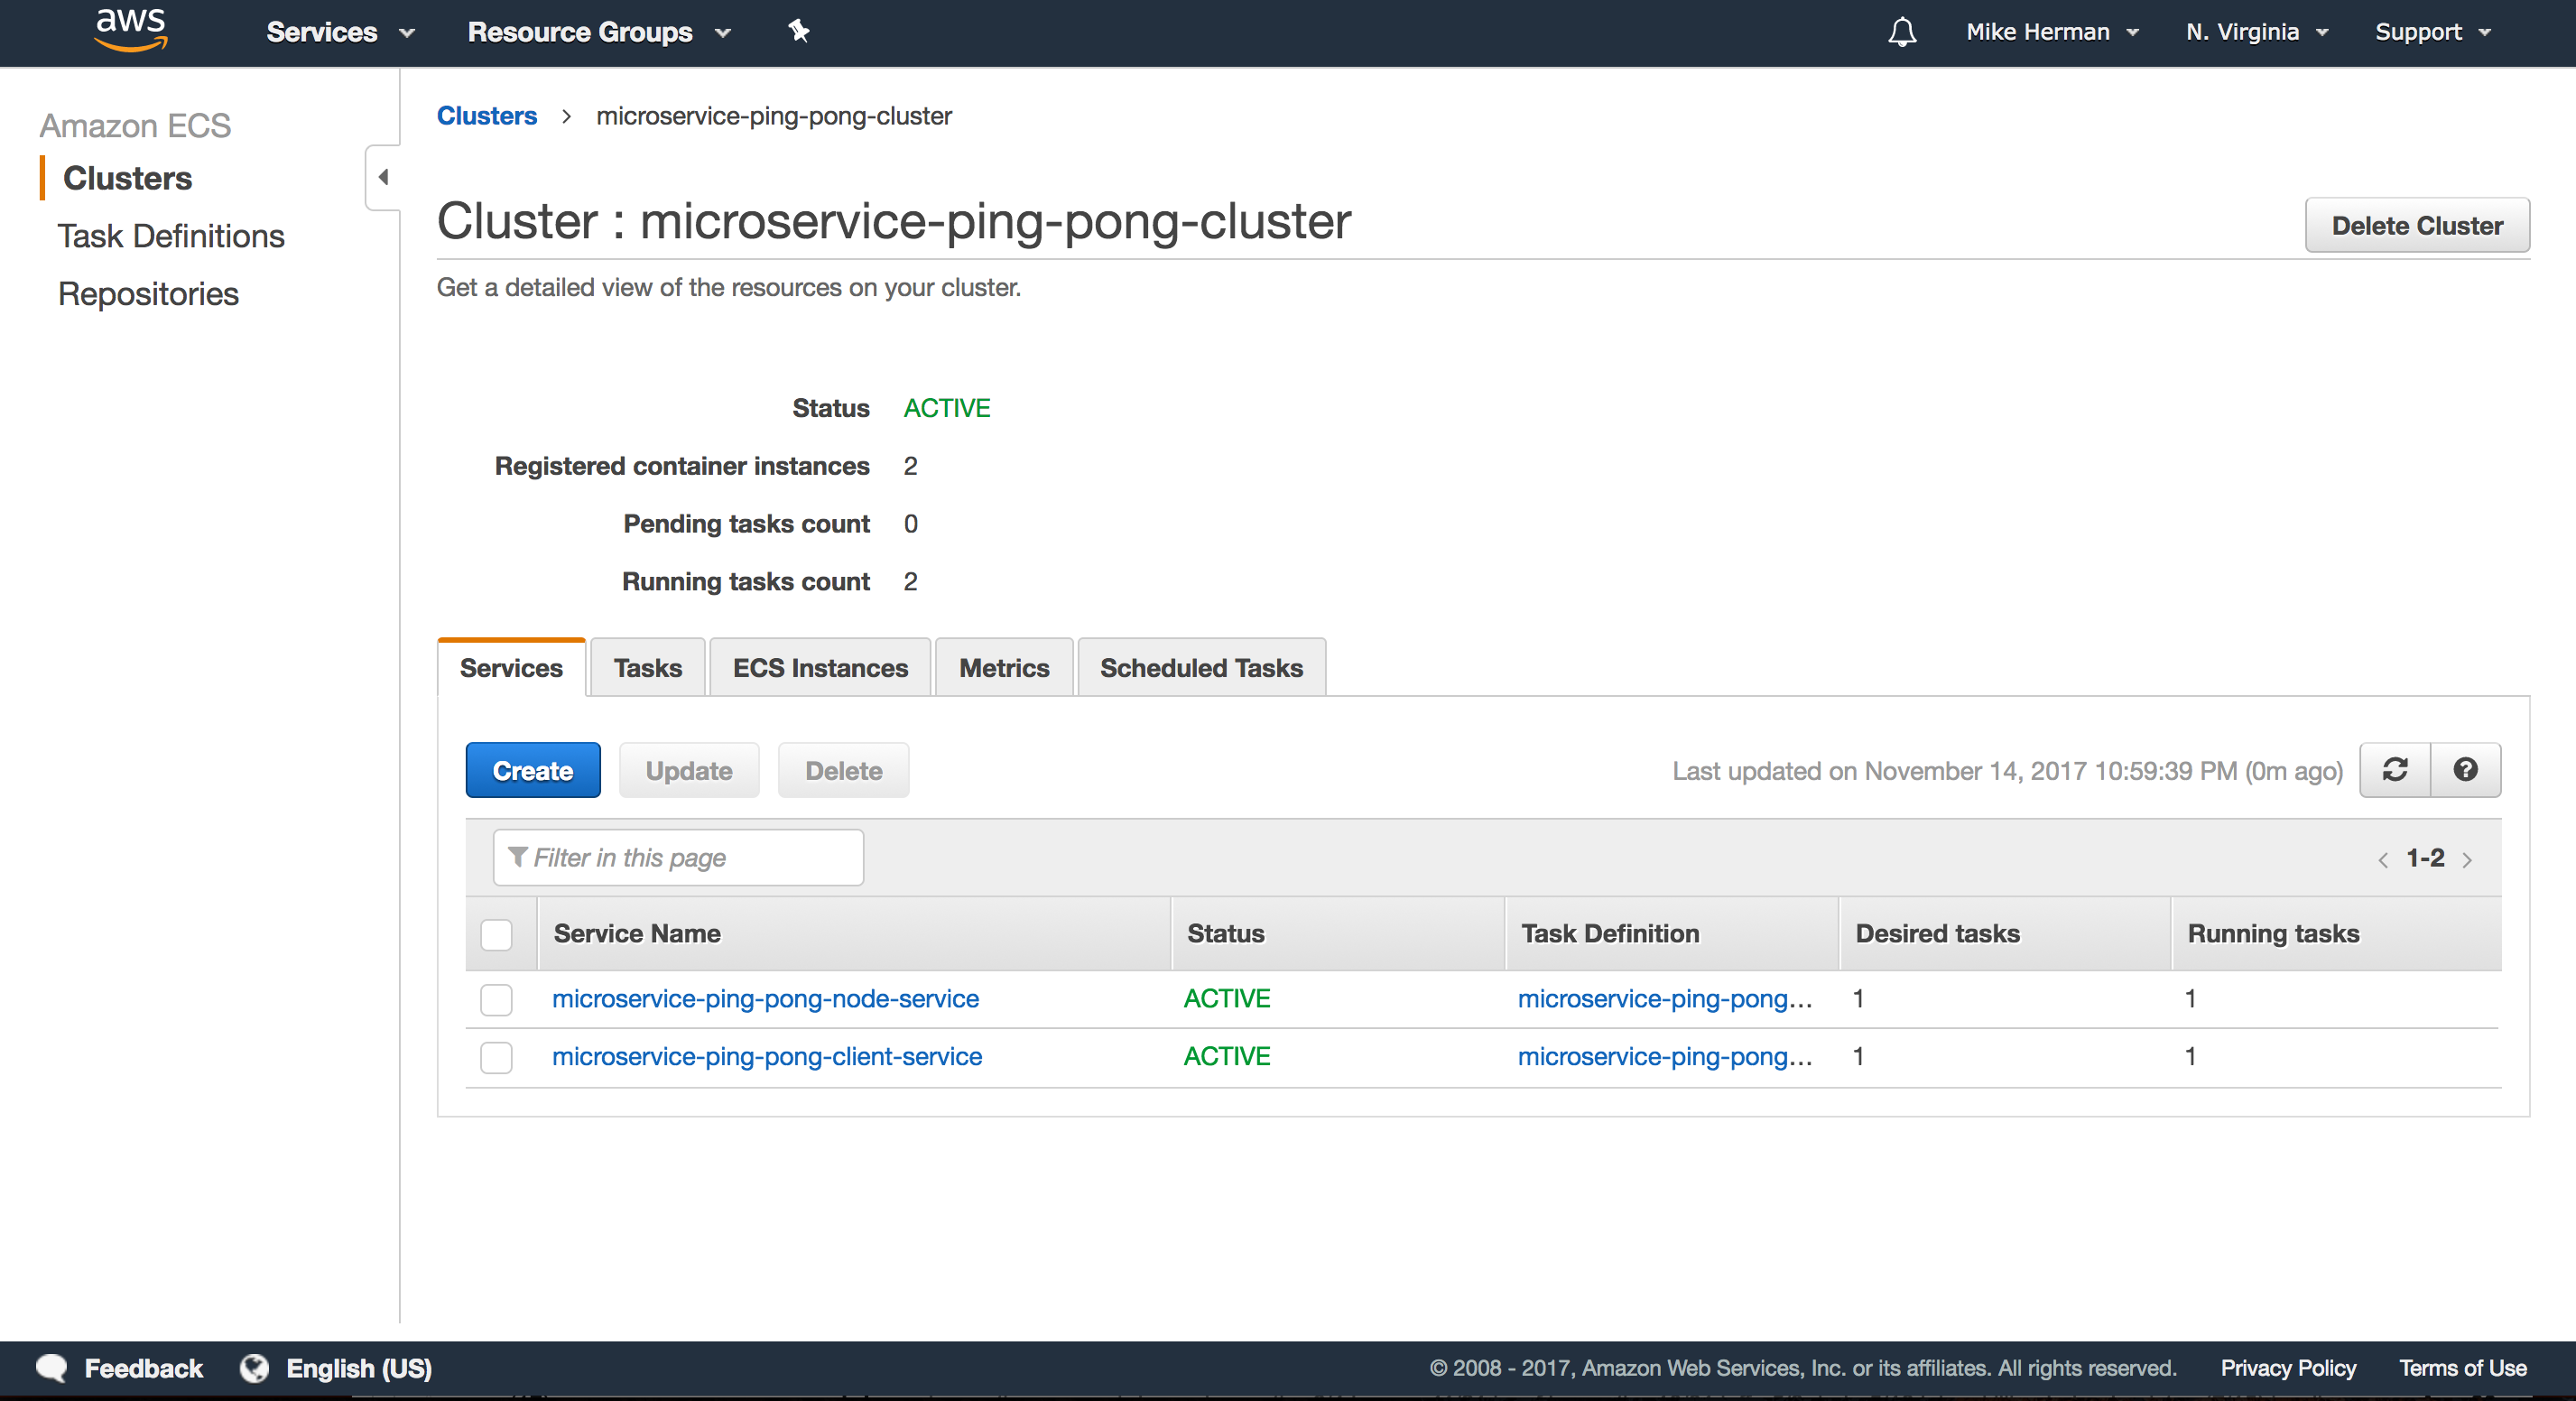
Essentially, when the Service was spun up, ECS automatically discovered and associated the new Cluster instances with the Application Load Balancer.

Zero Downtime Deployments
Check you understanding and try this on your own.
Steps
- Make a quick change to the app locally.
- Build, tag, and push the new images.
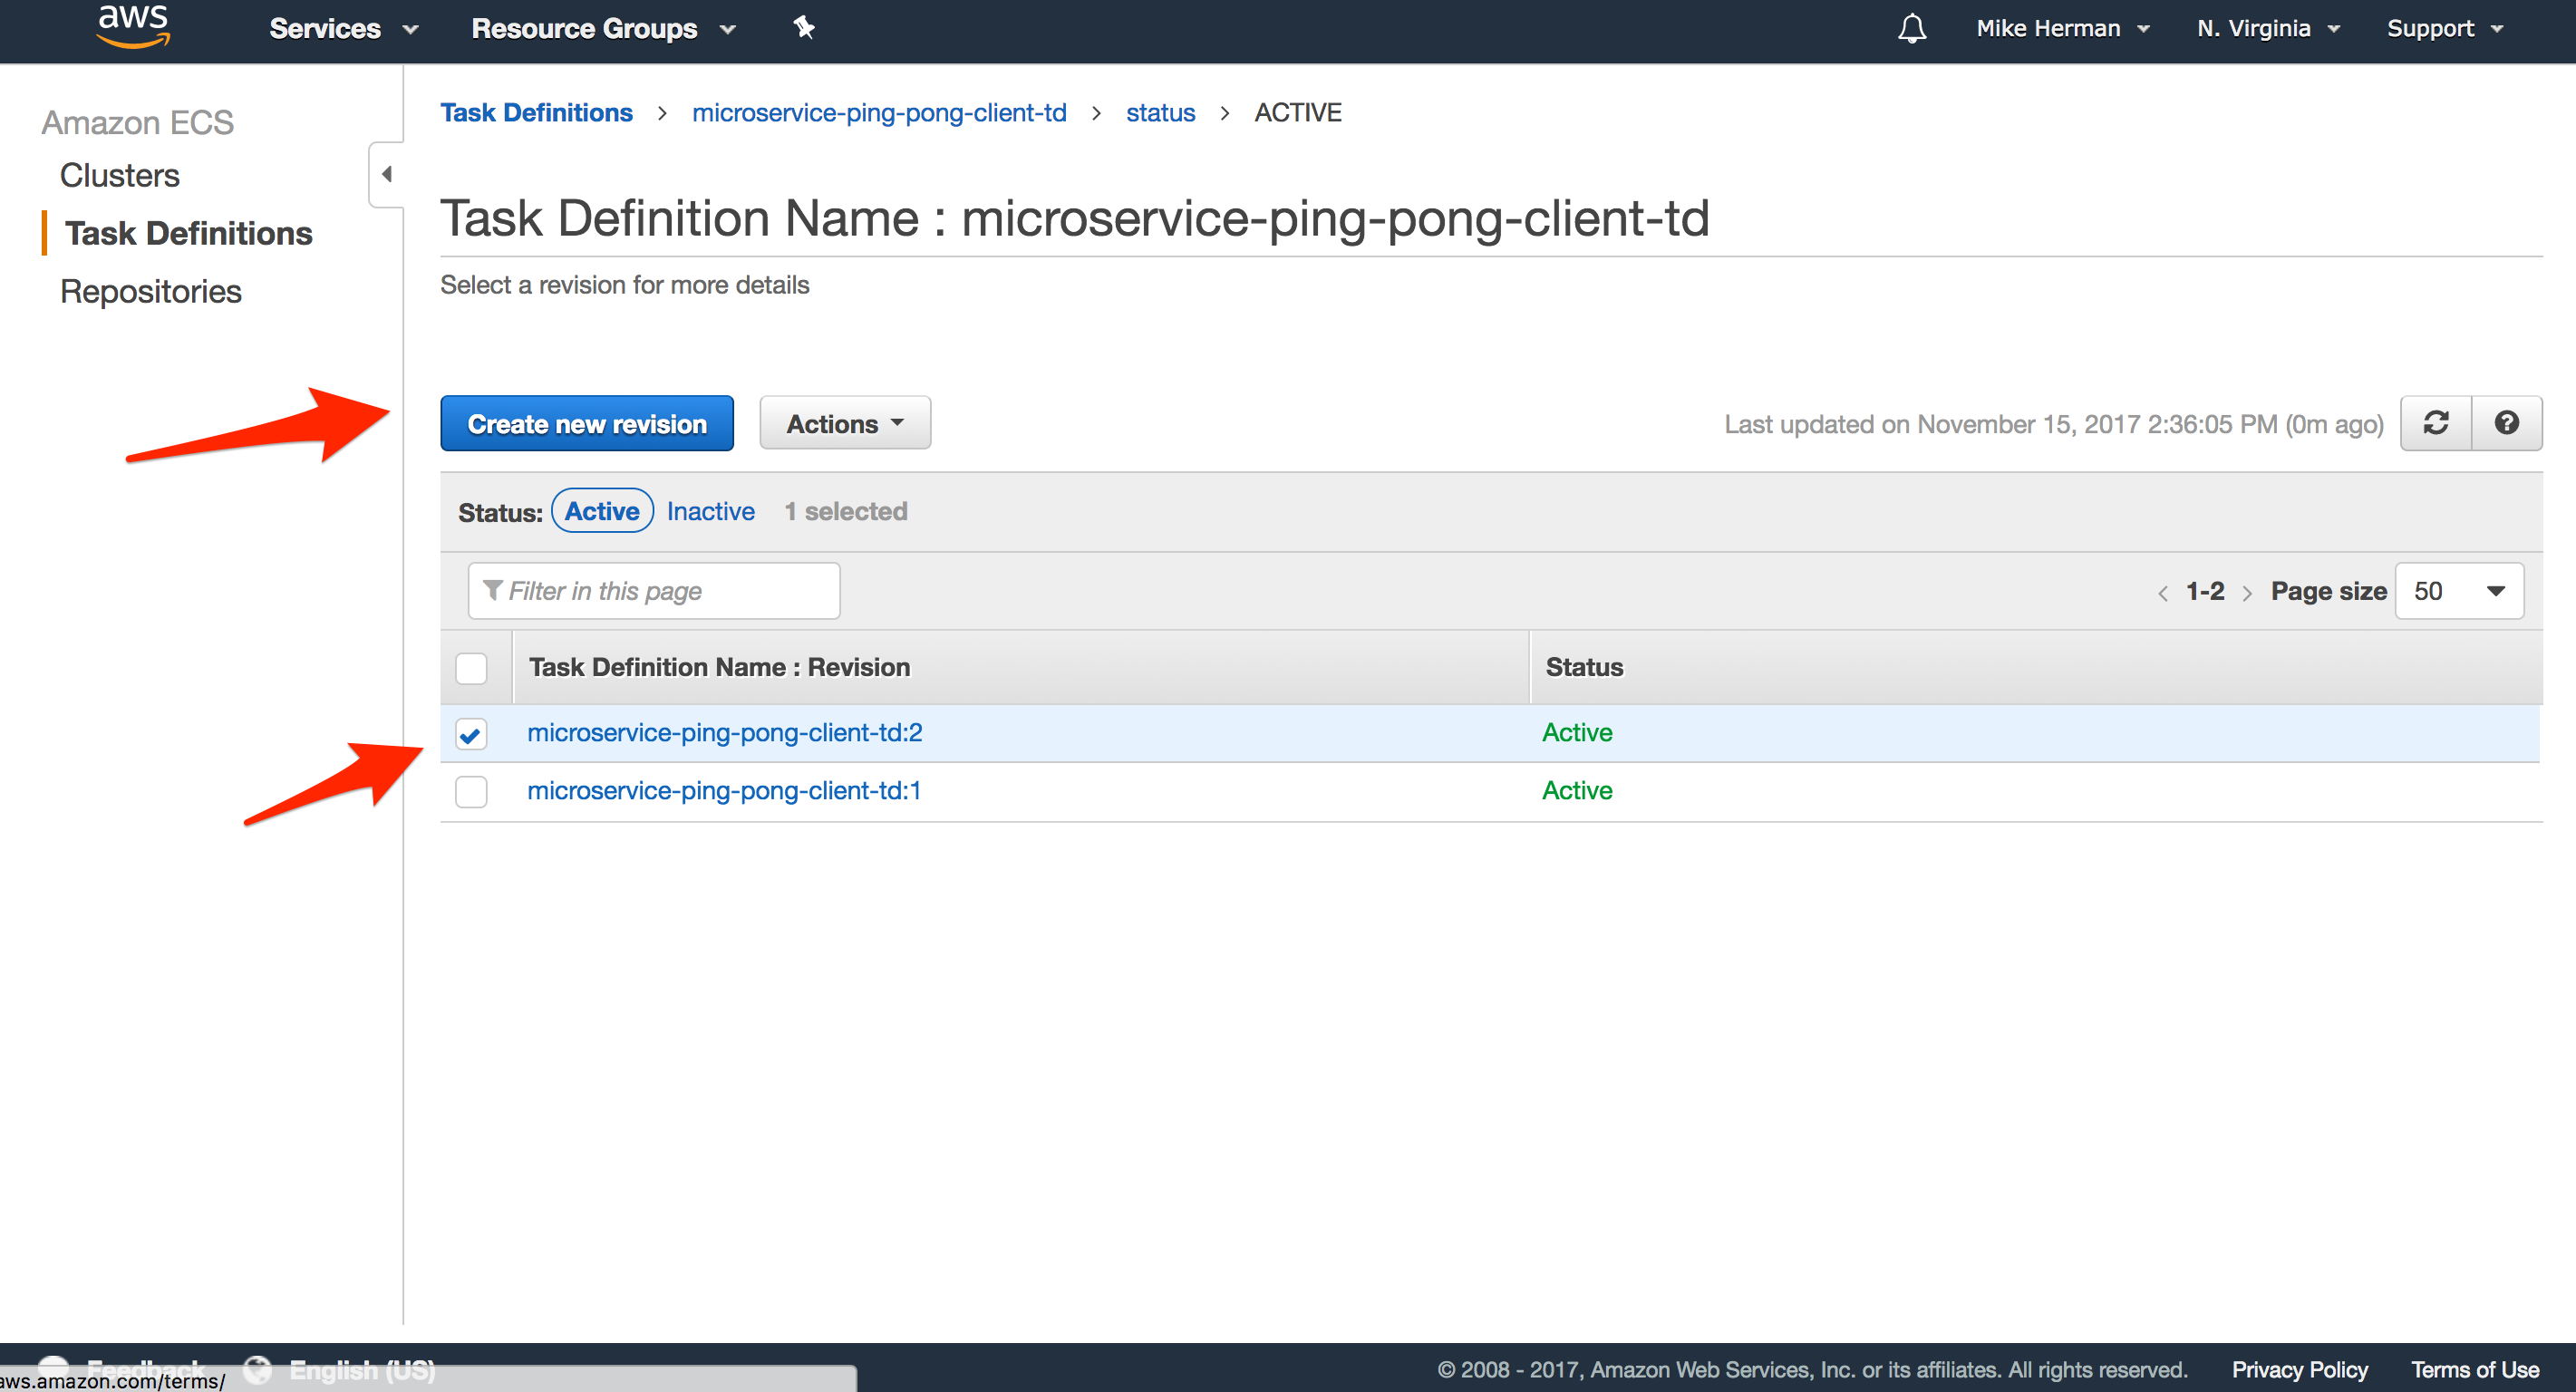
-
Add a new revision to the task definition.
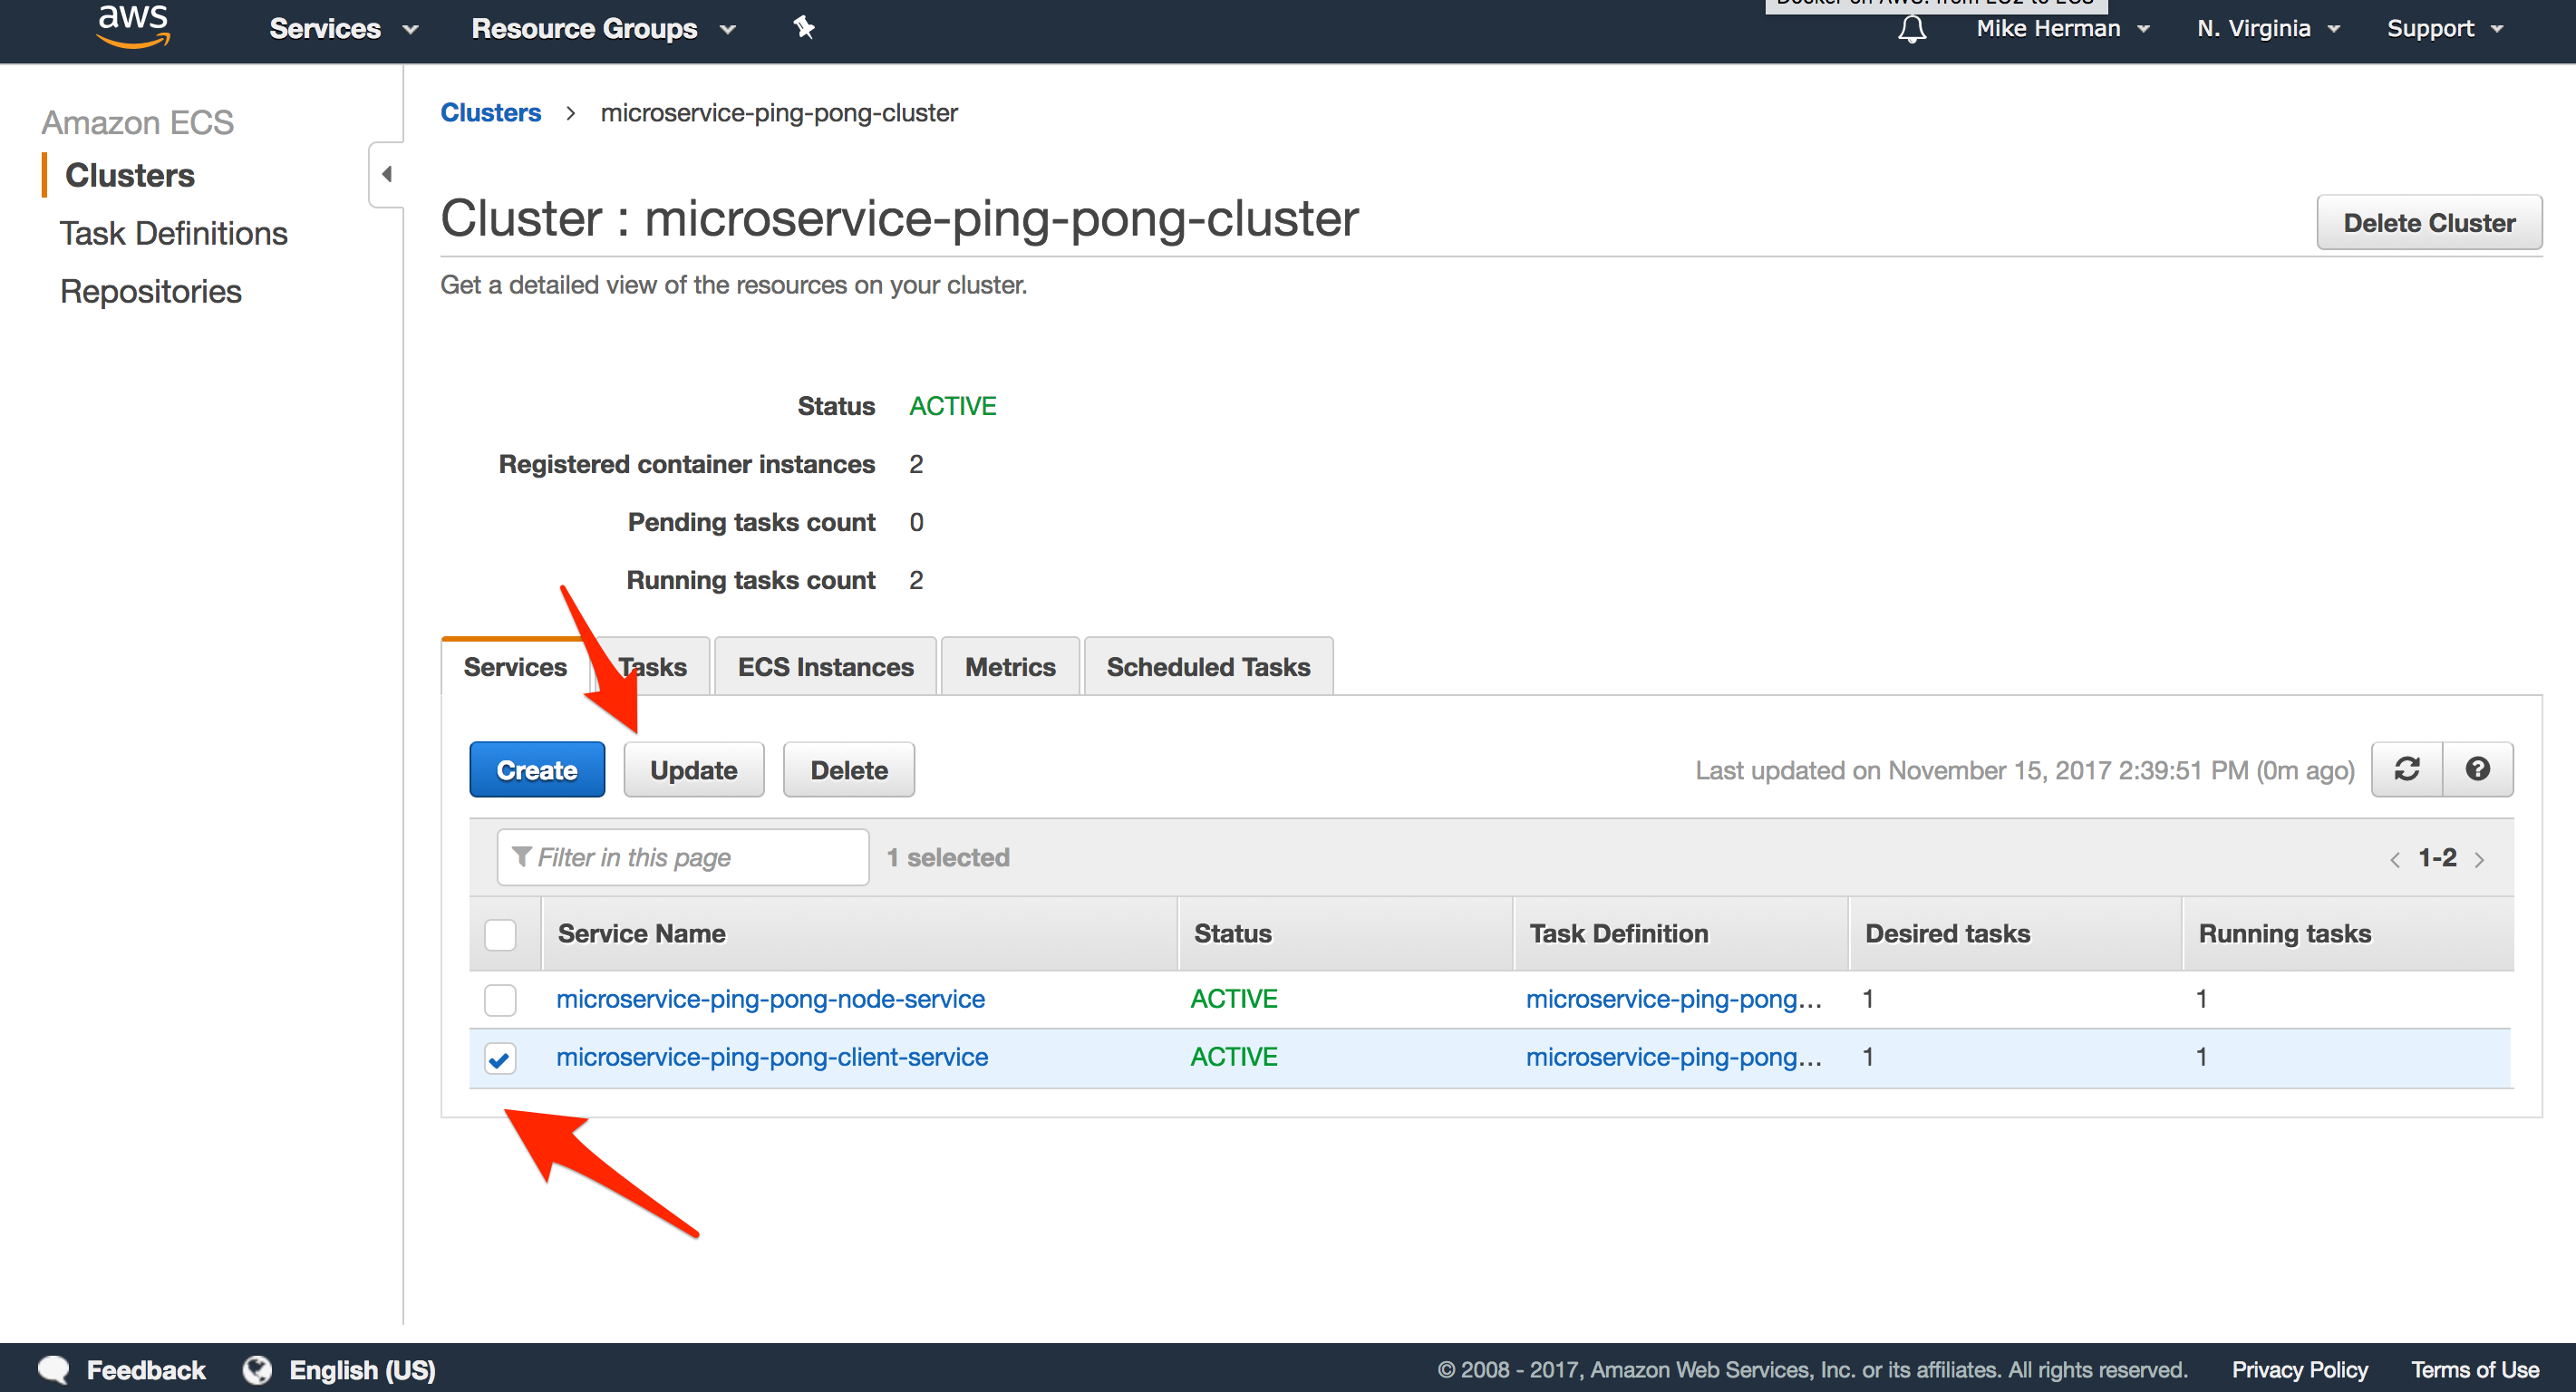
-
Update the service.
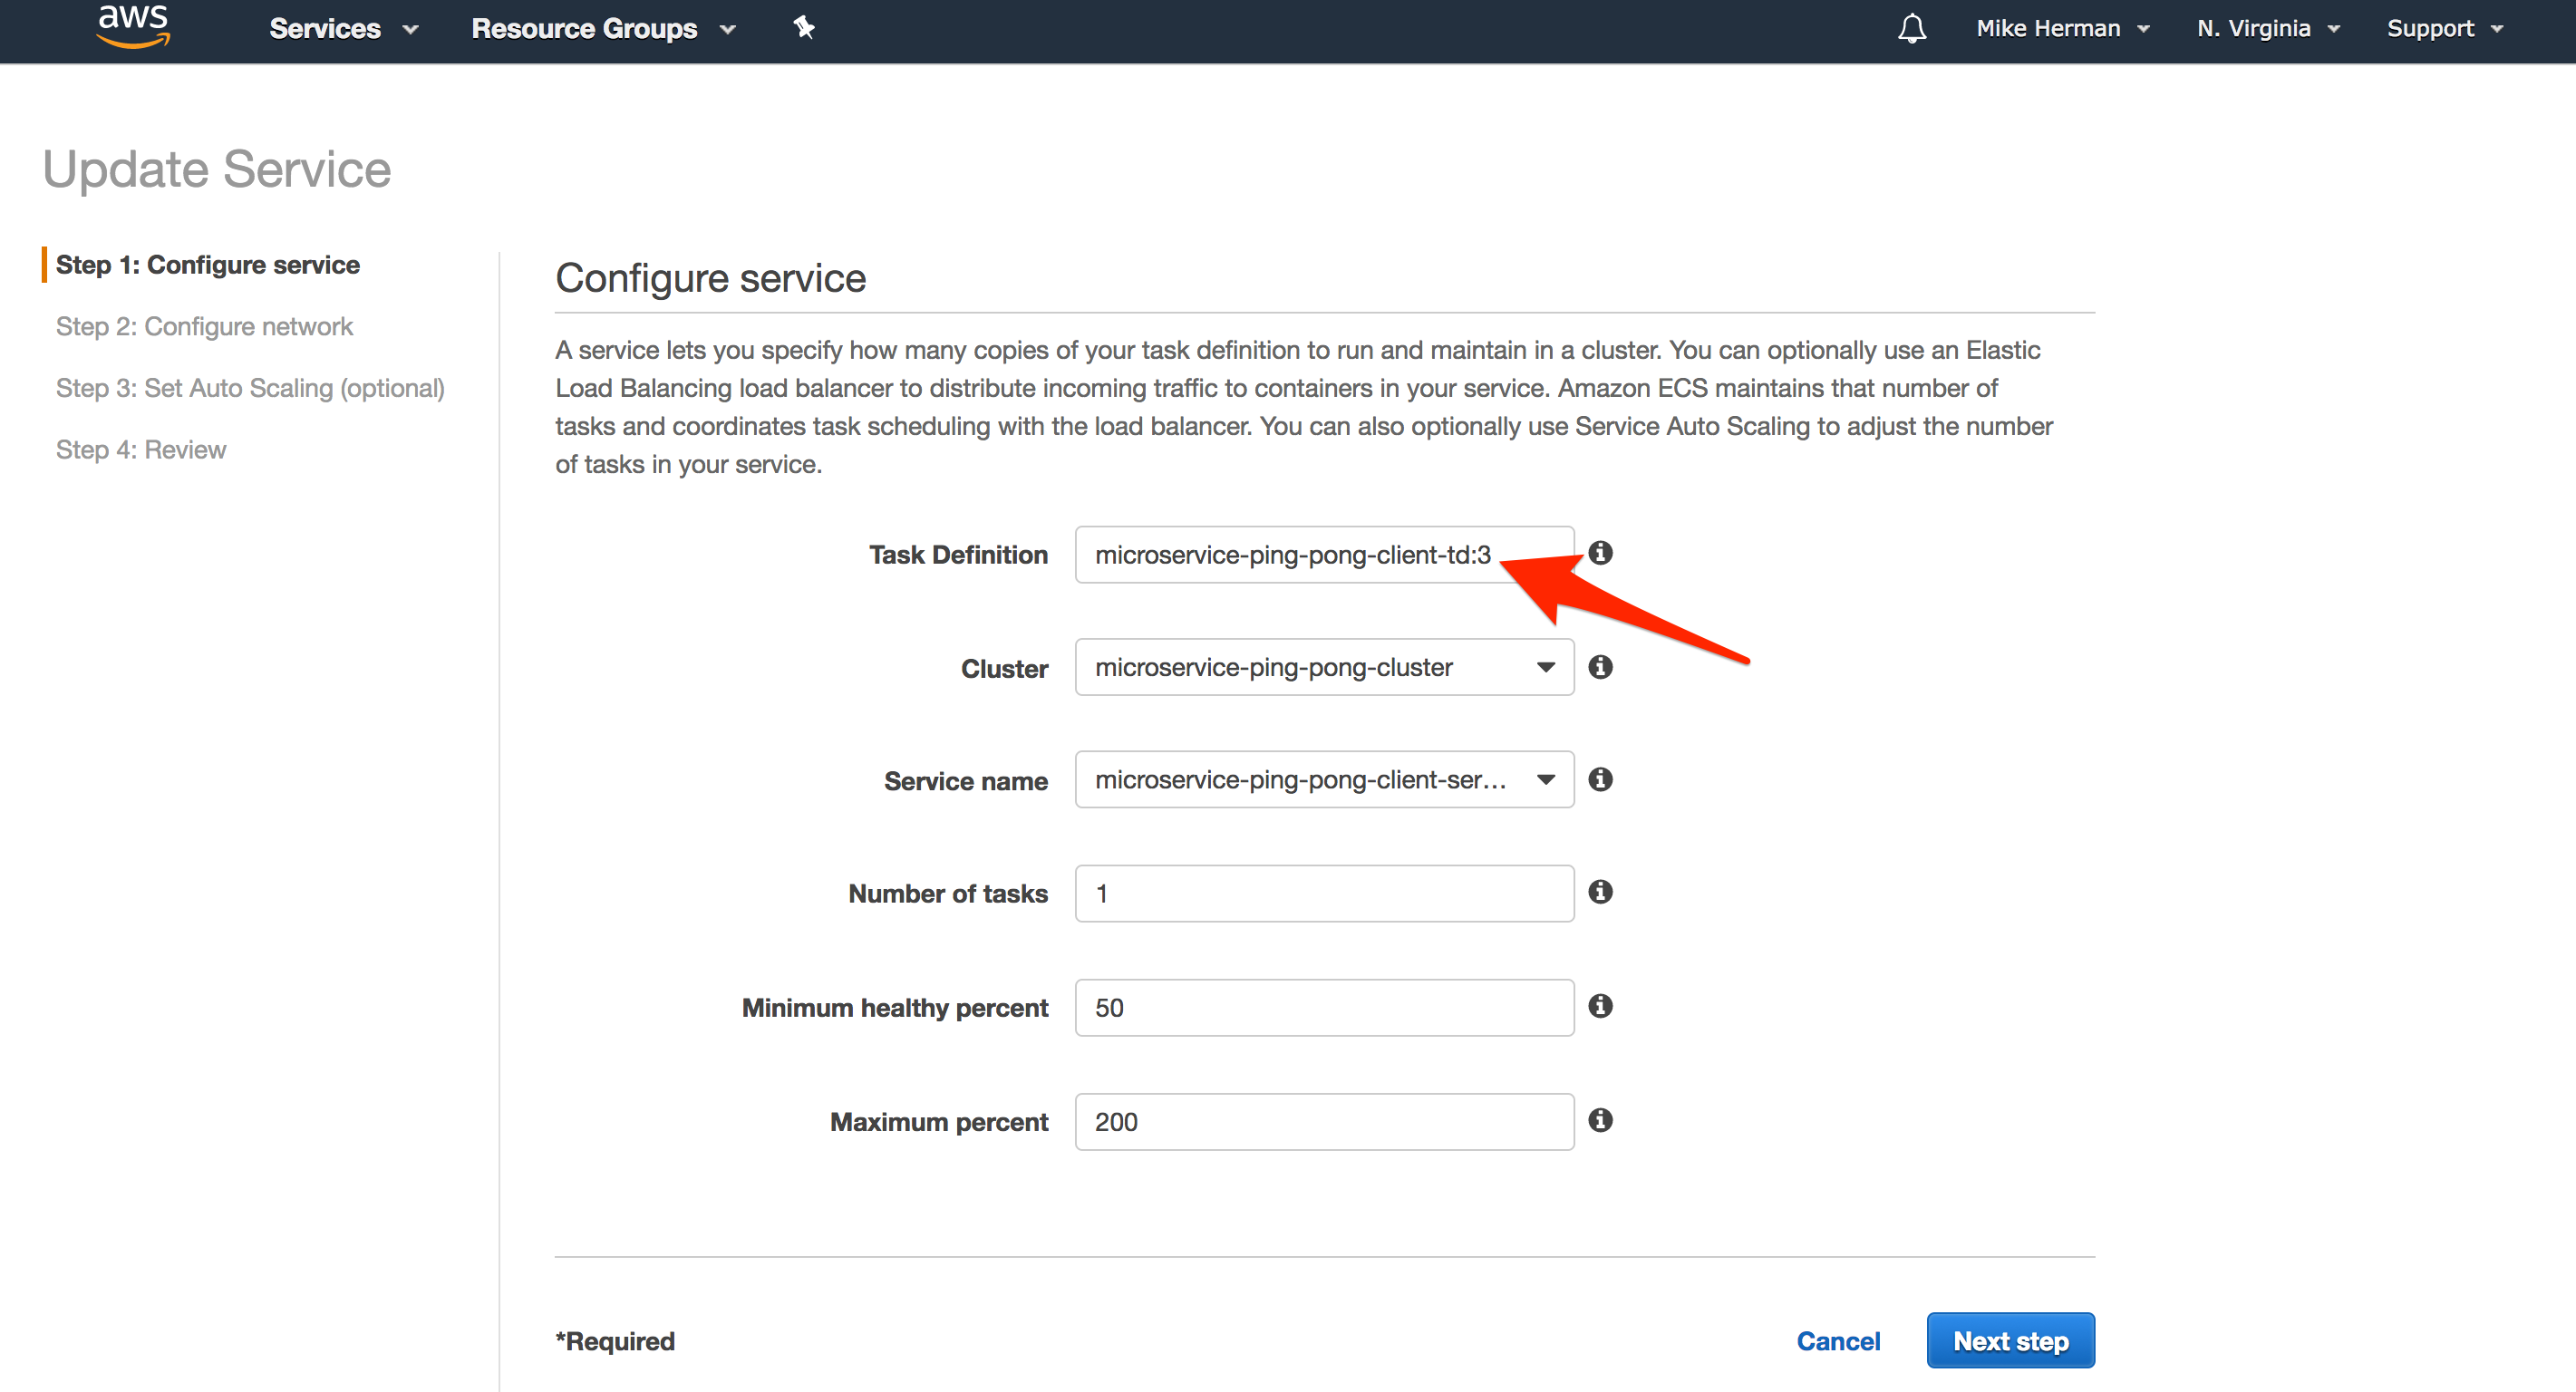
What happens next?
-
Once you update the Service, ECS will pick up on these changes and instantiate the Task Definitions, creating new Tasks that will spin up on the Cluster instances.
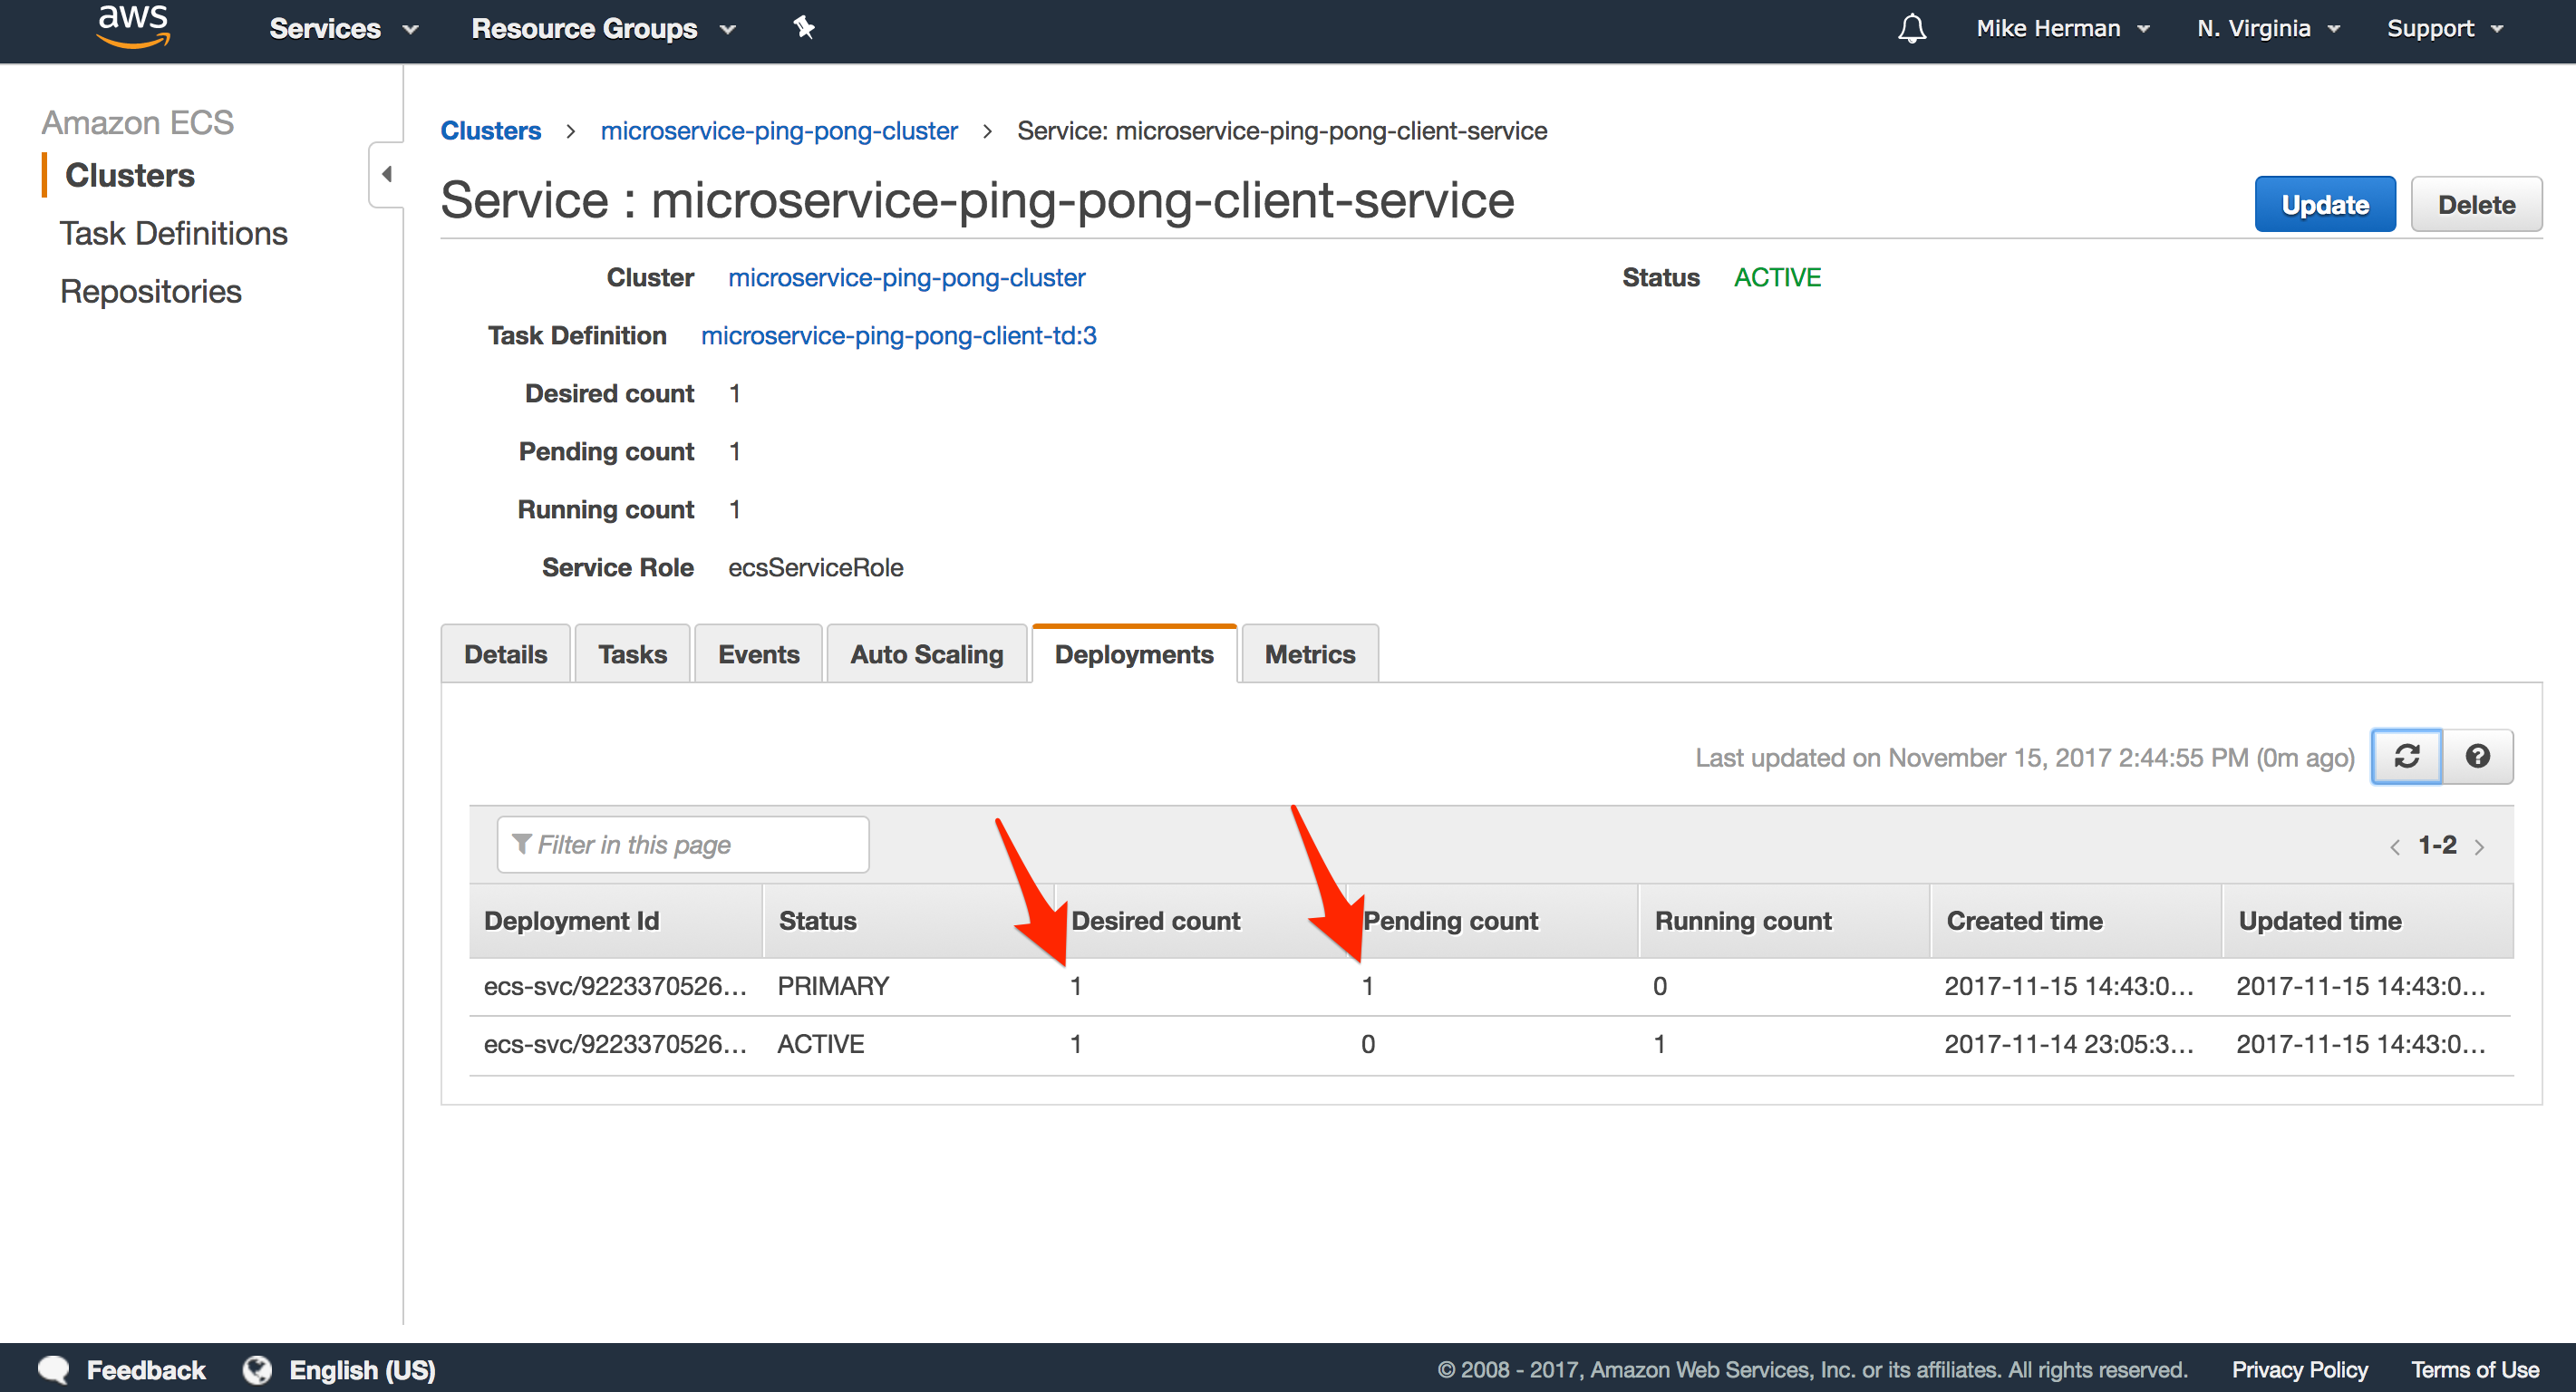
-
ALB will run health checks on the new instances once they are up.
-
If the health checks pass, traffic is forwarded appropriately to the new Tasks while the old Tasks are spun down.
-
If the health checks fail, the new Tasks are spun down.
-
The health checks are the last line of defense after your own unit, integration, and functional tests.
Autoscaling
You can scale up or down at both the Cluster (adding additional EC2 instances) and Service (adding more Tasks to an existing instance) level.
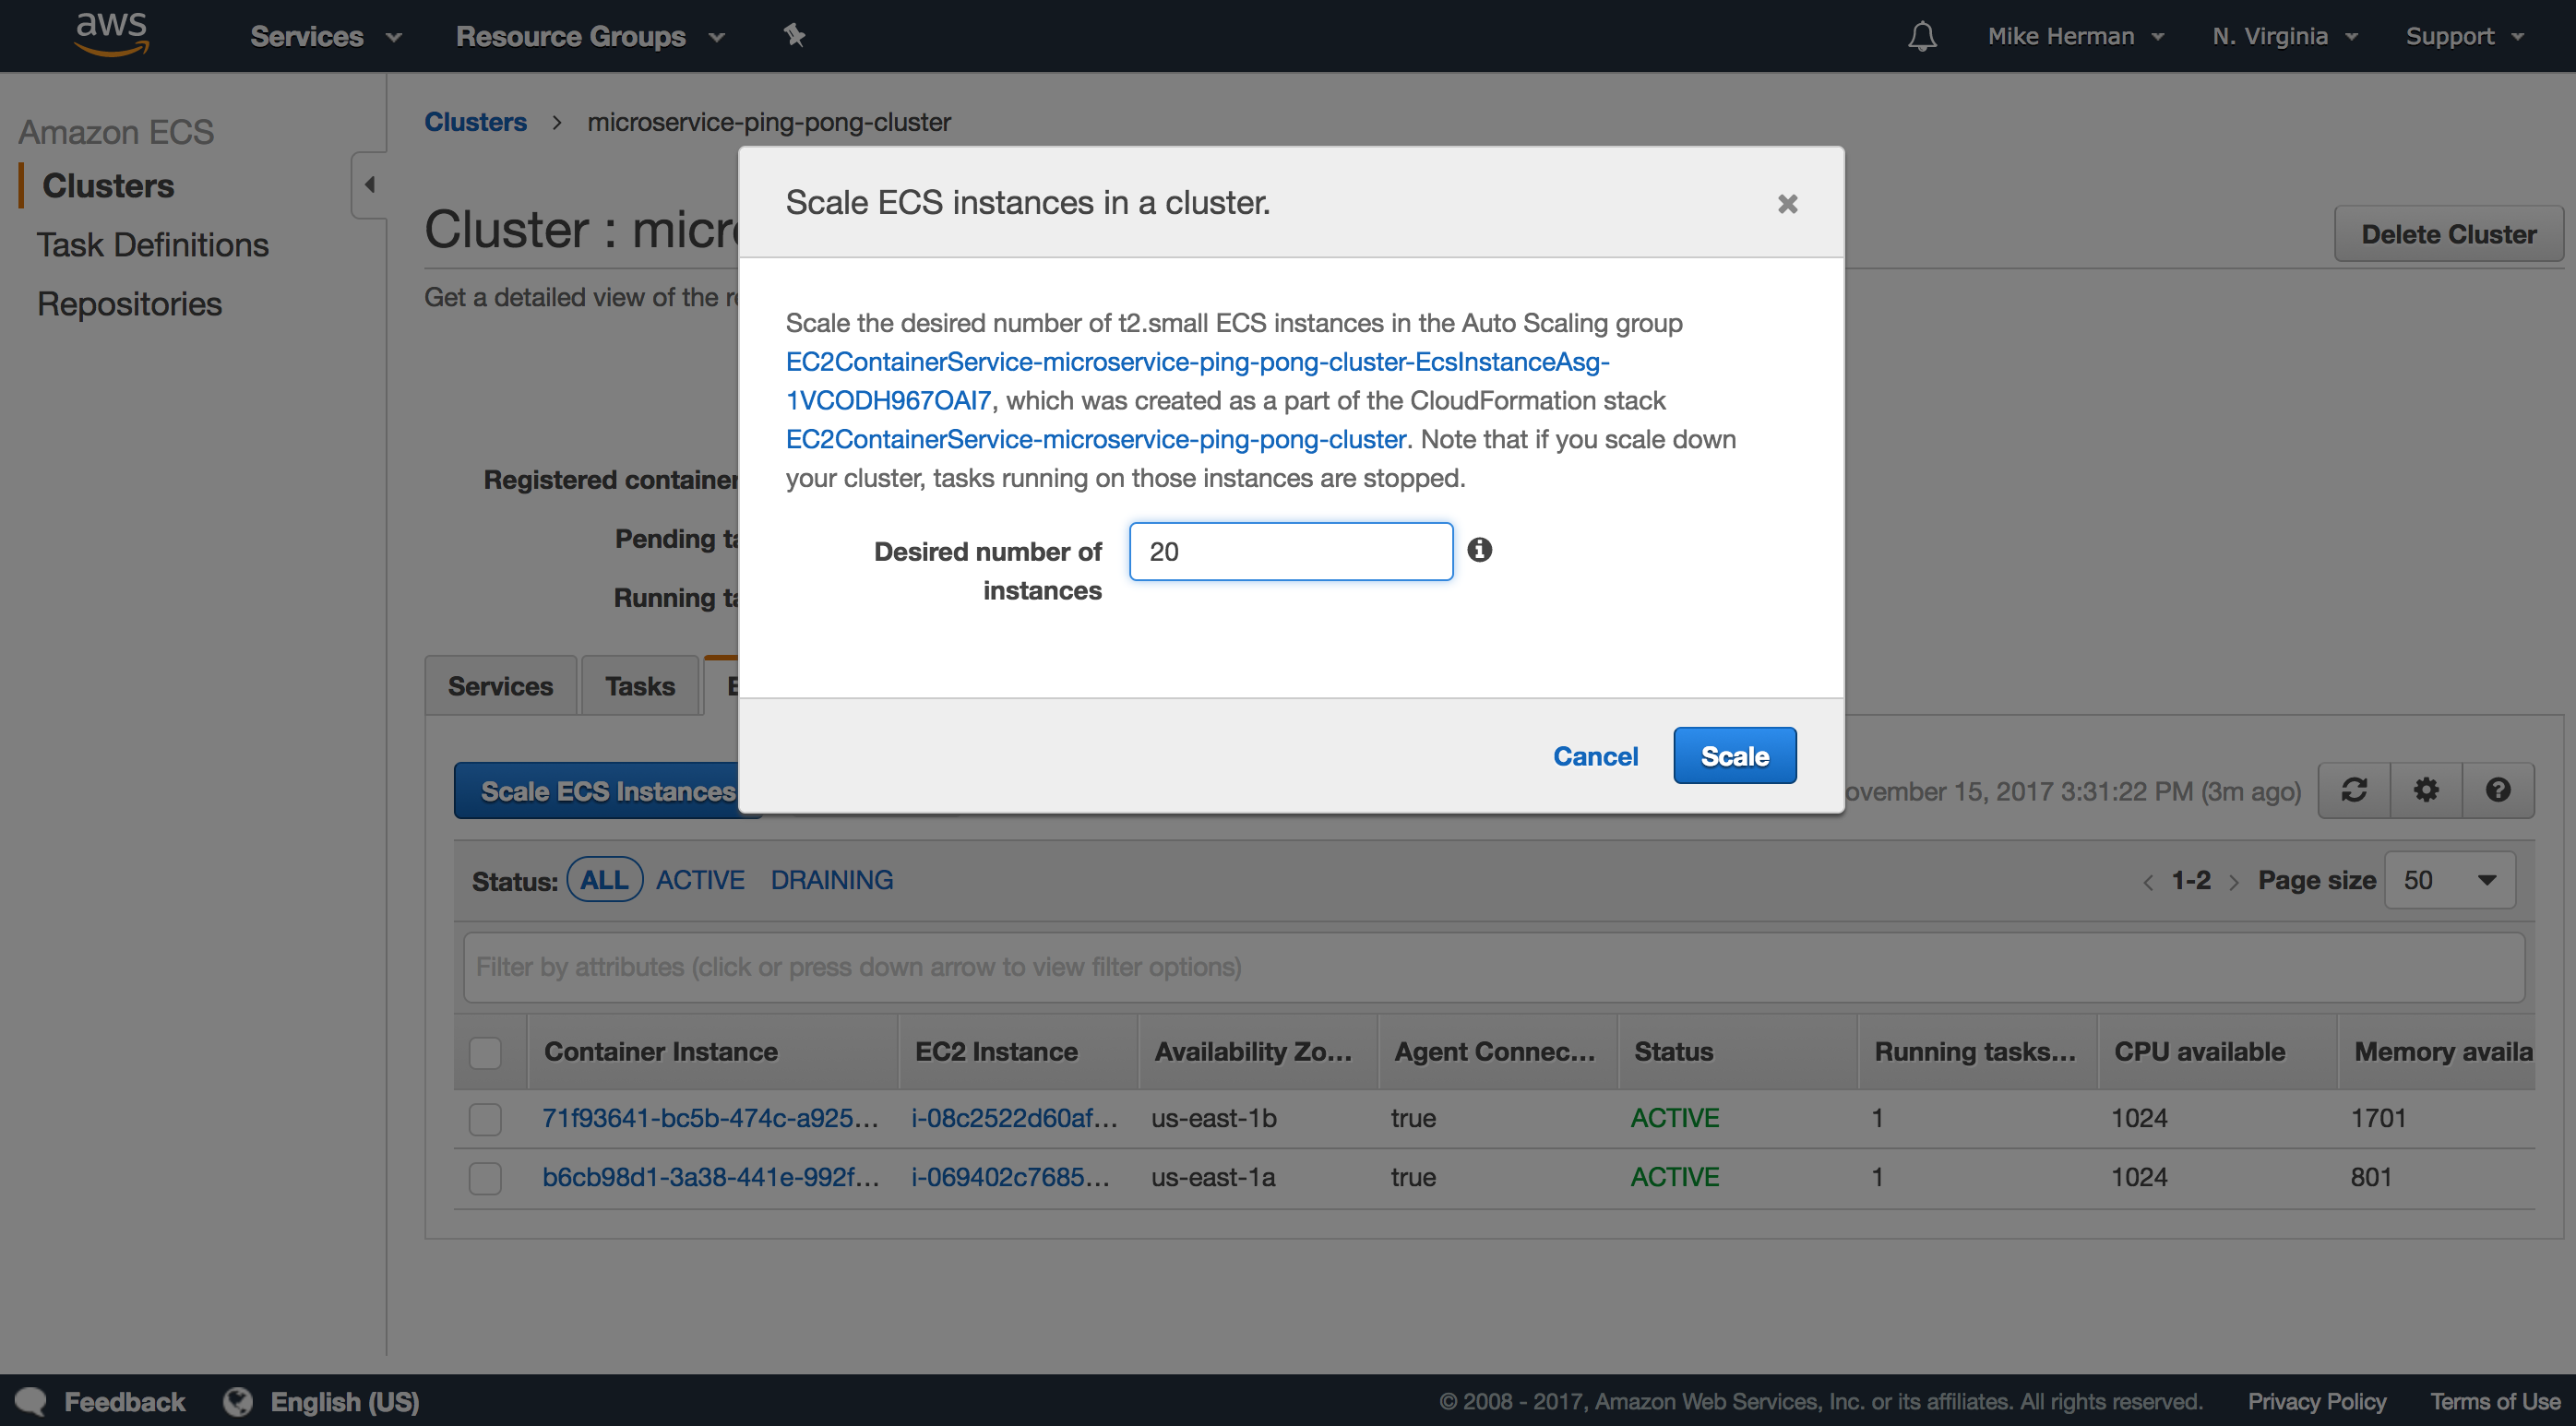
Cluster
To manually scale, navigate to the Cluster and click the “ECS Instances” tab. Then, click the “Scale ECS Instances” button and provide the desired number of instances you’d like to scale up (or down) to.
You can automate this process by setting up an Auto Scaling Group. Review the Scaling Container Instances with CloudWatch Alarms tutorial for more info.
Service
You can also scale Tasks up (or down) at the Service-level.
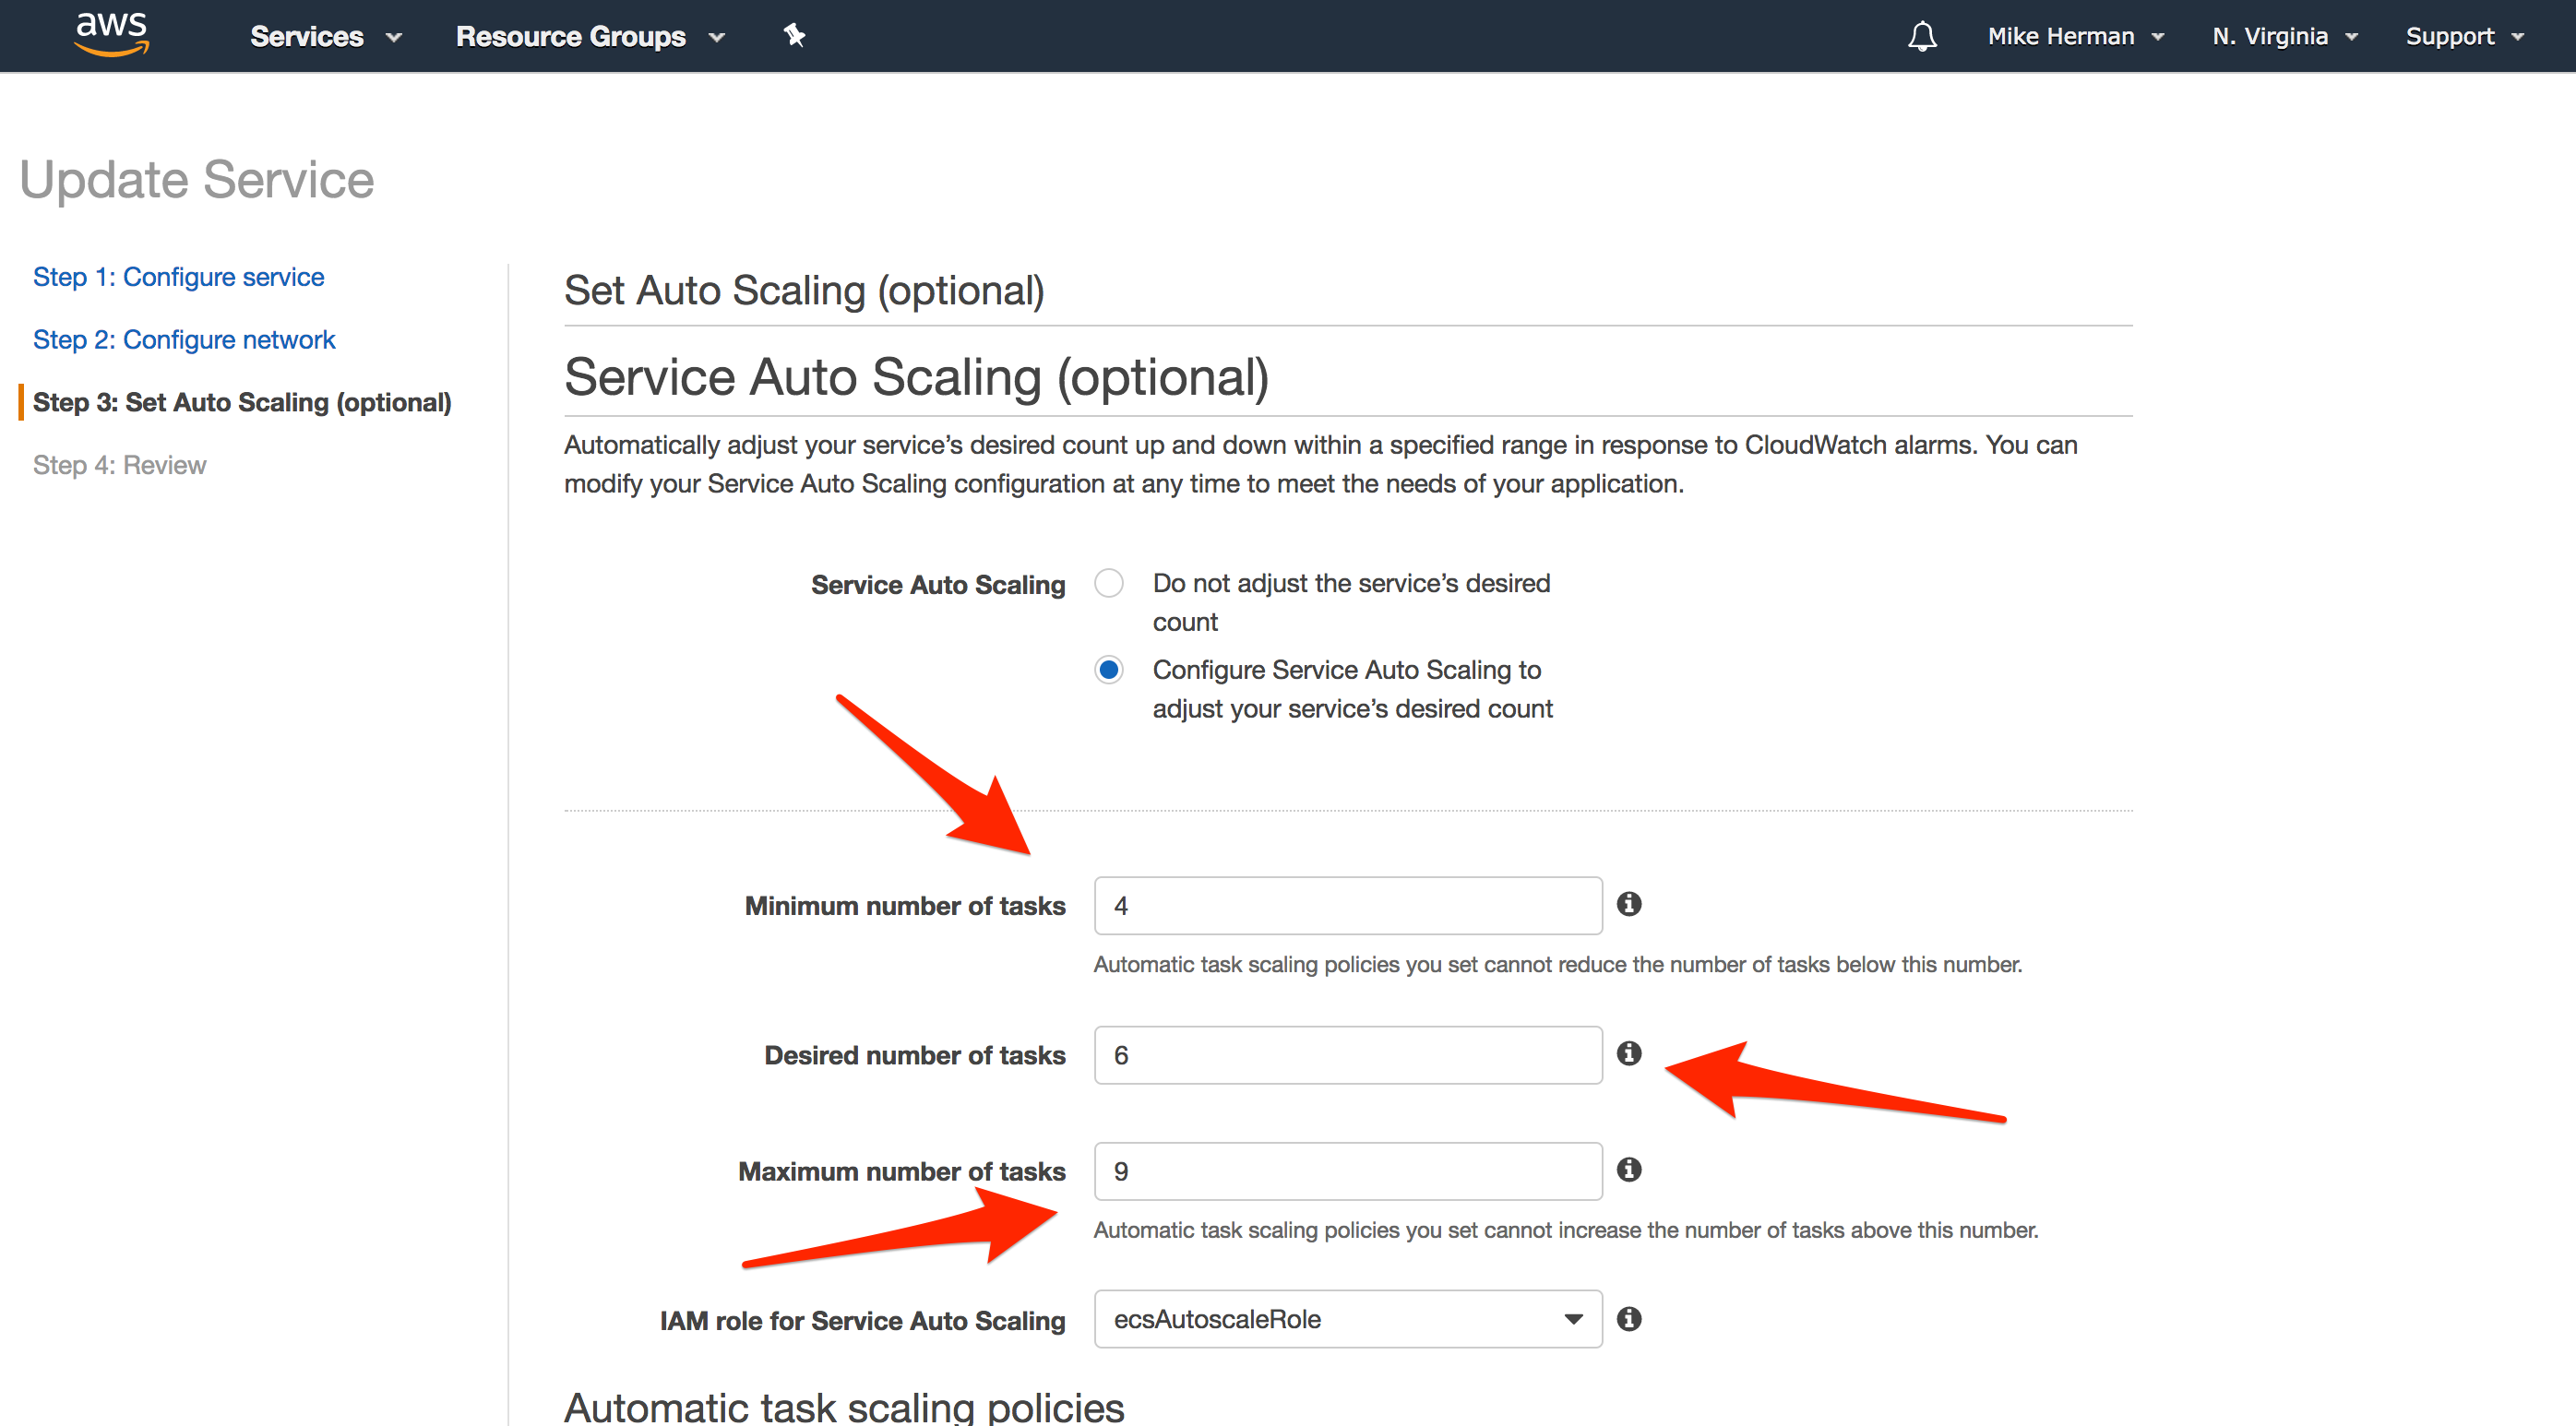
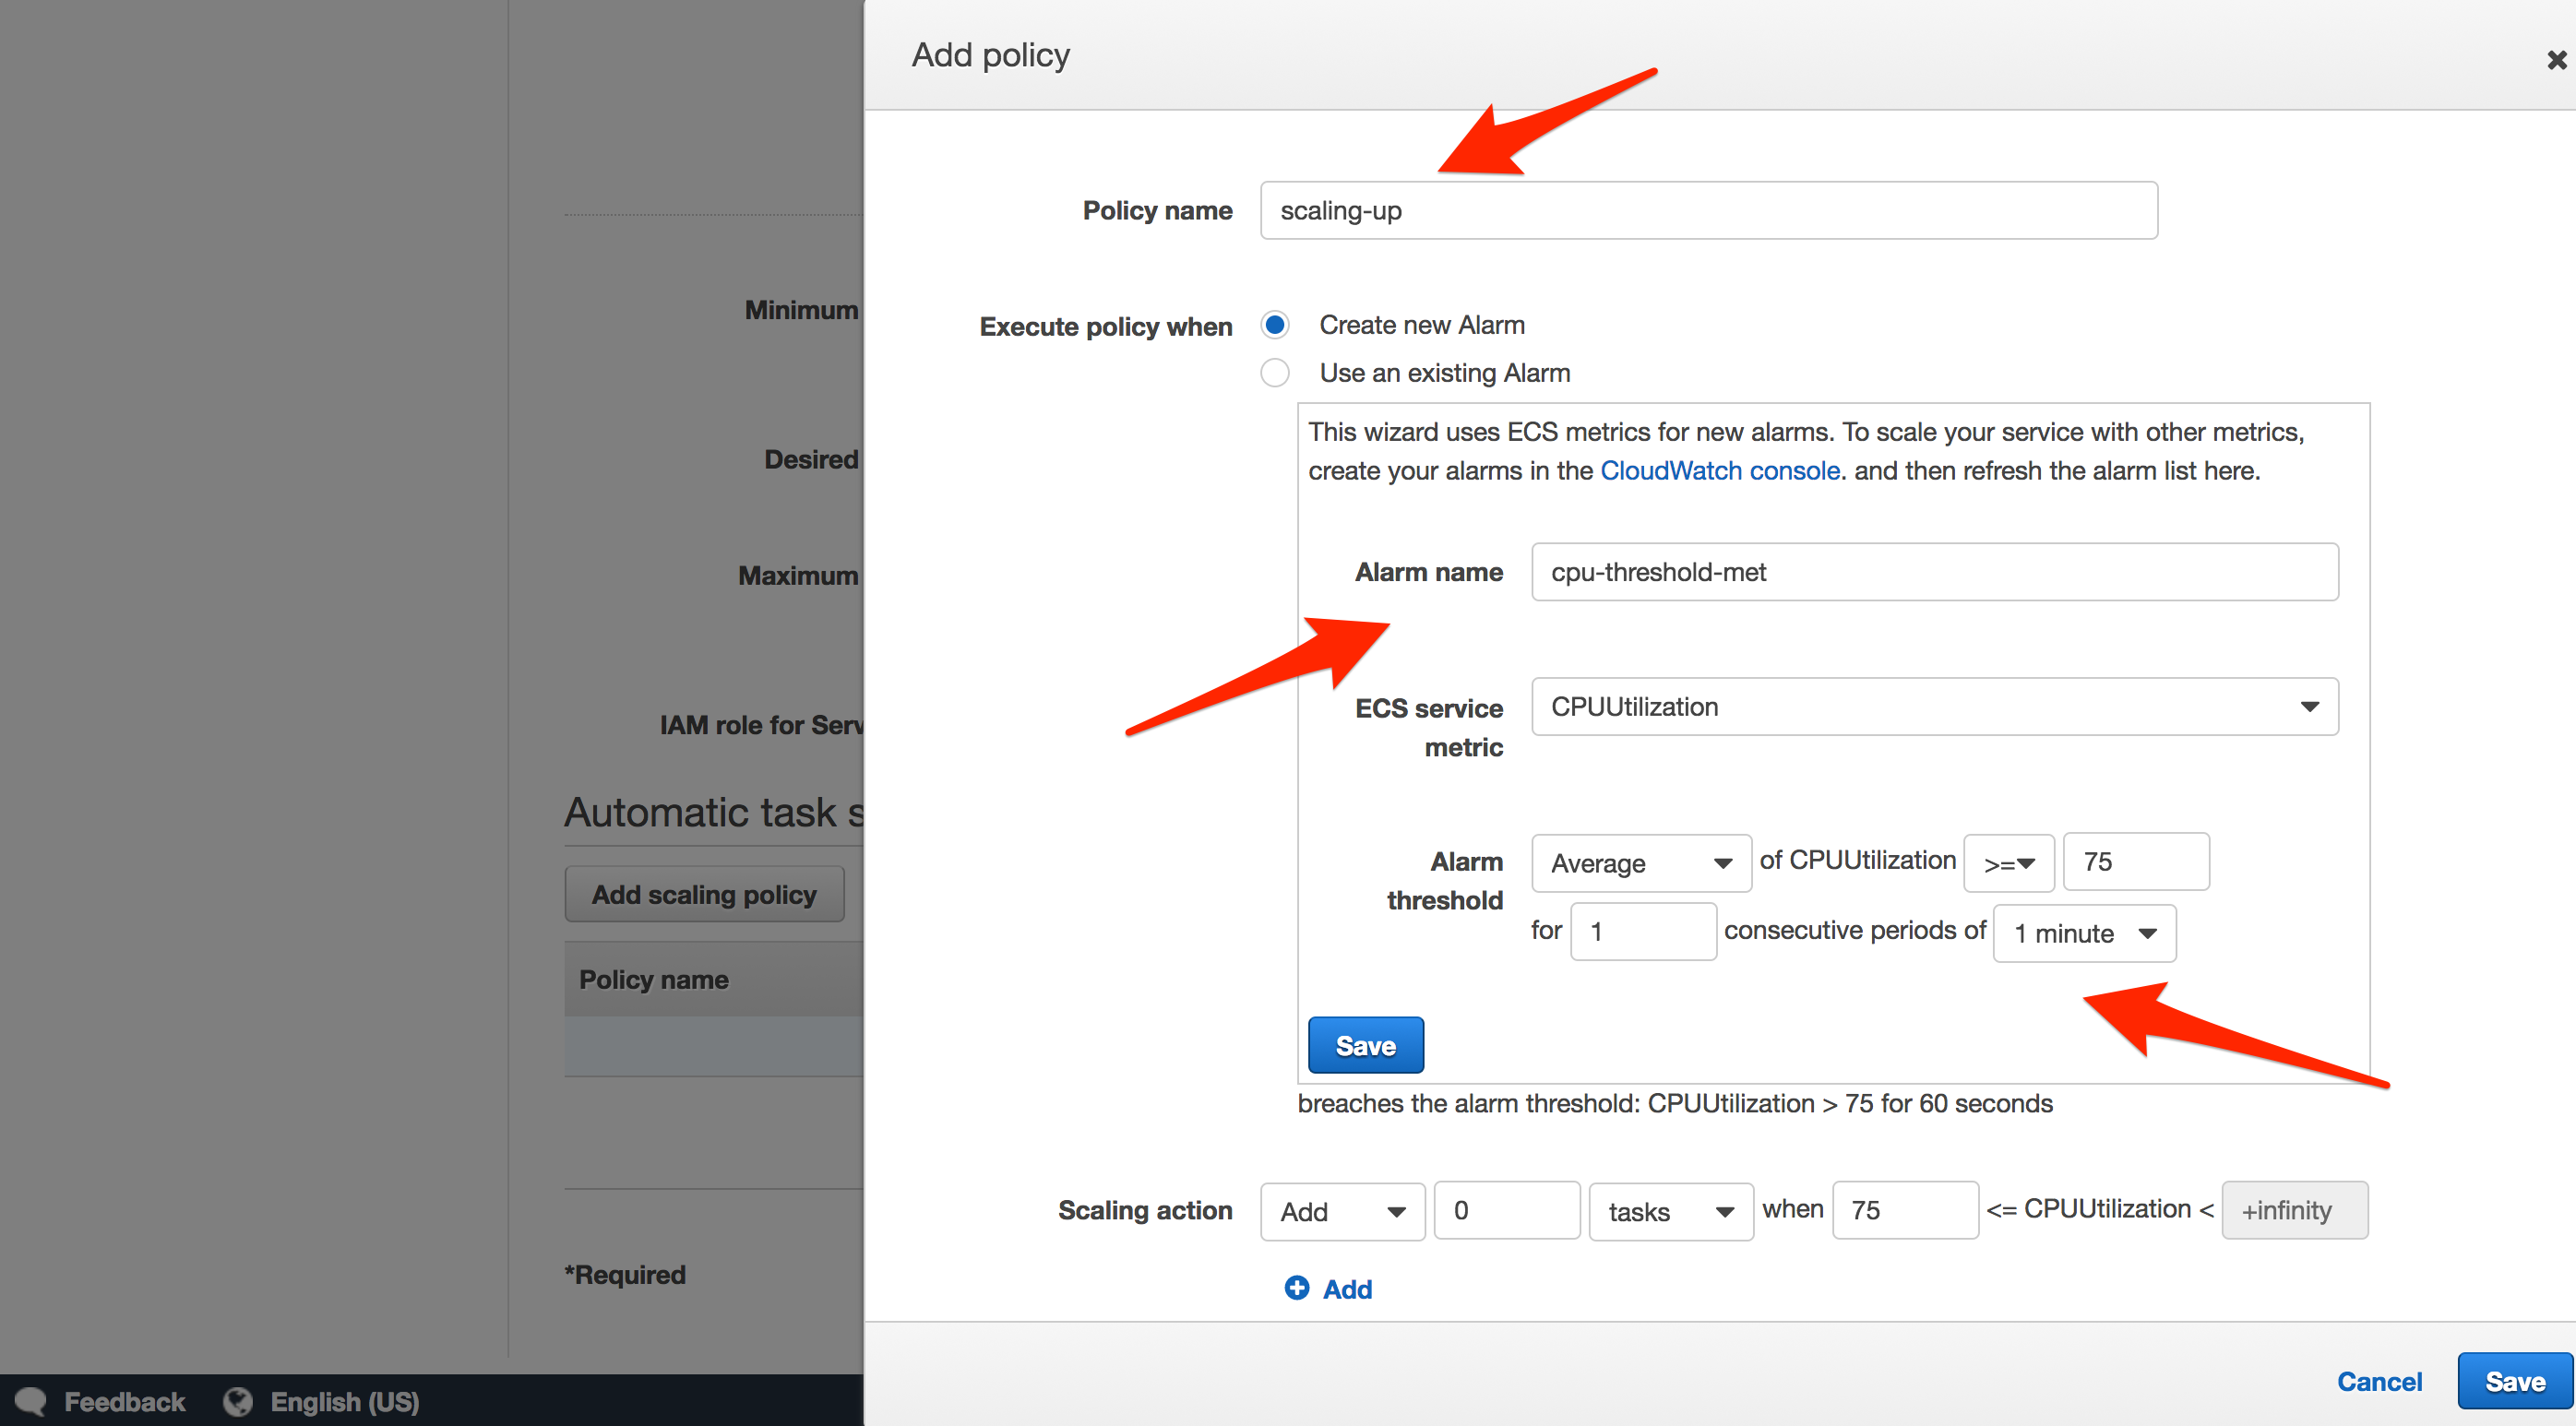
For more on this, review the Service Auto Scaling with CloudWatch Service Utilization Metrics tutorial.
Next Steps
That’s it!
Check your understanding
- Add CI/CD (via Circle CI or AWS Lambda) and Postgres via RDS (example)
- Turn back to the feature wish-list. Implement anything not covered.
- Did you notice that we didn’t add any of the environment variables from the Docker Compose file to the Task Definitions? Why does the app still work? Update the Task Definitions on your own.
Resources
- Slides
- Repo
- Testdriven.io - full tutorial! ❤️
- How to Build 12 Factor Microservices on Docker
- Docker Cheat Sheet
Cheers!