Crash Course in web2py (part 5 - modifying the appearance and deploying the web form)
You made it. In this final tutorial I’ll show you how to easily modify the form’s appearance, and we’ll deploy the app to PythonAnywhere.
Assumptions:
- You have web2py already installed => part 1
- You created the skeleton web form => part 2
- You added data validation (with the help of Han Solo) => part 3
- You learned how to easily add CRUD functions to manage records => part 4
Let’s get going …
Launch the server. -> Go to the admin interface. -> Edit the “form” application.
So, by default web2py utilizes the Twitter Bootstrap front-end framework, which makes updating the layout and appearance easy.
Contents
Download New Layout Plugin
First, go to the web2py layout plugin page to find a layout that you like. In this example, I used KeepitSimple. Once you find one, go ahead and download the .w2p file.
Back on the admin page for the form, scroll to the bottom of the page, and upload the .w2p file beneath the Plugins section. Now, click the link for plugin_layouts and copy the name of the new file including the full path- plugin_layouts/layouts/KeepitSimple.html. Now, edit the display_your_form.html file and paste the new .html file in the very first line of the code, replacing layout.html-
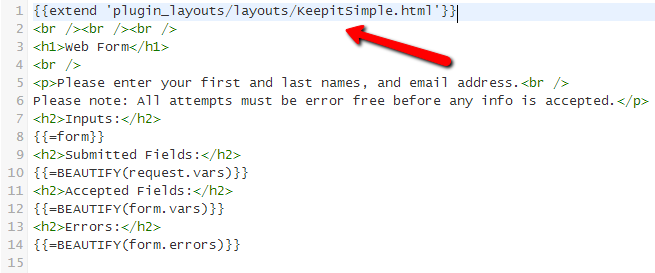
Next, I’m going to remove the Web Form title between the h1 tags, remove the line breaks, and clean up the instructions. I’m also going to remove the Submitted, Accepted, and, Errors sections, as the user does not need to see all that information. So the final code looks like this:
{{extend 'plugin_layouts/layouts/KeepitSimple.html'}}
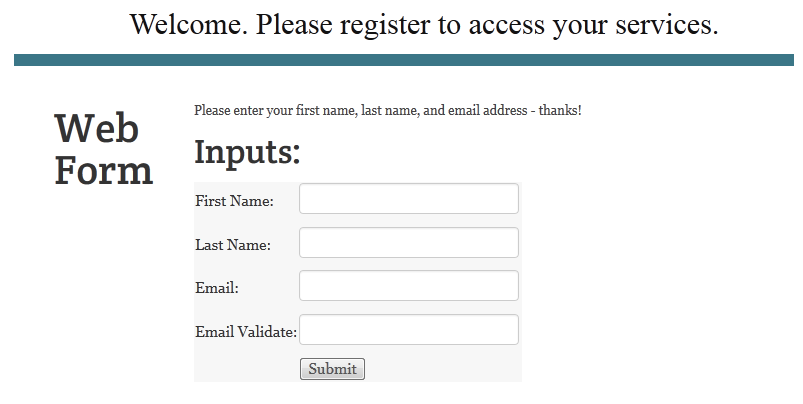
<p>Please enter your first name, last name, and email address - thanks!</p>
<h2>Inputs:</h2>
{{=form}}
Okay, now let’s edit the KeepitSimple html file:
First change the header div found in the middle of the page - “Welcome. Please register to access your services.” (I also surrounded it in <center> tags)
Add the following code to the header, just below the style.css -
{{response.files.append(URL(request.application,'static','css/bootstrap.min.css'))}}
Then remove these lines of code-
{{try:}}{ {=auth.navbar(action=URL('default','user'))}}{{ except:pass}}
{{=MENU(response.menu,_class='web2py-menu')}}
<div id="footer">©2007 Keep it Simple
<span class="separator"
|
</span>
Design by
<a href="http://www.realitysoftware.ca" title="Website Design">
Reality Software
</a>
</div>
Update CSS
Your form should look much cleaner now. It’s a bit bare, but you can liven it up with your own HTML. Now, let’s add some changes to the CSS.
Again, since web2py uses the Twitter Bootstrap, you can make CSS changes quickly. Navigate to Bootswatch. Here, you can find various CSS themes to play with. In this example, I’m going to use Spacelab.
Now, what you need to do is view the bootstrap.min.css file by clicking download and then selecting the file. It should open in your browser. Copy all the text. Return to your web2py admin. Scroll down to the static files, click the CSS folder, edit the boootstrap.min.css file-
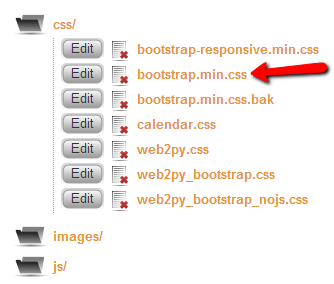
-and then delete all the current CSS and paste in the CSS that you copied before from the Spacelab theme. Refresh your form @ http://127.0.0.1:8000/form/default/display_your_form.html and test it again to make sure nothing broke.
Oh - and if you want, you can edit the layout/appearance of the all_records page as well. I trust that you can figure out how to do that by now. If not - Try anyway, and if you fail, Google to find the answer. You’ll learn better that way.
If all looks well, it’s time to deploy!
Deploy
I’ll go over this quick since I covered this in detail in the first tutorial.
- Go back to the admin page (http://127.0.0.1:8000/admin/default/site) and click Pack All. Save the w2p-package to your computer.
- Fire up PythonAnywhere.
- Once logged in, click Web, Replace with a new web app, then click the button for web2py.
- Enter an admin password. Click Next.
- Next, head on over to the admin interface - https://mjhea9.pythonanywhere.com/admin/default/index (don’t forget to use your own user name and add the https:) - which should look familiar (it better!). Enter your password.
- On the right side of the page, under the Upload and install packed application section, upload the w2p file you saved. Enter a name for your app (“form”). Click Install.
- Check out your form.
Now just test it out to make sure it all works. Make sure all the errors/validators are working and then add a new record. One thing you do need to change is the default for generic view. You can read more about it here. Open up db.py and scroll down to line 28. You need to remove the if statement, so the line will look just like this:
response.generic_patterns = ['*']
Now, make sure you can access the grid page and edit, update, and delete some records.
One change that does need to be made is to add the requirement IS_EMAIL() to the email validation field to the db.py file; otherwise, you can submit email addresses that do not follow the conventional format. The final code looks like this:
db = DAL('sqlite://webform.sqlite')
db.define_table('register',
	Field('first_name', requires=[IS_NOT_EMPTY(), IS_ALPHANUMERIC()]),
	Field('last_name', requires=[IS_NOT_EMPTY(), IS_ALPHANUMERIC()]),
	Field('email', unique=True, requires=[IS_NOT_EMPTY(), IS_EMAIL()]),
	Field('email_validate',requires=[IS_EMAIL(), IS_EQUAL_TO(request.vars.email)]))
db.register.email.requires=IS_NOT_IN_DB(db,'register.email')
Recap
And you’re done. So - what all did we do?
- Part 1: You learned how to install web2py on your local computer and deploy a basic app on a cloud platform
- Part 2: You learned about Model View Control (MVC) architecture and created a skeleton web form
- Part 3: You added data validation to the form
- Part 4: You learned how to manage records in the database
- Part 5: You learned how to modify the appearance and layout of the form
Congrats!
What’s next? Think about what you can do with this info.
- Keep practicing.
- Build something else.
- Make some money
- And have fun!
Thanks for reading. Cheers.
You can find the new code for db.py, display_your_form.html, and default.py, as well as all the files and the final packed app (.w2p) here.