Crash Course in web2py (part 3 - form validation)
Well, in the last tutorial I showed you how to create a basic web form that stores the submitted data in a SQLite database. In this tutorial, we’re going to add in data validation to your form.
Assumptions:
Start the web2py server, go to the admin interface, and then edit the “form” application (or whatever you decided to name it).
Model
Right now, there is a requirement set in the db.py file for each field-
requires=IS_NOT_EMPTY
In other words - all fields must be filled out or an error populates.
View
What do you want to display to the user?
Open up display_your_form.html and change your code to match the following:
{{extend 'layout.html'}}
<br /><br /><br />
<h1>Web Form</h1>
<br />
<p>Please enter your first and last names, and email address.<br />
Please note: All attempts must be error free before any info is accepted.</p>
<h2>Inputs:</h2>
{{=form}}
<h2>Submitted Fields:</h2>
{{=BEAUTIFY(request.vars)}}
<h2>Accepted Fields:</h2>
{{=BEAUTIFY(form.vars)}}
<h2>Errors:</h2>
{{=BEAUTIFY(form.errors)}}
By adding { {extend ‘layout.html’}}, you will be able to display the flash error messages, which we’ll add in next.
Controller
Update default.py to match the following code-
def display_your_form():
    form = SQLFORM(db.register)
    if form.accepts(request,session):
        response.flash = 'Thanks! The form has been submitted.'
    elif form.errors:
       response.flash = 'Please correct the error(s).'
    else:
       response.flash = 'Try again - no fields can be empty.'
    return dict(form=form)
This adds an If Statement to display text based on whether the user submits your form with the required fields or not.
Test
- Go to http://127.0.0.1:8000/form/default/display_your_form.html.
- Enter your first name, last name, and email.
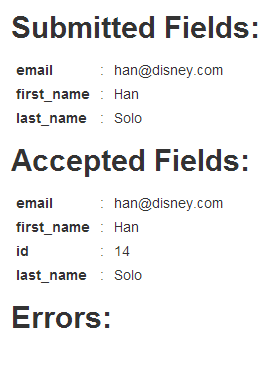
- Your output should look similar to this-

As long as no fields are blank, you won’t see any errors - and the data will be added to the database. Notice how you can now see the unique identifier. The message “Thanks! The form has been submitted.” is visible in the top right corner, as well.
How does this work?
Well, when a field is submitted, it’s filtered through the accepts method from the Controller, according to the requirements specified in the database schema (IS_NOT_EMPTY). If the field meets the requirement (accepts returns True), it’s passed to form.vars; if not (accepts returns False), an error populates, which is then stored in form.errors.
Got it?
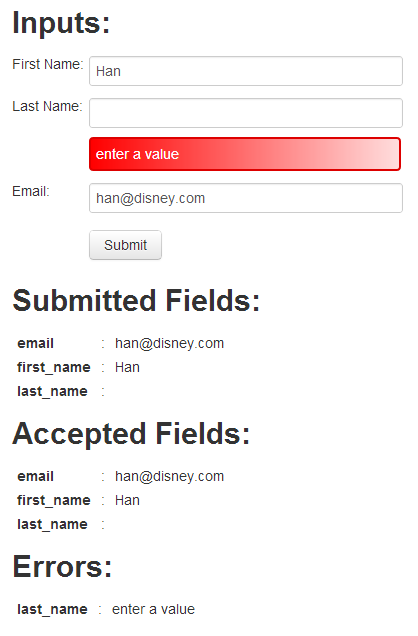
See what happens when you enter an error.

So when Han forgets his last name and just decides to leave it blank, the field values that meet the requirement are still passed. But they are not added to the database, since there is an error. And you should see an error message in the top right corner. As soon as he remembers, he can go back and correct. Poor Han.
What happens though if he gets confused and enters his first name correctly, but enters his last name in the email field and his email in the last name field? Try it. You should not see an error.
This is a problem. Let’s add additional requirements to prevent this from happening.
Model
Update the code in db.py to match the following-
db = DAL('sqlite://webform.sqlite')
db.define_table('register',
    Field('first_name', requires=[IS_NOT_EMPTY(), IS_ALPHANUMERIC()]),
    Field('last_name', requires=[IS_NOT_EMPTY(), IS_ALPHANUMERIC()]),
    Field('email', requires=[IS_NOT_EMPTY(), IS_EMAIL()]))
- IS_ALPHANUMERIC() requires that the field can only contain characters ranging from a-z, A-Z, or 0-9
- IS_EMAIL requires that the field value must look like an email address
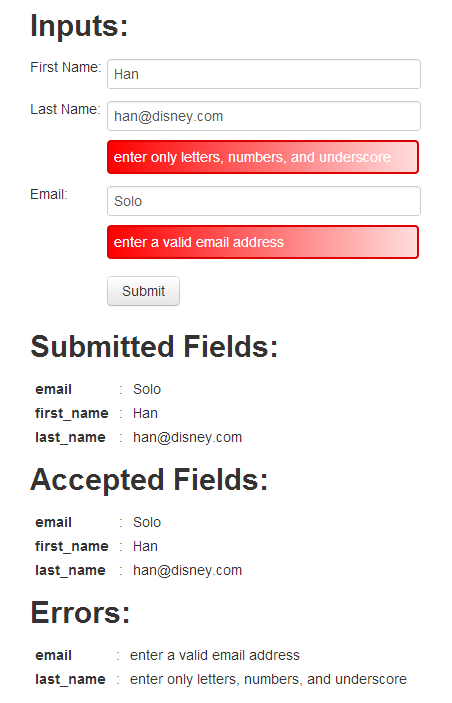
Now watch happens when you switch the last name and email address.

Good. Now he just needs to enter the correct value in the correct fields.
Hey - at least he remembered his last name.
Recap
By just tweaking the code a bit, we added basic validation to ensure that no fields are empty and to limit any data integrity issues. Again - Do not deploy the app on PythonAnywhere just yet. We still have more features to add, but we are well underway on having the best form on the Internet.
You can find the new code for db.py, display_your_form.html, and default.py here. When ready, move on to Part 4.